You can view any appointment that uses resources directly on the schedule. Resources are displayed to the right of your staff members. This article will guide you through the process of viewing resources on your schedule.
Things to know:
- The ability to view resources directly on the schedule is controlled by the "Accessing Appointments" access control setting.
- To schedule appointments with resources, resources must be configured on the account. Learn more here.
- You can assign resources to all services or selected services. Learn more here
- When scheduling an appointment, the system will automatically default to the first-created resource from the group of resources assigned to the service. You can manually change the resource if needed during the booking process.
- Any appointment that uses a resource will appear in the schedule for that resource
- Depending on your account configuration, you can monitor appointment statuses and resource capacity directly from the Scheduler in both Day and Agenda views.
- The Resource Capacity feature provides real-time visibility into how your resources are being utilized. The system displays this utilization by comparing your active appointments against a resource's maximum capacity.
Capacity Statuses- Booked: Reflects the total number of scheduled appointments for the day that have not yet checked in.
- Checked-In: Reflects the number of clients who are physically checked in and actively using the resource.
- Important Note on Capacity Overages: Because in-store staff can manually bypass resource capacity restrictions, the total number of appointments scheduled may sometimes exceed a resource's maximum limit. However, the denominator on the counter will always show your maximum configured capacity (e.g., /10), even if the location is overbooked.
- Example: Let's look at how the counters display data for a resource with a maximum capacity of 10:
- Total Appointments Booked for the Day: 12 (Includes 2 overbooked appointments manually forced in-store)
- Appointments Currently Checked In: 5
- Appointments Remaining (Not Checked In): 7
- In this scenario, the resource counters will display:
- 7/10 Booked: This shows that 7 scheduled appointments have not yet checked in, measured against your standard capacity of 10.
- 5/10 Checked-In: This shows that 5 out of your 10 available spots are currently in active use.
- The Resource View filter allows you to organize your calendar by specific resources (such as rooms or equipment) instead of by staff members. This view helps you:
- Track resource usage
- Monitor availability throughout the day or week
- Better manage scheduling across shared resources
- Since there is an article on the filter then link it after that statement.
To view and manage resources on the schedule:
- Go to the Schedule
- Select the desired date, location, and staff members
- Click the “Select Resources” dropdown

- Choose one or more resources you want to display (such as rooms or equipment)
- The selected resources will appear as columns on the right side of the schedule
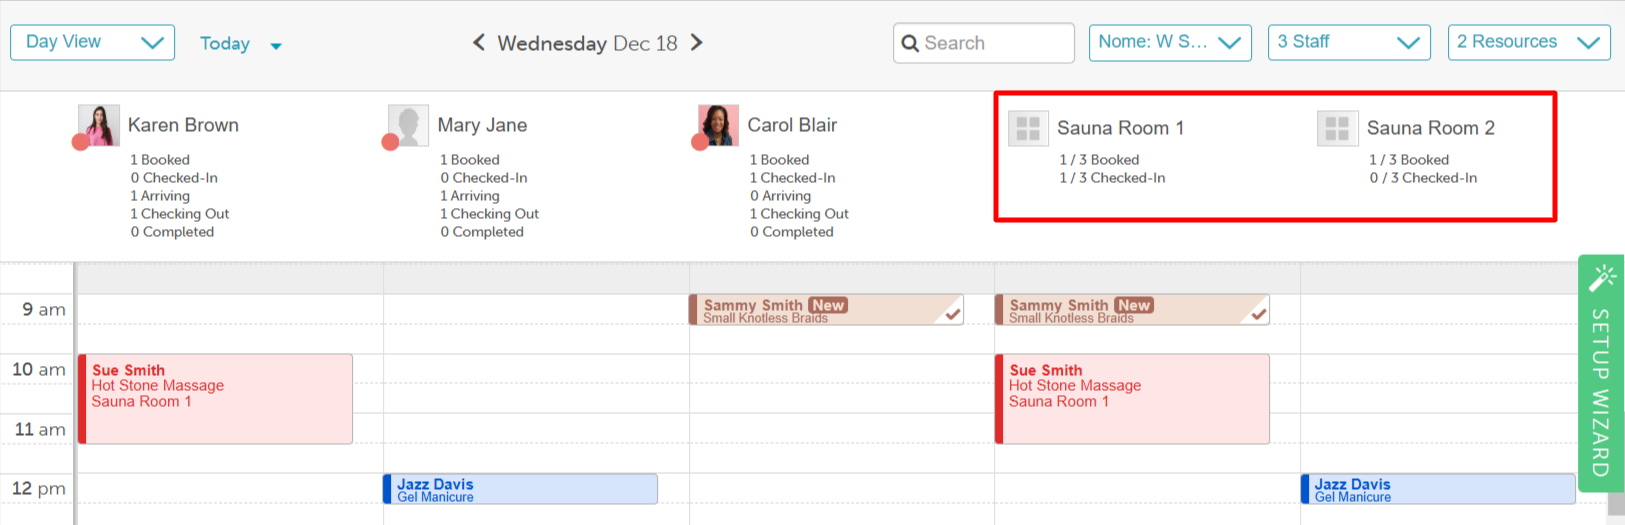
- You can view resource availability alongside staff schedules, making it easier to manage bookings and avoid conflicts.
For more information, contact support@mytime.com.
Related Articles:
Assigning Resources to Services
Scheduling Appointments with Resources
Appointment Count & Resource Capacity
Filter Schedule By Day, Week, Month, Agenda, Split & Resource View
Was this article helpful?
That’s Great!
Thank you for your feedback
Sorry! We couldn't be helpful
Thank you for your feedback
Feedback sent
We appreciate your effort and will try to fix the article