If a class session is fully booked, you can add interested clients to a waitlist. A waitlist consists of clients who wish to attend a session that has already reached its maximum capacity. When a scheduled attendee cancels or reschedules, the system automatically triggers a notification to waitlisted clients, allowing them to book the newly available spot. In this article, we will guide you through the steps on how to configure the "Class Session Available" notification to notify clients of openings.
Things to Know
- In order to utilize the class waitlist feature, ensure the following settings are configured:
- Access Control: Staff must have the Schedule Classes/Events permission set to Edit
- Hidden Settings: Contact your account manager or the support team to enable the "Enable Client Waitlisting" and "Enable Client Waitlist for Classes on Scheduler" hidden settings.
- Class-Level Setting: The "Enable Waitlisting" toggle must be turned ON inside each individual class modal (it is OFF by default). You can enable it when scheduling a class or at any time after the class has been created.
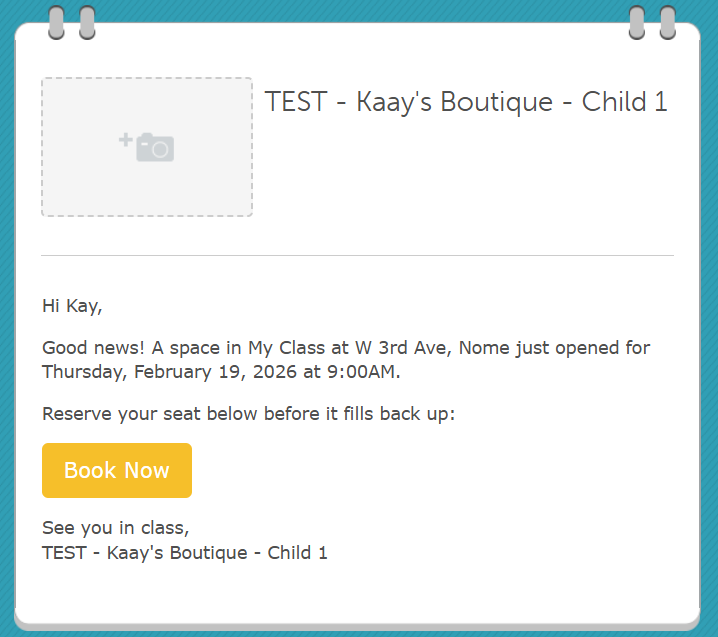
- When a class is deep linked and spot opens up in a class session, clients on the waitlist receive a "Class Session Available" notification. This email includes a deep link that simplifies the booking process:
- Direct Checkout: Clicking the link bypasses class selection and takes the client straight to the checkout screen with the correct class and attendee types already in their cart.
- Cart Persistence: If the client refreshes their browser, the URL parameters automatically restore the cart so they don't lose their selection.
- Automatic Error Handling: If the link is invalid or the session is no longer available, the client is redirected to the main class selection page instead of getting stuck on a loading screen.
- Full Compatibility: Works for all class types (local, global, or recurring), membership-included classes, and for both guests and logged-in users
- You can filter templates by category directly from the main page. Select a single category, such as Class Notifications, or select multiple categories at once to narrow down your view and find exactly what you need without scrolling through the full list.
- This notification is deliverable via email, SMS, and push notification channels.
- SMS Segments & Billing
- SMS billing is calculated per segment, not per message.
- Encoding Types
- GSM Encoding
- Up to 160 characters per segment
- Long messages split into 153-character segments
- UCS-2 Encoding
- Used when messages include emojis or special characters
- Up to 70 characters per segment
- Long messages split into 67-character segments
- Note: Even a single emoji forces UCS-2 encoding.
- Billing Rules
- Each segment is billed individually
- Each recipient receives their own copy of the message
- Total cost = segments × recipients × rate. Example: 2-segment message sent to 50 recipients = 100 billable segments
- Learn more about SMS Segments & Billing here.
- For franchise businesses using global marketing, if the “Allow Child Accounts to Edit Global Automated Marketing Templates” hidden setting is enabled, any edits made to the template at the child account level will apply only to that child account.
To customize your templates:
- Navigate to Marketing > Automated Messages

- Scroll to the Class Session Available template
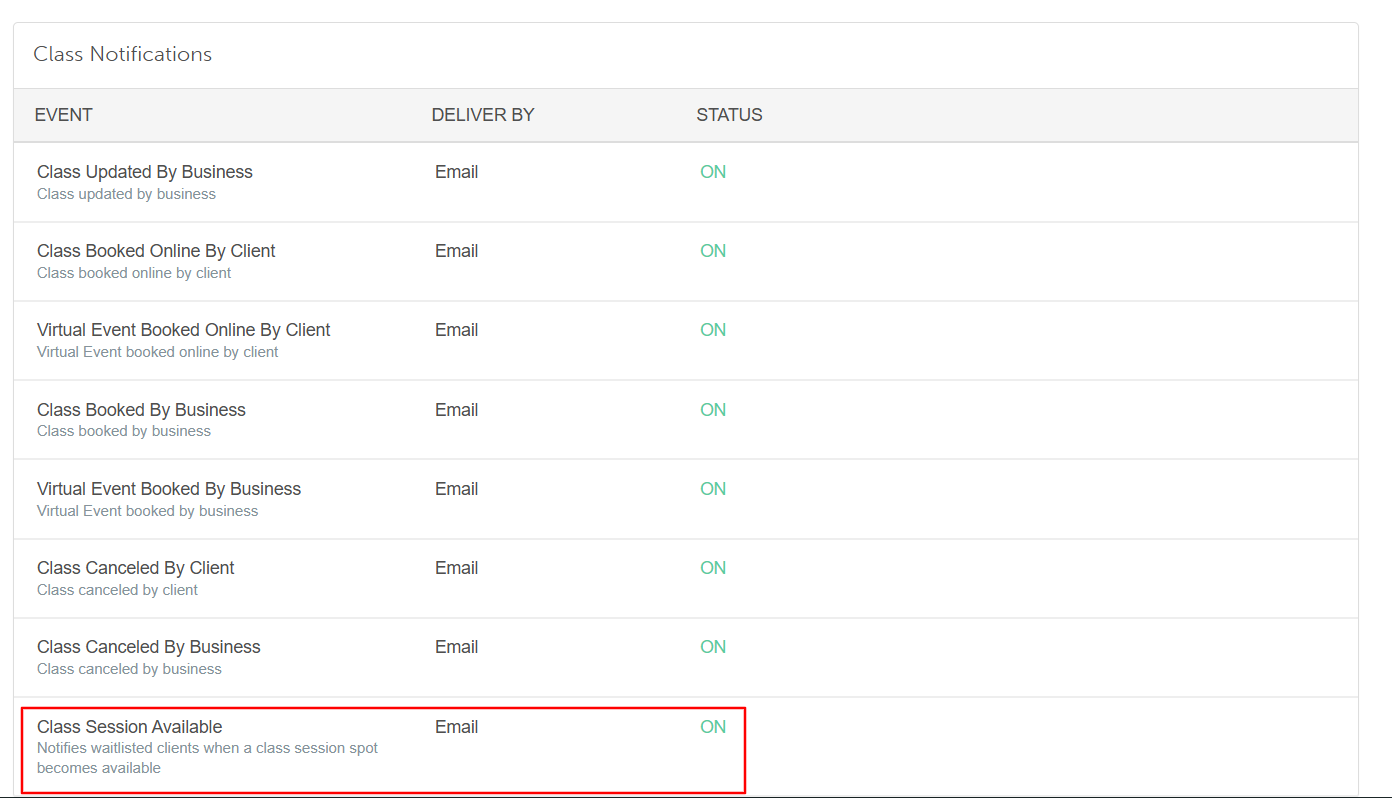
- Hover over the template and select 'View'
- From here you can edit the following (if your subscription allows):
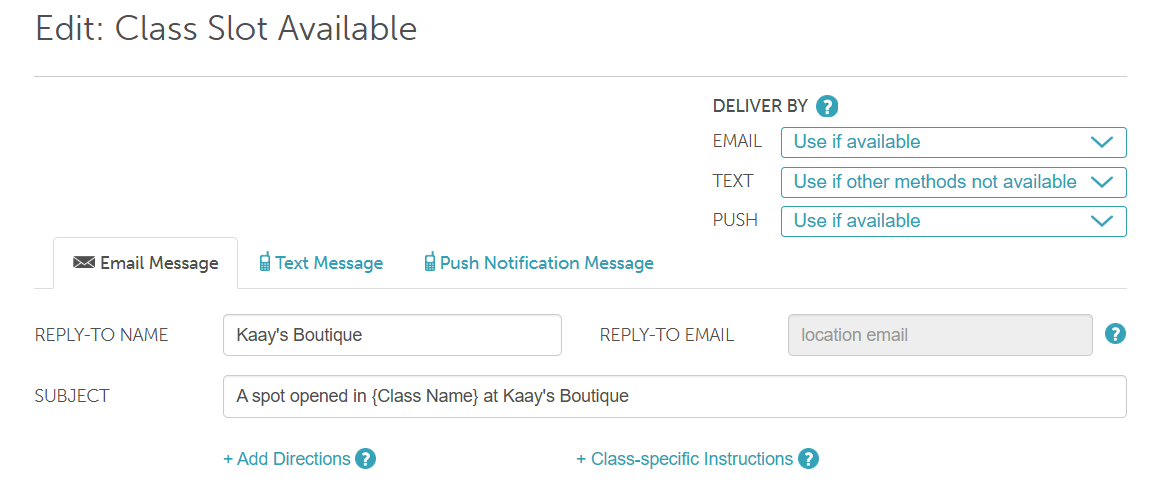
- Delivery By: You can specify a fallback delivery method (email, SMS, push notification) when the primary method is unavailable. Learn more here
- Use if available: This is the primary method that will be attempted first
- Use if other methods not available: This method will be attempted if the primary option is unavailable (because contact information is not on file or the user opted out)
- Never Use: This method will not be used, even if none of the other options are available
- Reply-to Name: This is the name that appears when clients reply to an automated email. By default, it is pulled from the business name set on the Business Profile page.
- Reply-To-Email: By default, this is set to the location's email address configured under Business Setup > Business Profile > Edit Location.
- If no email is configured for the location, the system will use the location's owner's email address instead.
- If the "Use a specific reply-to-email for outbound emails" hidden setting is enabled, the system will use the email address entered in the "Reply-To-Email for Outbound Emails" field
- Subject Line: The subject line of the email as it will appear in the client’s inbox.
- Add Directions: Add directions for each location; they will appear in class-related emails.
- Class-Specific Instructions: Include tailored instructions for each class. These instructions will automatically appear in all class-related email, SMS, and push notifications. Learn more here.
Body of the template
- Once you've finished making changes, click Save to update the template.
For more information, contact us at support@mytime.com or (385) 233-6964.
Was this article helpful?
That’s Great!
Thank you for your feedback
Sorry! We couldn't be helpful
Thank you for your feedback
Feedback sent
We appreciate your effort and will try to fix the article