Managing your inventory efficiently is crucial for the success of your business. If using an Excel spreadsheet isn’t your preferred method, manually updating products is a quick and straightforward alternative. In this article, we’ll guide you through the steps to manually update products in your inventory.
Thing to know:
- Product updates are governed by specific access control settings. Users must have the appropriate permissions enabled to modify the following areas:
- Product Details: Controlled by the "Accessing Inventory Details" permission.
- Stock Quantities: Updating Back Bar and Retail quantities, as well as product min and max levels, is controlled by the "Accessing Inventory Quantity" permission.
- Retail Pricing: Updating a product’s price is controlled by the "Accessing Inventory Prices" permission.
- Product Cost: Modifying the wholesale or purchase cost is controlled by the "Accessing Inventory Costs" permission.
- Vendor Management: Assigning a vendor to a product SKU requires the "Manage Inventory Vendors" permission.
- To learn how to update products using a spreadsheet, please click here
- For franchise businesses, the ability to update global product details is restricted to the parent level.
- Local products can only be edited at the franchise level. However, for global products, price and quantity can be edited at the local (child) level if the access control setting to edit inventory quantity and price is enabled.
- Updates made at the parent and child account levels will impact all associated locations.
- Parent Account Level - If a global product is marked as "Not Commission Eligible" at the parent account level, this will automatically apply the "Not Commission Eligible" status to the product across all locations under the parent account.
- Child Account Level - If a local product is marked as "Not Commission Eligible" at any single location within a child account, this status will be applied to the product at all locations within that child account.
- Adding a Shipment: When adding a shipment, you can choose whether the incoming products are allocated to Back Bar or Retail inventory. You can add inventory using two methods: clicking the "Add Shipment" icon or using the bulk "Inventory Import" tool.
- Once a shipment is checked in and saved, the assigned inventory type for those products cannot be changed.
If you only update the product cost in the "Add Shipment" modal, the retail or valuation cost on your main screen will not change immediately. It will continue displaying your previous cost until the current batch is fully sold out. Once that batch is depleted, the system will automatically update to display the new cost from the incoming shipment.
FIFO (First-In, First-Out) Expiration Tracking: When adding a shipment, you can assign an expiration date. The system automatically tracks and catalogs shipments sequentially by expiration date, from oldest to newest. As staff consumes inventory or rings up sales, MyTime depletes the oldest-expiring stock first, reducing product waste.
- When SKUs are out of stock or have expired, an alert will appear on the notification bell. Clicking on any of these alerts will open a modal displaying the details of the SKU corresponding to the out-of-stock or expired item
- To delete an inventory category, you must first ensure that it contains no assigned products. If you attempt to delete a category that is still in use, the system will display a pop-up window listing all items currently linked to it. For your convenience, you can click on any product name within this list to jump directly to its settings and reassign it to a different category. Once the category is completely empty, you will be able to successfully delete it from your inventory list.
- Managing Online Product Visibility on Shopify
- When the “Sync SKUs Automatically on Shopify” setting is enabled, your POS and Shopify remain synchronized:
- Real-Time Updates: Changes to prices, product details, and inventory levels are automatically pushed to Shopify.
- Instant Visibility: The “Sell Online” toggles allow you to quickly include or exclude specific SKUs and locations from your online store. For businesses using global inventory, control of this setting depends on the product type:
- Global products: Managed at the parent level
- Local products: Managed at the child (location) level
- When this setting is disabled, automatic syncing is turned off. Any updates to inventory, pricing, or product details must be manually made in Shopify.
Contents:
Update Products Manually
- Navigating to POS > Inventory
- Locate the product you wish to update and click on the product drop-down menu

- From here, you can update the product's price and current stock
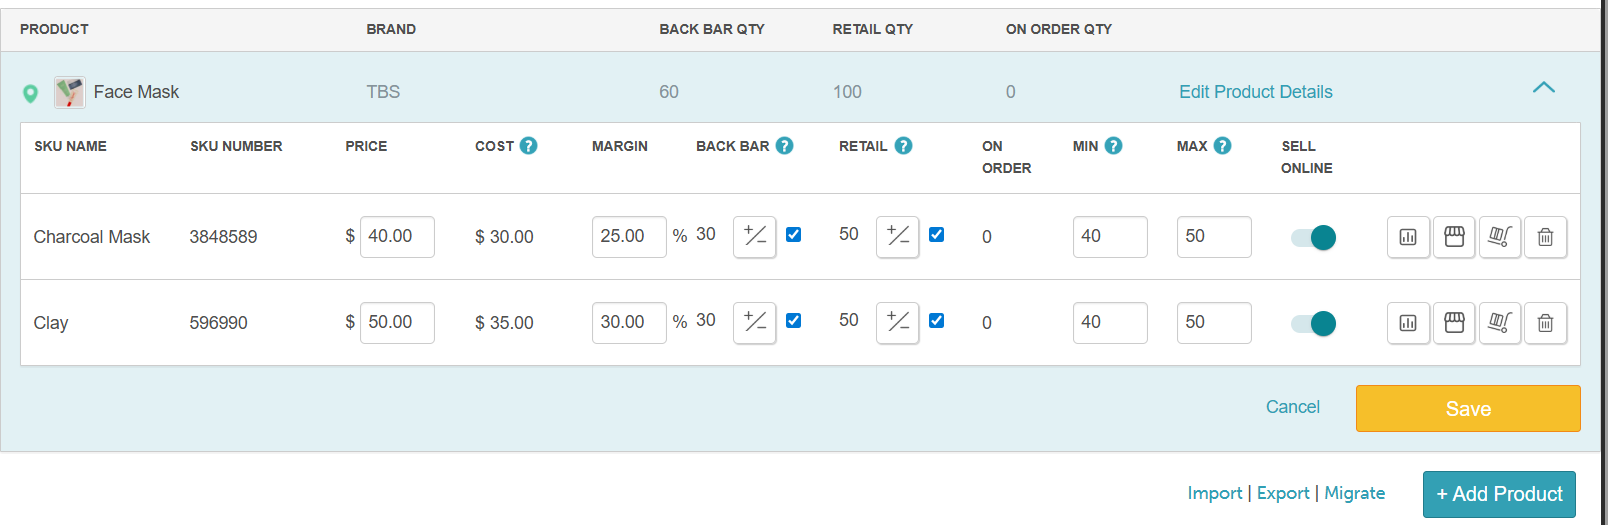
- To add a new shipment to your inventory, click the "Add Shipment icon"
- A modal will appear displaying your shipment history for that product
- Click the plus (+) icon to enter your new shipment details and select the inventory type. The new shipment will appear at the bottom of the list.
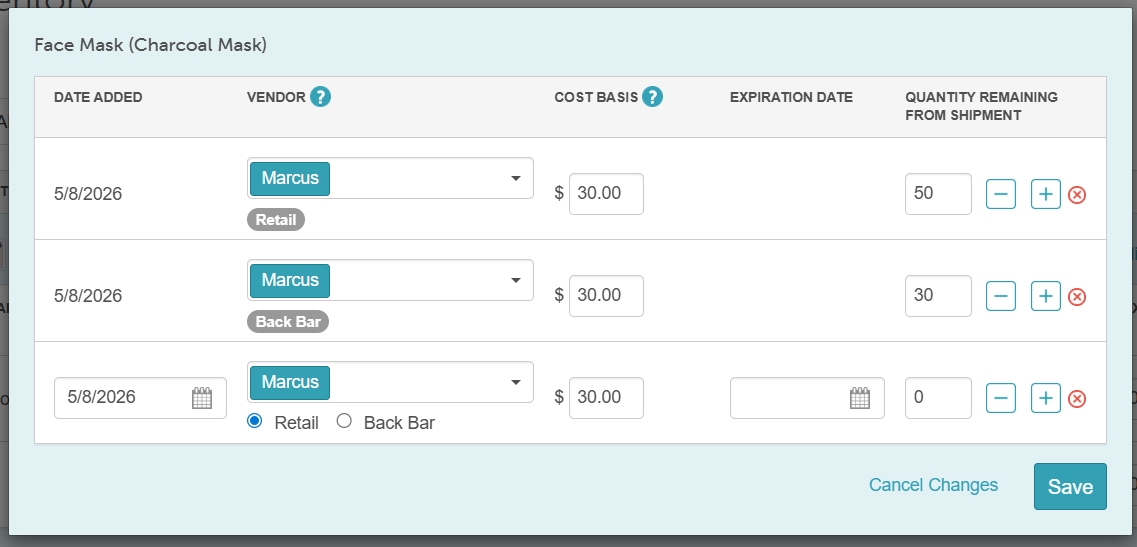
- Once you’ve entered the information, click "Save"
- Once saved, your current stock will automatically update
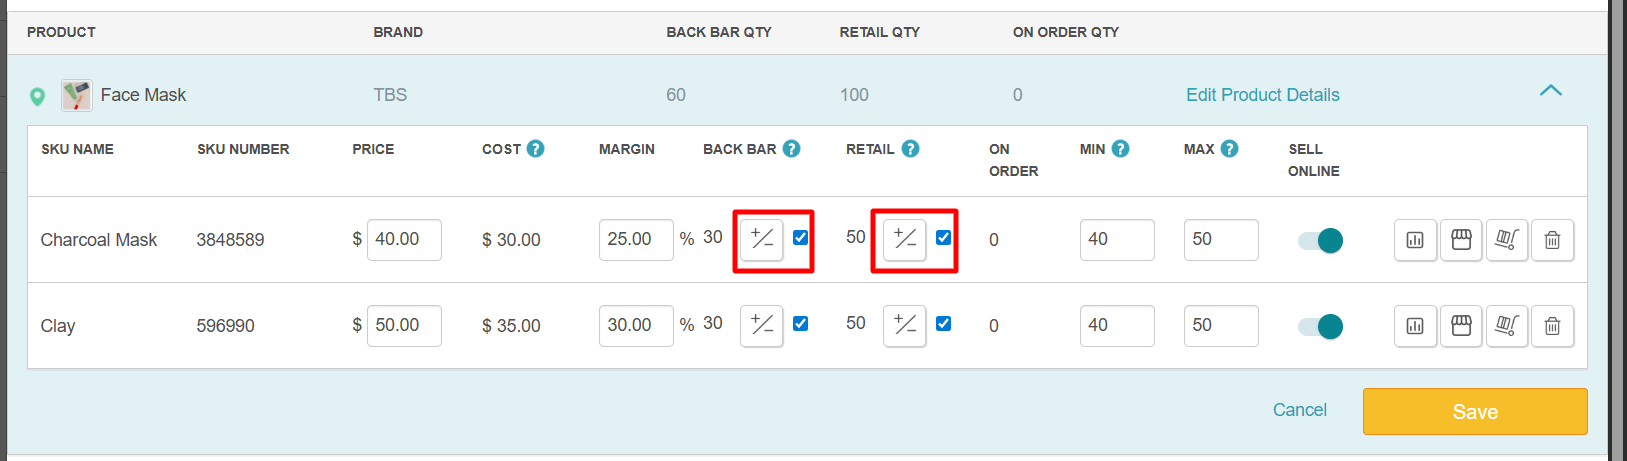
- If you did not receive a new shipment but wish to adjust your current stock, simply change the quantity by clicking on the +/- option below "Retail QTY" or Back Bar QTY. A modal will appear where you can increase or decrease the quantity and add a note or reason for the adjustment.
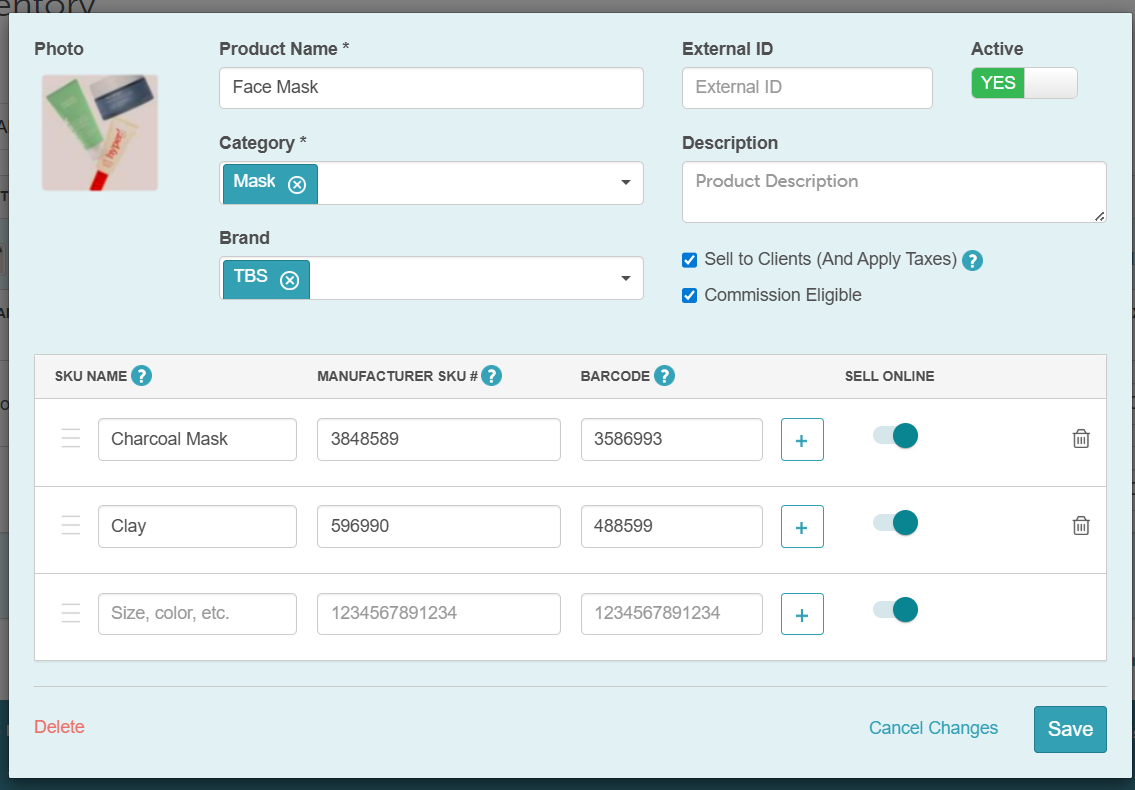
- To edit other product details (such as product name, SKU, category, or brand), select the "Edit Product Details" hyperlink.
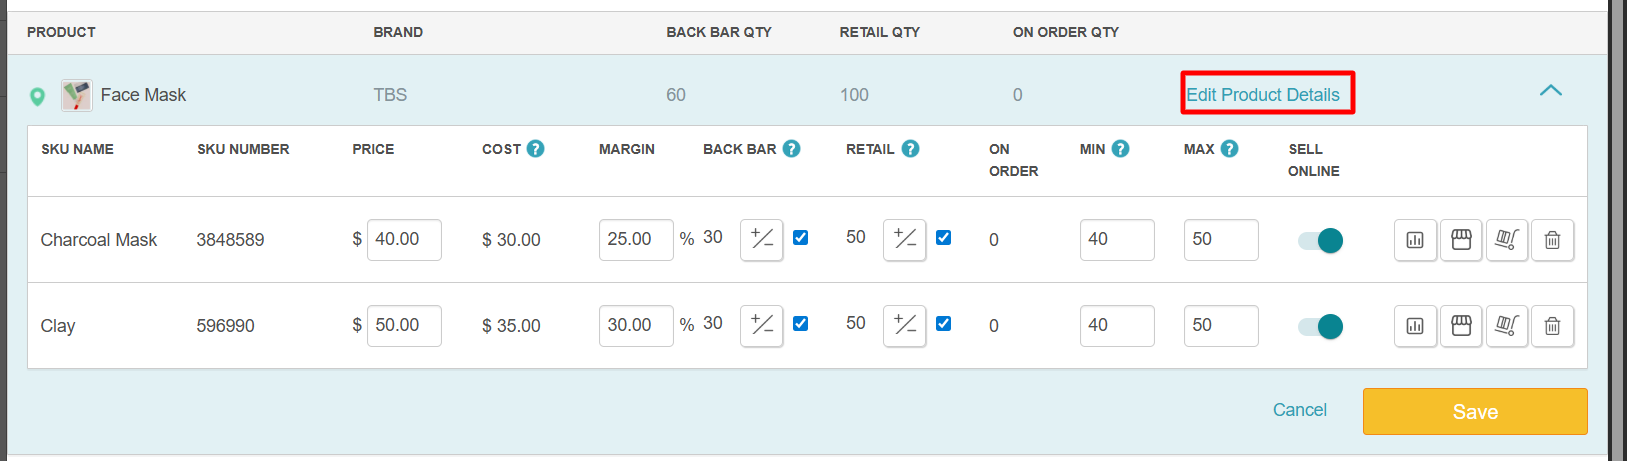
- A modal will appear where you can modify any information you like. Once done, click "Save".
- If you need to completely delete a product, select "Delete" in the lower left-hand corner
Congratulations, you've updated your inventory! Click here to learn how you can track your inventory with MyTime's Inventory Report.
Assign Vendors to a Product SKU
Things to know:
- Vendors can be assigned to a product SKU from the inventory page, but only existing vendors can be selected. Adding new vendors directly from the inventory page is not supported.
- Once a vendor is assigned to a SKU, that vendor will no longer appear in the vendor dropdown for additional assignments to the same SKU.
- Vendors assigned to a SKU cannot be edited; any changes require deleting the vendor and re-adding them.
- You can assign local vendors to global products, but global vendors cannot be assigned to local products.
- The Retail Price field displays the most recent stock price and is non-editable.
- When viewing a global product in the inventory, clicking the “Assign vendors to this SKU” icon within a child account will display only the vendors assigned to that product for that specific account. Example: If a global product “Shampoo X” has three vendors assigned across all accounts—Vendor A, Vendor B, and Vendor C—then in Child Account 1, clicking the icon will only show the vendors assigned to that account, such as Vendor A and Vendor B. Vendor C will not appear unless it is assigned to that child account.
To assign a vendor to a product SKU:
- Navigate to POS > Inventory

- Locate the product you want to update and open the product dropdown menu

- Click the Assign vendors to this SKU icon beside the desired product

- In the modal that appears, complete the following fields:
- Vendor: Select from the vendor dropdown list
- Vendor SKU: Enter the SKU number assigned by the vendor, if it differs from the manufacturer SKU.
- MOQ: Set the minimum order quantity required to replenish stock.
- Cost: Enter the price paid to the vendor for the product.
- Retail: Displays the price charged to clients; this field is not editable.
- Margin: Displays the margin percentage, calculated as:
- Margin% = (Retail Price - Cost) / Retail Price × 100
- This calculation is based on the cost and retail price at the chosen location or location group.
- To add another vendor, click the + Add Another Vendor hyperlink.

- Click Save to apply your changes.
Bulk Assign SKUs to Vendor on Inventory Page
Things to know:
- The ability to bulk assign vendors is controlled by the following permissions:
- Accessing Inventory Details
- Managing Inventory Vendors
- Users must have both permissions enabled to use this feature.
- You can bulk assign products to vendors to streamline inventory management across multiple suppliers. This feature is controlled by "Enable Bulk Assign SKUs to Vendor" hidden setting. To enable it, please contact your account manager or support@mytime.com.
- Once enabled, the system processes your inventory based on the following rules:
- Complete Catalog Coverage: The action applies to all SKUs that match your filtered results across your entire inventory—not just the current page.
- Smart Skip (Protects Existing Data): Products that are already assigned to a vendor are skipped. Existing vendor costs and Minimum Order Quantities (MOQs) are not modified.
- Franchise & Multi-Location Support: For franchise businesses using global inventory, you can also assign global products to a local vendor when bulk-assigning vendors
- The newly added products will be visible on all selected vendor profiles.
To bulk assign products to vendors:
- Navigate to POS > Inventory
- Search for the products you want to assign (you can use filters such as product, category, or brand)

- Click the “Assign All to Vendor” link at the bottom of the page

- In the Assign SKUs to Vendor modal, select the desired vendor(s)

- Click Confirm

- The selected products will be assigned to the chosen vendor(s).
For more information, contact us at support@mytime.com.
Related Articles:
- Global Products
- Adding Products Manually to Inventory
- Adding Products to Inventory on Scheduler App
- Importing Products
- Updating Products via Inventory Spreadsheet
- Updating Product Price, Cost and Quantity via CSV File (Ingest Data)
- Updating Product Name, Brand or Category via CSV Files (Ingest Data)
Was this article helpful?
That’s Great!
Thank you for your feedback
Sorry! We couldn't be helpful
Thank you for your feedback
Feedback sent
We appreciate your effort and will try to fix the article