Things to know:
- Prerequisites:
- You must be using Stripe as your payment processor
- Online booking must be enabled
- Applies to all online purchases
- Not available when using the guest checkout option
Device Compatibility: Digital wallets only appear if the client’s device and browser support them:
- Apple Pay is supported on Safari/iOS and on Chrome for macOS. For Apple Pay to appear on Chrome, the client must meet all of the following:
- Operating System: macOS Sonoma (14.0) or later
- Browser: Chrome version 121 or newer
- iCloud: Signed into an active iCloud account
- Wallet Setup: At least one active card set up in Apple Wallet on that Mac, or the Mac must be paired with an iPhone or Apple Watch with active cards
- Google Pay appears on any compatible browser (such as Chrome or Android) as long as the client is signed into their Google account with a saved, valid payment method
- Apple Pay is supported on Safari/iOS and on Chrome for macOS. For Apple Pay to appear on Chrome, the client must meet all of the following:
Digital wallet transactions are listed under the Credit Card column in the Daily Payments report.
To prevent duplicate profiles and eliminate checkout friction, the booking widget dynamically handles scenarios where a client attempts to sign in with Google or Apple but already has an existing password-based account under that same email address.
Instead of blocking the user with an error message, the system guides them through a seamless linking flow:
Automatic Redirection: The booking widget securely routes the client to the password screen, automatically pre-fills their email address, and displays a banner explaining that an account with this email already exists.
Instant Identity Linking: As soon as the customer enters their password and logs in, the system permanently links their Google or Apple identity to their existing profile.
Frictionless Checkout: Once the accounts are successfully linked, the checkout process completes immediately. Moving forward, the customer can use social login with a single click for all future bookings.
Streamlined Password Recovery: If the client cannot remember their existing password, clicking "Forgot Password" will automatically forward their prefilled email directly into the reset screen so they don't have to retype it.
- Guest Checkout Payment Method: Digital wallets require saving a card to a registered client profile. Because client profiles are created after booking in guest mode, clients checking out as guests will need to enter their card details manually using the standard credit card fields.
- Embedded iFrame Requirements: On iPhone and iPad, clicking Book Now on an embedded booking widget opens the booking flow in a new browser tab on mytime.com. Opening outside the embedded widget allows Apple Pay and Apple Sign-In to function properly for your iOS clients. This behavior is controlled by the "Open embedded booking widget in a new tab on iOS to enable Apple Sign-In and Apple Pay" company setting on the Business Setup > Settings page. If this setting is disabled, iOS clients may not see the Apple Pay option and may experience issues signing in with Apple.
- Credit Card Surcharges: Standard surcharge fees apply to transactions completed via digital wallets just like traditional card payments. Learn more here
Contents:
Checking out with Google Pay
Clients can use Google Pay as a fast and secure payment option when booking appointments online. The Google Pay button will automatically appear on the checkout page for eligible users.
- A client can navigate to your business website or booking widget
- If multiple locations are available, select the preferred location to view the correct booking calendar
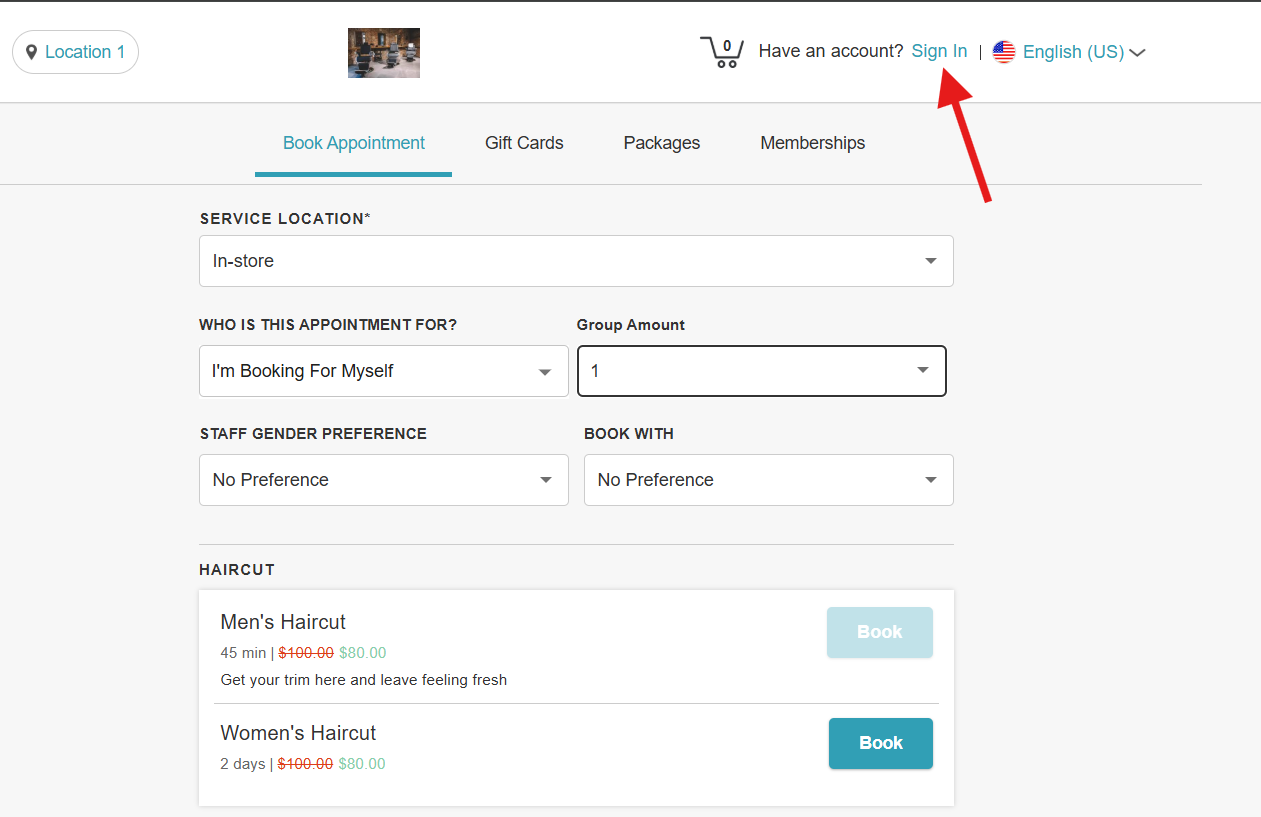
- Click "Sign In" at the top of the page
- Choose their login method:
- Standard: Enter their registered email address and password, then click 'Sign In'
- Social Login: Select 'Continue with Google,' 'Continue with Apple,' or 'Continue with Facebook' to use their existing social media credentials
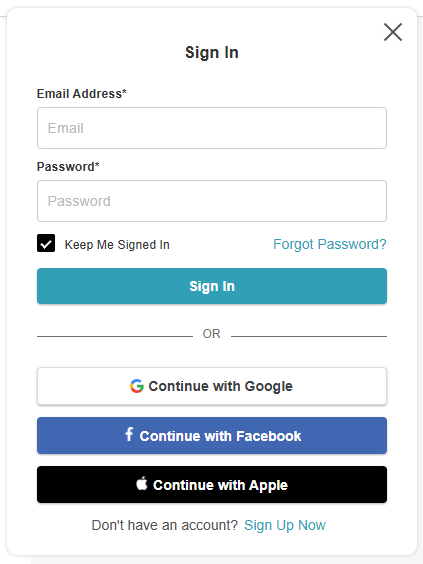
- Once their credentials or social accounts are authenticated, they will be instantly logged into the booking widget and can proceed with scheduling appointments.
- Select 'Book' next to the desired service
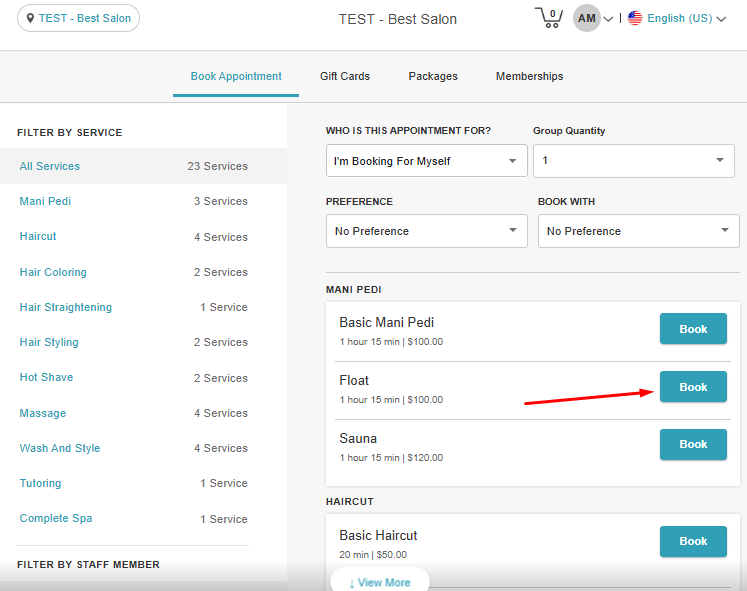
- Select “Select Time," then choose a date, time, and staff preference
- On the checkout page:
- Add notes or special requests (optional)
- Complete any required intake forms
- Review booking details
- If eligible, the Google Pay button will appear below the card entry section
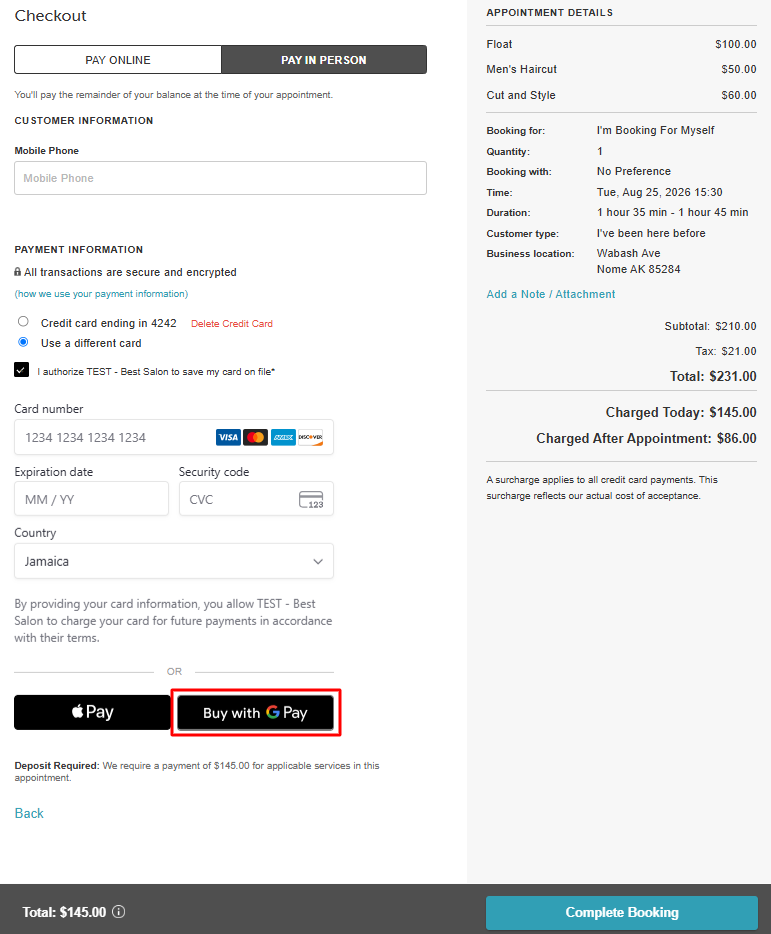
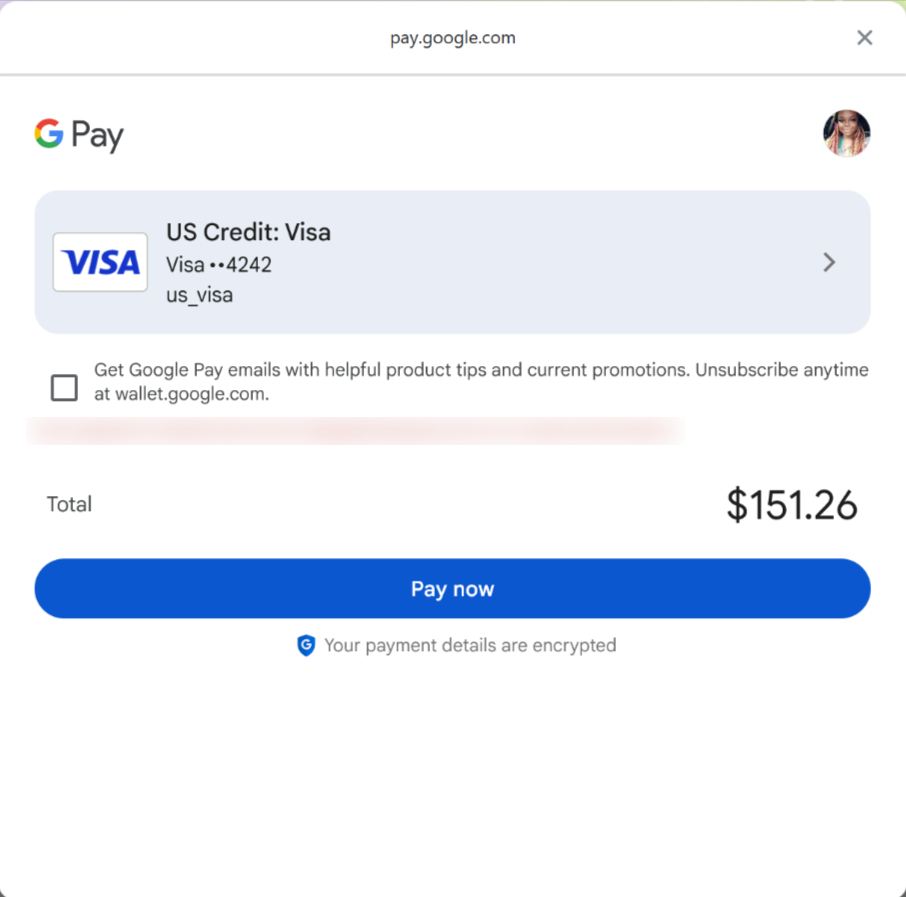
- Click 'Google Pay' to open a secure prompt and confirm your selected card within the Google Pay prompt.
- Finalize your booking based on the account type:
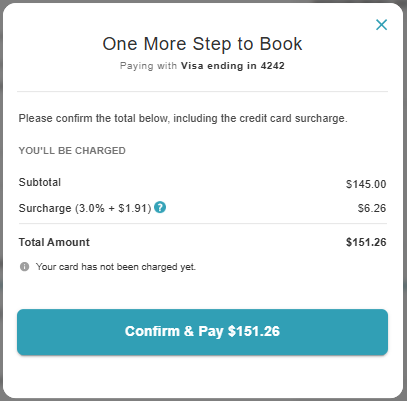
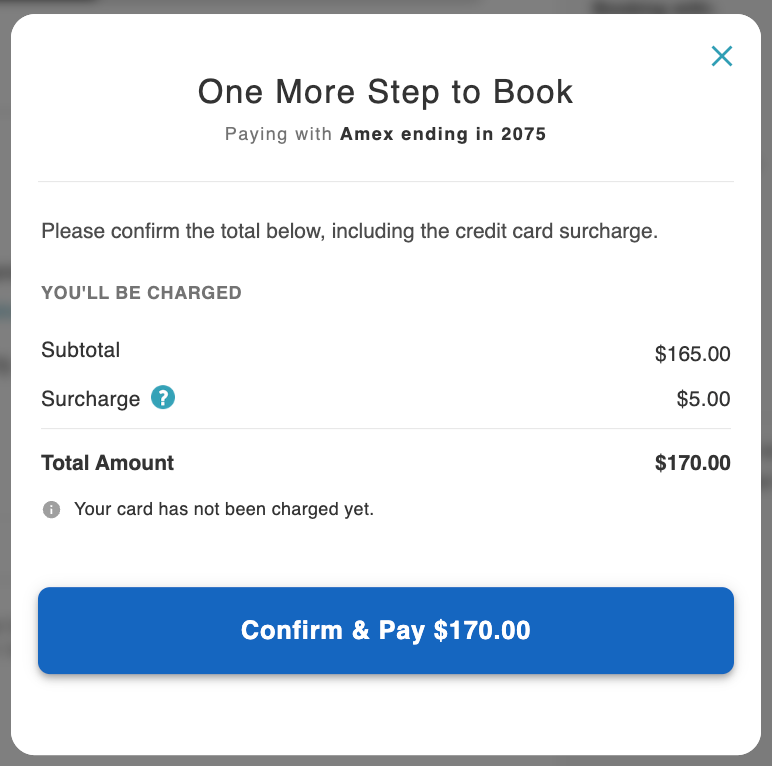
- Accounts with a surcharging fee: A "One More Step to Book" pop-up will appear. Click "Confirm & Pay $XX" to complete the transaction
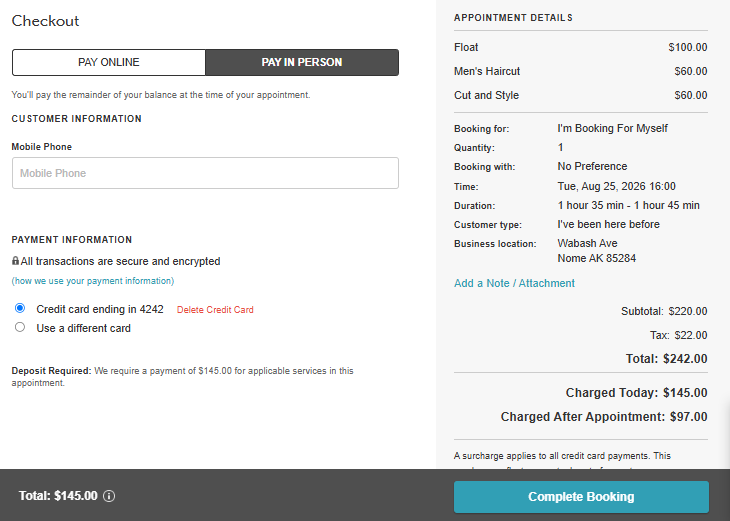
- Accounts without a surcharging fee: Click Complete Booking to finalize the payment
- Accounts with a surcharging fee: A "One More Step to Book" pop-up will appear. Click "Confirm & Pay $XX" to complete the transaction
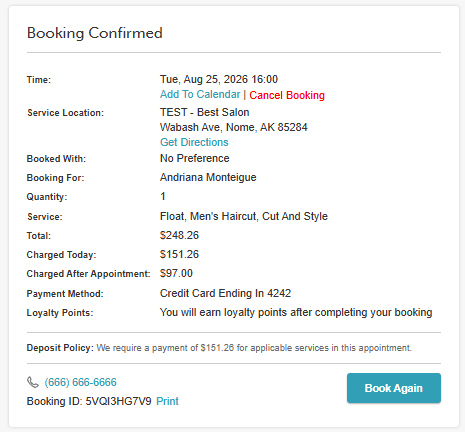
- Once processed, your booking confirmation page will display
Checking out with Apple Pay
Clients can use Apple Pay as a fast and secure payment option when booking appointments online. The Apple Pay button will automatically appear on the checkout page for eligible devices.
- Client can navigate to your business website or booking widget
- If multiple locations are available, select the preferred location to view the correct booking calendar
- Click "Sign In" at the top of the page
- Choose their login method:
- Standard: Enter their registered email address and password, then click 'Sign In'
- Social Login: Select 'Continue with Google,' 'Continue with Apple,' or 'Continue with Facebook' to use their existing social media credentials
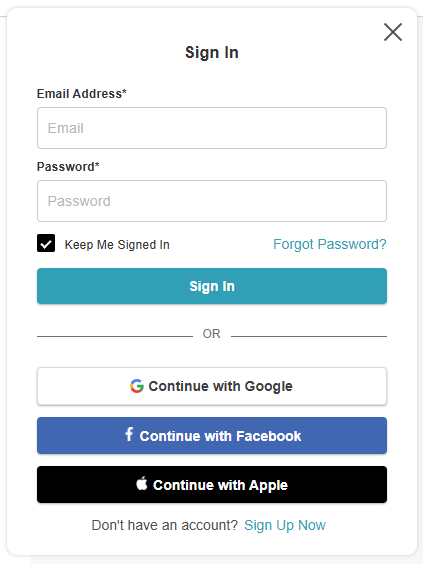
- Once their credentials or social accounts are authenticated, they will be instantly logged into the booking widget and can proceed with scheduling appointments.
- Select 'Book' next to the desired service
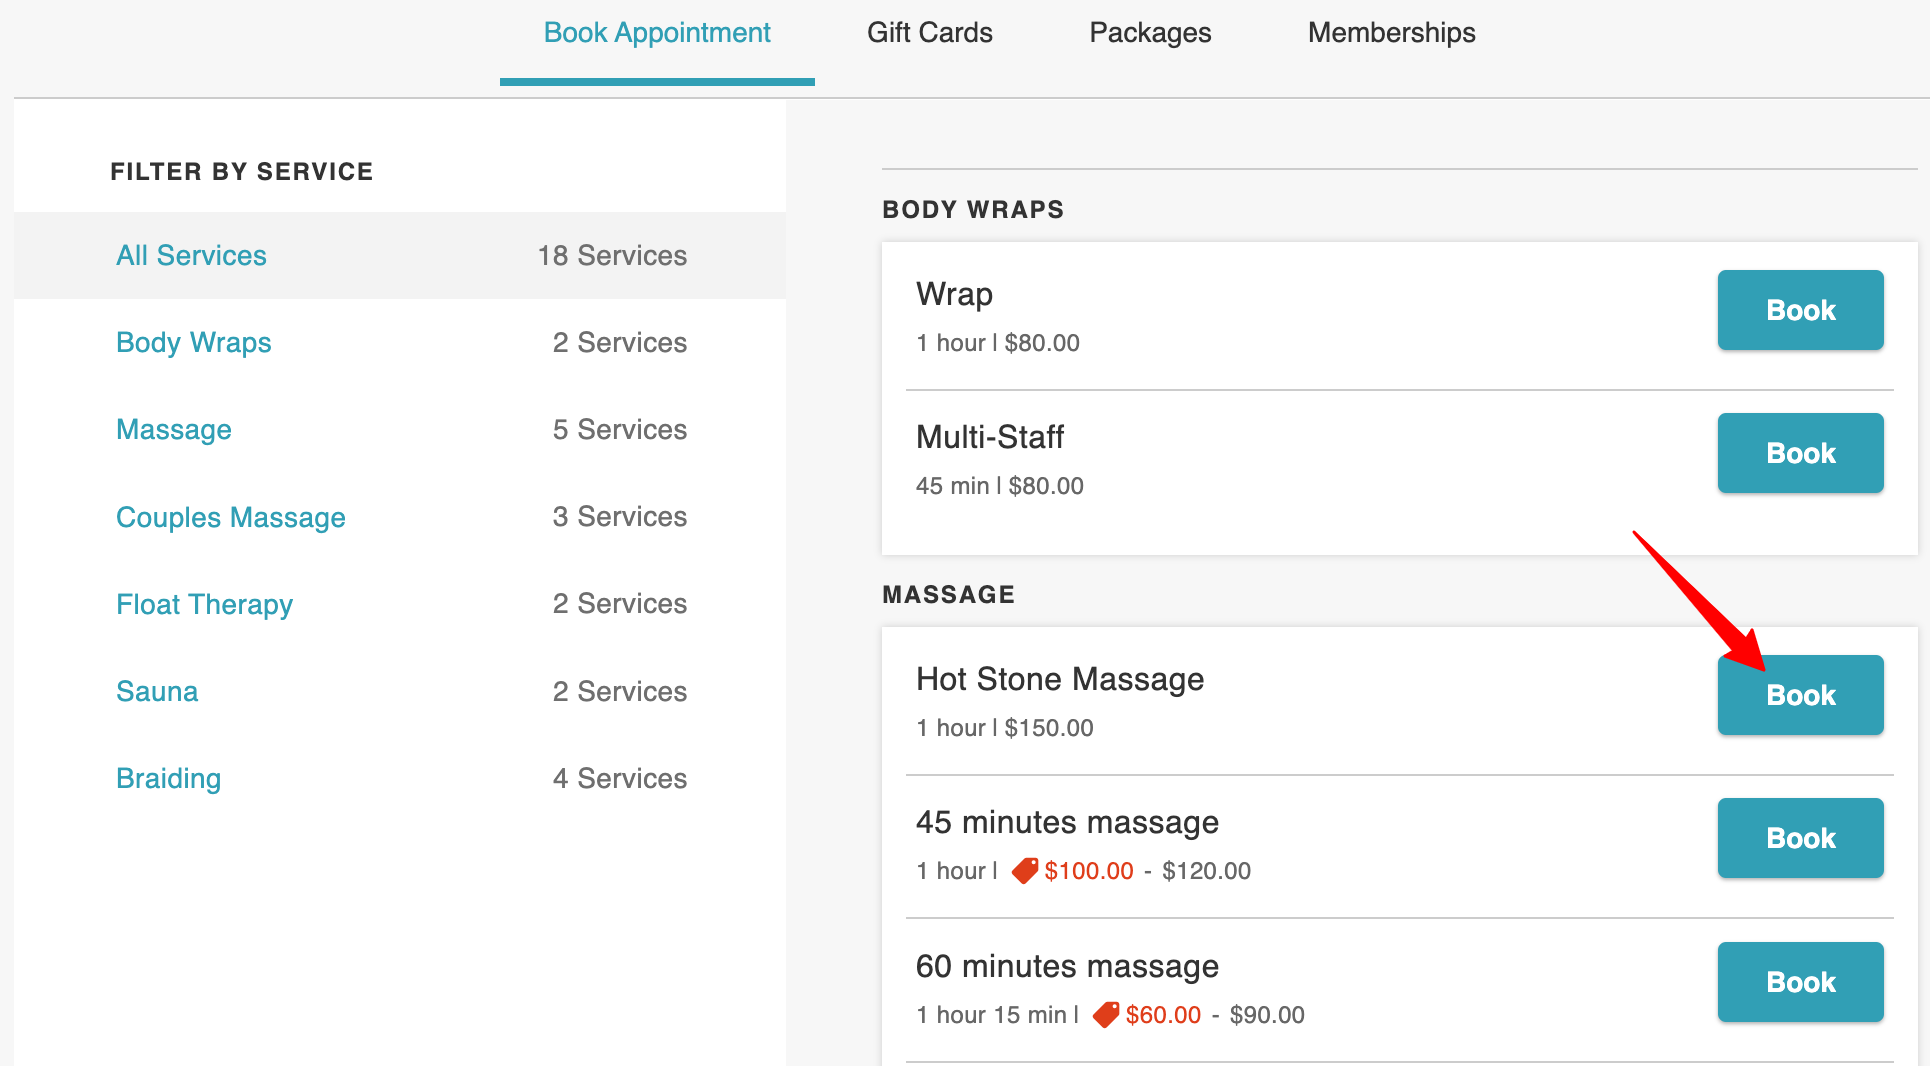
- Select “Select Time," then choose a date, time, and staff preference
- On the checkout page:
- Add notes or special requests (optional)
- Complete any required intake forms
- Review booking details
- If eligible, select the Apple Pay button located below the card entry section
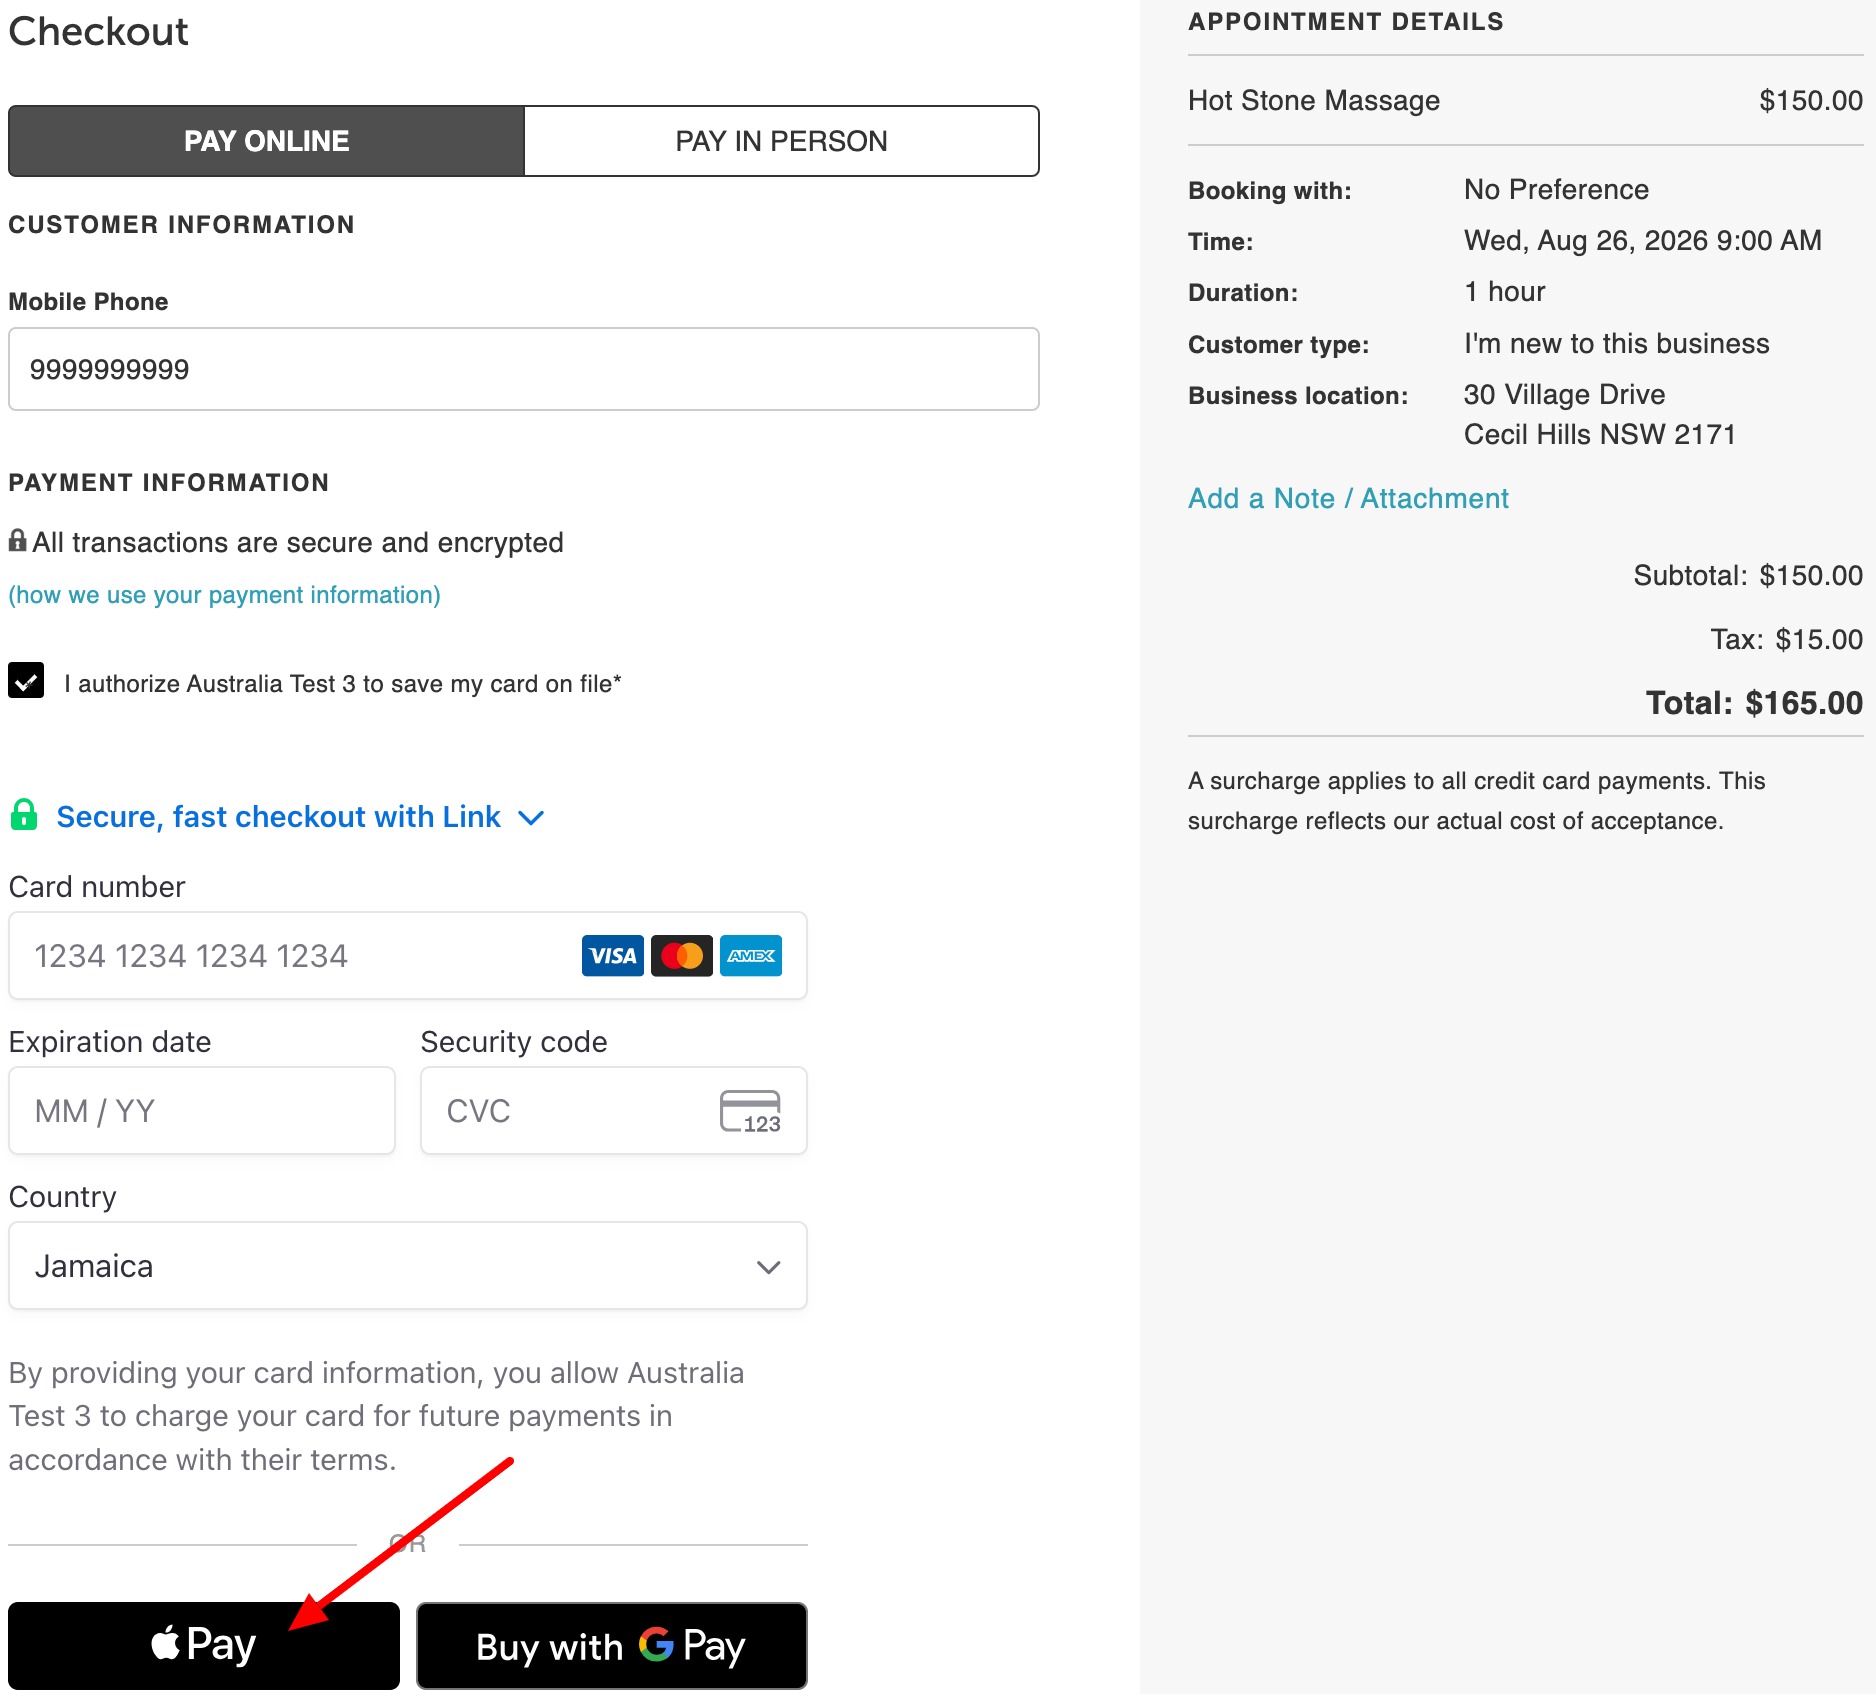
- Complete your payment depending on your device:
- On Mobile / Safari: Authorize the payment directly using Face ID, Touch ID, or your passcode
- On Desktop: A QR code will appear on screen. Open your iPhone camera to scan the code, then authorize the payment on your phone
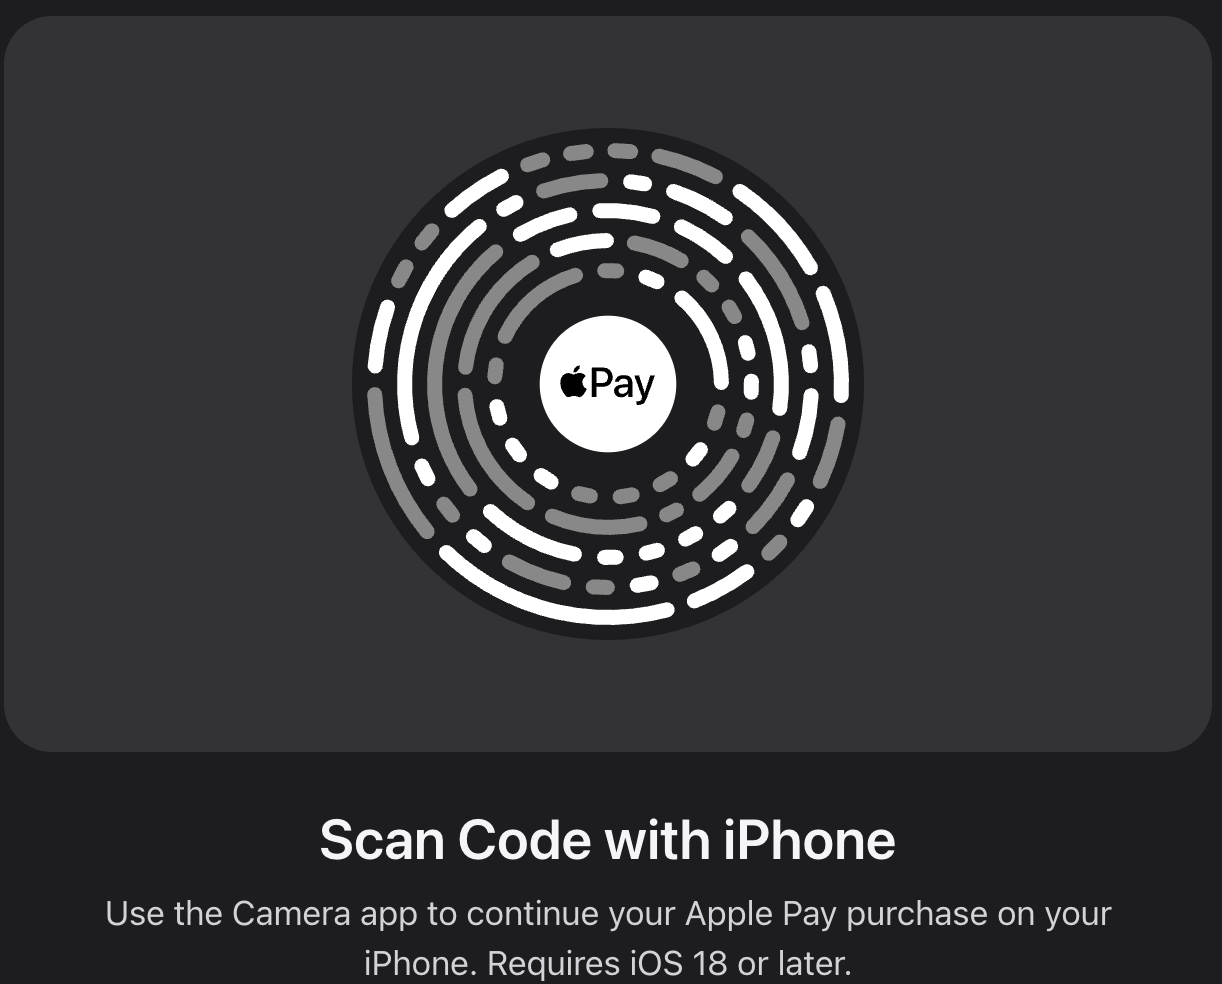
- Confirm the payment
- Once processed, your payment method will apply automatically and the appointment confirmation page will display.
Related Articles:
Client Sign-Up Options on Widget/Express Checkout
Booking Appointments Online for Clients
Booking Group Appointments Online
Booking Multi-Day Appointments Online
Booking Multi-Staff Appointments Online
Booking Multi-Client Appointments Online
Purchasing Client Packages Online
Was this article helpful?
That’s Great!
Thank you for your feedback
Sorry! We couldn't be helpful
Thank you for your feedback
Feedback sent
We appreciate your effort and will try to fix the article