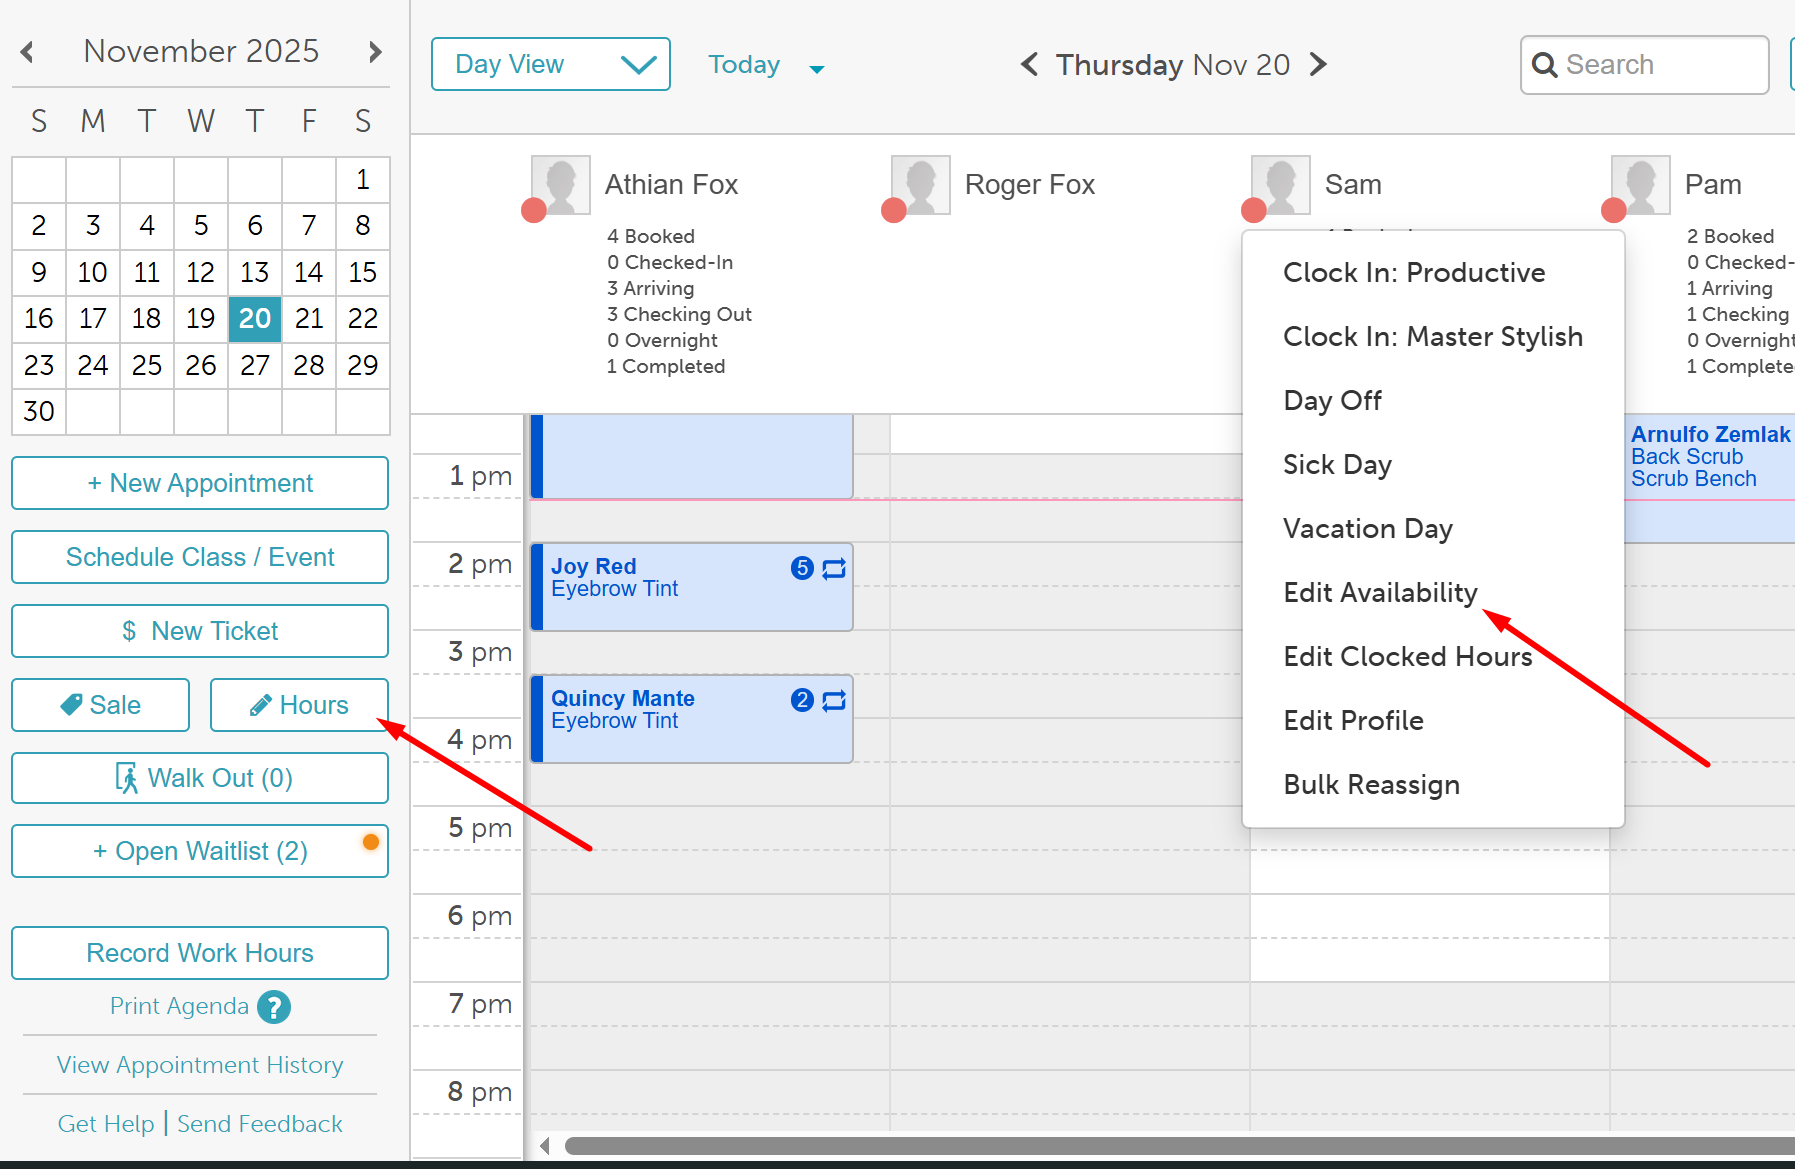
You can use the "Hours" button or the "Edit Availability" option on the schedule to create/edit your staff members' hours for a certain day of the week without affecting their regularly scheduled working hours stated on their profiles. When custom hours are established, the scheduler and booking widget will update to display the custom scheduled hours, and the scheduler will keep track of the historical working hours. In this article, we'll walk through the steps on how to create and edit work hours, along with creating split shifts.
Things to know:
- The ability to create or edit custom work hours is governed by the "Custom Work Hours" access control setting.
- The default view is the Day view
- When in Week View, clicking on a specific day opens the modal for that day, but with the option to expand to see and edit the entire week
- When custom hours are added, they take priority and replace the staff member’s regular scheduled hours for the selected day(s).
- When custom hours are set, the staff member's productivity and availability in reports for previous dates are not affected
- Work hours for previous dates cannot be modified and are displayed in gray; however, future work hours can be edited
- Days off are divided into three categories: days off, vacation days, and sick days. These all function similarly, but there is a visual distinction in the hours scheduled, and they are reported differently in reports.
- Clicking on the white space around a staff member's name will automatically open the full week view modal (when in week view)
- Only the staff members' default hours will be overwritten when setting hours for all staff using the "All Staff" option
- When using the day view, blockages are shown in black for the hours, and when using the week view, they are shown below the scheduled time
- Setting a staff member’s work hours to ‘Not Scheduled’ will remove their scheduled hours from both the schedule view and the Edit Work Hours page.
- When viewing staff schedules in Schedule > Edit Work Hours (Day View), you can toggle between Business Hours and All Hours. Here is how each view displays scheduled shifts:
- Business Hours View
- This view restricts the grid display to your set operating hours:
- Shifts Starting Early: If a shift starts before your business opening time, the colored shift block begins visually at the opening time and ends at the shift’s end time.
- Shifts Ending Late: If a shift ends after your business closing time, the colored block visually stops at closing time.
- Shifts Outside Business Hours: If an entire shift occurs completely before opening or after closing, no colored block will appear on the grid.
- Exact Times Label: The written time label on the block (e.g., "7:00 AM – 5:00 PM") always displays the staff member's actual scheduled hours, regardless of how the block renders visually.
- This view restricts the grid display to your set operating hours:
- All Hours View
- Shows the complete 24-hour day grid. All shifts display at their exact start and end times, regardless of your business operating hours.
Note: Toggling between these views only changes how hours are displayed on your calendar grid. It does not alter actual staff availability or client booking capabilities.
- Business Hours View
- Changes made to work hours affect the following reports: Calendar Utilization
- Staff Productivity
- Dashboard charts for productivity
Contents:
Setting Custom Hours & Creating Split Shifts
To set custom hours and split shifts:
- Go to your appointment schedule
- On the left sidebar, you will see the Hours button. If you want, you can also filter the schedule by Day View > Select any staff, then click on the Edit Availability option.
- This will open the Custom Hours user interface. Here you will be able to:
- Filter by a specific location
- Filter by business hours or all hours
- Filter by a specific day
- Choose between day or week view
- Import schedule
- Select Custom from the drop-down menu
- Add your start and end times as well as the frequency. Should the custom hours be for just today or until a specific date?
- Once you have saved your changes, your availability will be updated automatically.


This option is useful when staff members have a recurring day off. For example, if a staff member has every Tuesday off for the next 4 weeks, they can set recurring, customized hours. Recurring customized hours are also useful when there are holidays or special events and the staff member has a different schedule than usual for a specific period of time.
Editing Work Hours
- Navigate to Scheduler
- On the left sidebar, you will see the Hours button. If you want, you can also filter the schedule by Day View > Select any staff, then click on the Edit Availability option
- You will be directed to the Edit Work Hours page
- From here, you can set your preference
- Choose your location: If multiple, all locations will be listed if you click the down arrow
- View By: Choose to view the work hours by the business hours or all hours
- Search Bar: Search for staff members to edit work hours for
- Date: You can use the arrows to toggle between dates and use the drop-down arrow to view weeks out
- Day/Week: Choose to view by days or weeks
- Import Schedule: This allows you to import your staff members' schedule
- Edit Work Hours for All Staff: This button gives you the option to edit the hours to one schedule for all staff members


For more information, contact us at support@mytime.com.
Related Articles:
Was this article helpful?
That’s Great!
Thank you for your feedback
Sorry! We couldn't be helpful
Thank you for your feedback
Feedback sent
We appreciate your effort and will try to fix the article