MyTime offers the ability for businesses to request clients to agree to their terms and policies through electronic waivers. These waivers can be created with different options, such as an unlimited validity period or an expiry period. In this article, we will discuss creating waivers.
Things to know:
- The ability to create waivers is governed by the "Manage Client Setup" access control setting.
- Types of waivers:
- Unlimited Validity Period: With this option, waivers have no expiration date. Clients who agree to the terms and policies through these waivers are considered to have accepted them indefinitely. This is useful for businesses that want a one-time agreement that remains in effect until further notice or until the client decides to revoke it.
- Expiry Period: Waivers created with an expiry period have a set duration during which they are valid. Once the specified time has passed, clients will need to re-agree to the terms and policies by signing a new waiver. This can be useful for businesses that want clients to periodically reaffirm their agreement or for situations where the terms and policies may change over time. Learn more about waivers with an expiry date here
- Waivers can be generated and signed either in-store or online during the booking or membership purchase process.
- For franchise businesses, waivers created at the child level are available only to locations under that specific child account. They are not accessible to locations under other child accounts. To make a waiver available across all locations, it must be created at the parent level, as only parent-level waivers are visible to all child accounts.
- When an appointment is scheduled, the appointment modal shows the current status of all required waivers. This includes both the business’s required intake forms and any forms tied to the selected service. To make it easy to see what still needs to be completed, waiver statuses are color-coded:
- Red: The waiver has not been signed and still requires action
- Green: The waiver has already been signed and is on file
- Grey: The waiver is expired
- If you prefer not to show unsigned waivers in the appointment modal, a hidden setting called “Don’t Show Unsigned Waivers on Appointment Modal” can be enabled by the MyTime team. Once enabled, the appointment modal will display only completed (green) waivers.
- When the “Enable Employee Appointment Intake Forms” setting is enabled:
- Waivers created as appointment custom fields will not appear in the Appointment Notes section.
- To display waivers with this setting enabled, they must be included in an Employee Intake Form.
- If the setting is not enabled, waivers from appointment custom fields will appear in the Appointment Notes section.
- Waivers are shown in the order configured in the Employee Intake Form. This applies to both incomplete and completed employee intake forms.
- For both incomplete and completed employee intake forms, you can:
- Add or delete waivers
- Download waivers
- Mark waivers as already signed
- Print waivers
Note: Waivers created as appointment custom fields do not have audit trails, so the Audit Trail button will not be available for these waivers.
To create a waiver:
- Navigate to the Clients tab
- Expand the Manage Clients menu
- Select Customize Client Fields
- Click the Add Field hyperlink
- Expand the Field Type section and choose 'Waiver' from the drop-down menu
- Fill in the necessary information in the applicable fields
- Field Name: Name of the waiver
- Field Tooltip: Informative message that appears when a client hovers over the waiver's name
- Content: The details you want to include in the waiver
- Expiration: The length of the waiver's expiration after completion
- Apply to existing waivers: This option can be used to apply the set expiration period to signed waivers
- Expires Every: Configure the number of days after a waiver is signed should it be expired
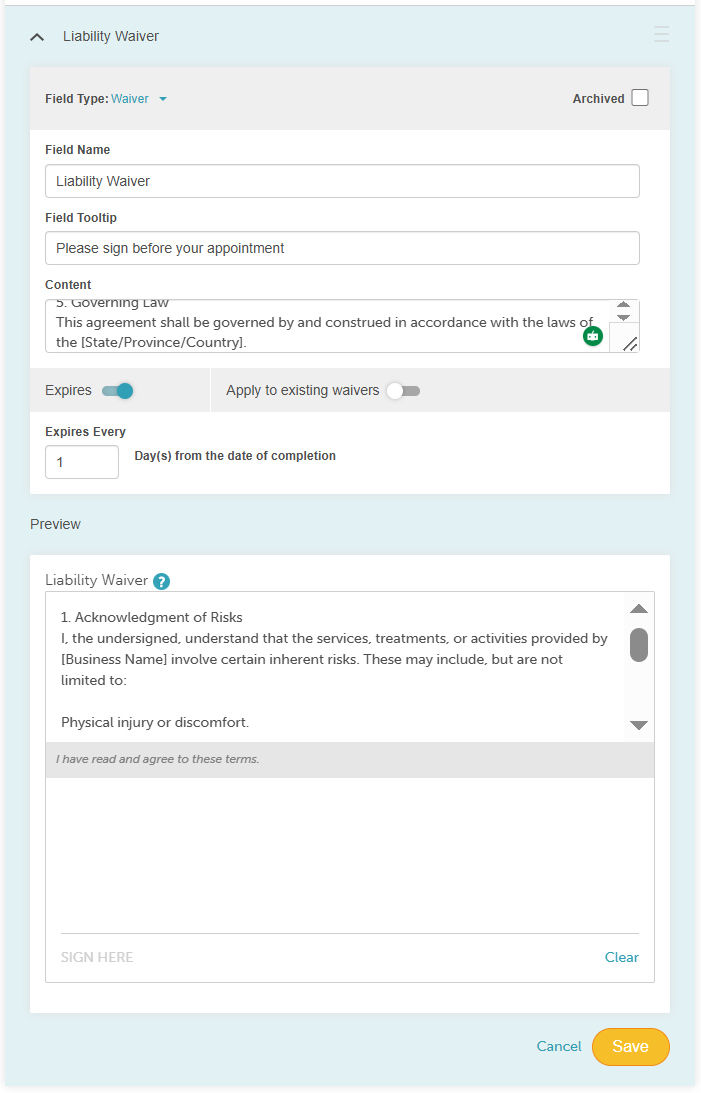
- The preview will appear once the details have been entered
- Save


After saving, the waiver can be added to the intake form and signed by your clients in-store or online.
Waiver Generated In-Store

Waiver Generated Online

For more information, contact us at support@mytime.com.
Related Articles:
Generating Membership Agreements In-Store
Was this article helpful?
That’s Great!
Thank you for your feedback
Sorry! We couldn't be helpful
Thank you for your feedback
Feedback sent
We appreciate your effort and will try to fix the article