MyTime provides the flexibility to print product labels for individual items or product groups. Each printed label encompasses essential details such as the company name, price, SKU name and number, barcode, and barcode number. This article will guide you through the process of printing labels.
Things to know:
- The ability to print product labels is governed by the "Accessing Inventory Details" access control setting
- You can print product labels for individual items or product groups either from the Inventory > Print Labels section or directly from the Purchase Orders page
- By default, the number of labels printed from a Purchase Order (PO) page matches the total quantity of items added to your retail and back bar inventory. Label printing is available only when a PO is in the Checking-In or Completed stage.
- If you want to print a single label for a shelf display instead of one label per item, you can enable Shelf Label Mode. This mode automatically reduces the print quantity to one, regardless of the total order quantity.
- Note: Shelf Label Mode is controlled by the Enable print shelf labels setting, which must be enabled by the MyTime team. To activate this feature, please contact support@mytime.com
- The "Print All" label button will display labels for the total number of items added to inventory, while individual "Print Label" buttons will be shown for items that were restocked to either the retail or back bar
- When printing labels for SKUs with multiple stocks, the price shown will correspond to the most recent stock
- The search bar on the Print Labels page supports matching against the product name, SKU's name, SKU number, and barcode (UPC).
- If the search term matches a specific SKU number, SKU name, or a barcode (UPC), only the product containing that exact SKU number, name or barcode will appear
- If the search term matches only the product name (not any of its SKUs), then all SKUs under that product will be shown.
- If the search term matches a word or phrase from the product description, the matching product will be displayed.
- The Print Label page offers several filters to help you quickly find and review products by location, stock status, category, and brand. Below is an explanation of how each filter works:
- Location Filter
- Allows you to select one location or one location group at a time.
- Use this filter to view products for a specific location or a group of locations.
- Inventory Filter: This filter controls which products are displayed based on their stock status:
- All Inventory: Shows all products added to the selected location, regardless of whether they are currently in stock.
- In Stock at This Location: Shows only products that are currently in stock (either in back bar or retail) at the selected location.
- Carried at This Location: Shows only products with SKUs that have been stocked at the selected location.
- Out of Stock at This Location: Shows all products that are currently out of stock at the selected location.
- Not Carried at This Location: Shows only products with SKUs that have never been stocked at the selected location. On the Inventory page, these products will appear with the “Add to Inventory” option.
Category Filter: Allows you to filter by all categories or narrow results by selecting a specific category. If all categories are deselected, no products will be shown.
Brand Filter: Allows you to filter by all brands or narrow results by selecting a specific brand. Deselecting all brands will result in no products being shown. Selecting the "No Brand" option will display only products without an assigned brand.
After filtering the Print Label page, you can click the "All" hyperlink to select all the products currently displayed for printing, so you don’t have to select each product manually.
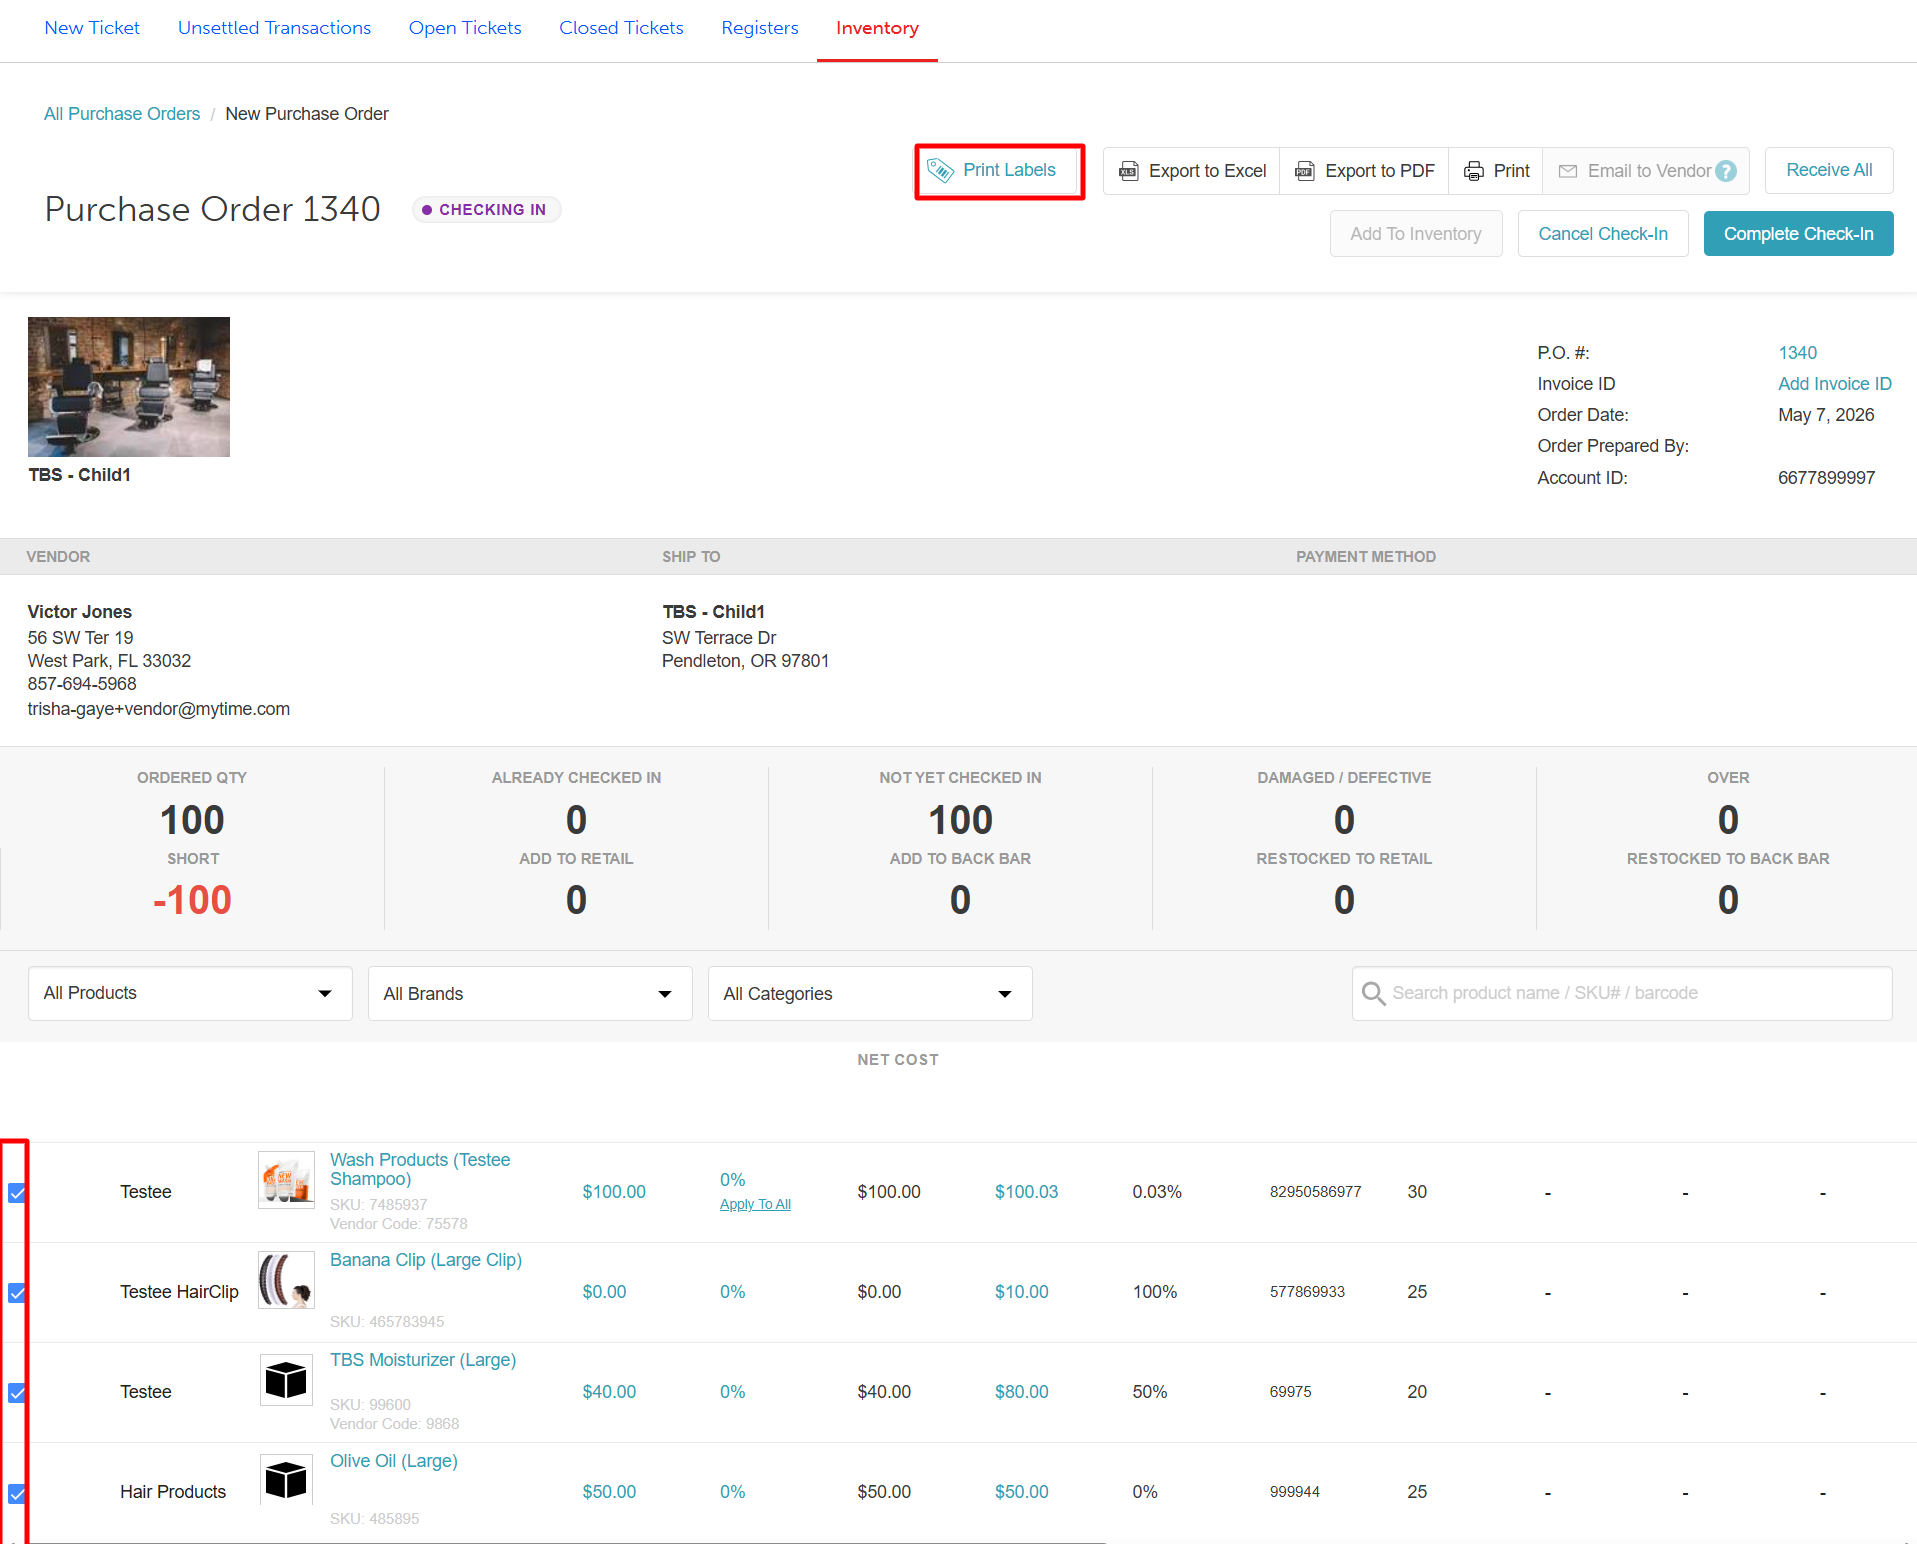
When both the “Enable Product Labels” company setting and the “Enable Print Shelf Labels” hidden setting are enabled, you can use the Select column on a Purchase Order (in Checking-In or Completed status) to choose specific products for label printing. Your selections are preserved as you navigate between pages or search for items, ensuring that only selected products across the entire order are included when you click Print All Labels.
Note: If the hidden setting is not enabled, labels will be printed for all products in the purchase order by default. To enable this feature, please contact MyTime Support at support@mytime.com.
CONTENTS
- Enable Product Labels
- Print Product Labels from Inventory > Print Labels
- Print Product Labels from Purchase Order
Enable Product Labels
- Navigate to Business Setup > Settings
- Locate the "Enable Product Labels" setting and toggle to " ON"

- Scroll to the bottom of the page to save the changes
Print Product Labels from Inventory > Print Labels
To print a product label from the Inventory > Print Labels section:
- Navigate to POS > Inventory
- Select Print Labels from the left panel

- Choose the products for which you want to print labels

- Select the Print Label button on the bottom right of the page

- A 'Skip Labels When Printing' pop-up will be displayed, allowing you to enter a number value to indicate how many label spaces should be skipped

- When the print screen appears, you can preview the labels before printing

- When you're finished, click the print button
Print Product Labels from Purchase Order
To print a product label from the Inventory > Purchase Order section:
- Navigate to POS > Inventory
- Select Purchase Orders from the left panel
- Open an existing order in the Checking In status
- Update Add to Retail or Back Bar field and Add to Inventory
- Check the box next to the desired product in the Select column, then click the Print Labels button at the top of the page.
- Open an existing order in the Completed status
- Check the box next to the desired product in the Select column, then click the Print Labels button at the top of the page.
- When the print screen appears, you can preview the labels before printing
- When you're finished, click the print button
Please contact our Support Team at support@mytime.com if you have any questions.
Related Articles:
- Global Products
- Adding Products Manually to Inventory
- Adding Products to Inventory on Scheduler App
- Importing Products
- Updating Products Manually
- Updating Products via Inventory Spreadsheet
- Updating Inventory Cost & Price for Location Groups
- Updating Product Name, Brand or Category via CSV Files (Ingest Data)
- Discontinue Products Manually
- Discontinue Products via Inventory Spreadsheet
- Deleting Products Manually
- Delete Products via Inventory Spreadsheet
Was this article helpful?
That’s Great!
Thank you for your feedback
Sorry! We couldn't be helpful
Thank you for your feedback
Feedback sent
We appreciate your effort and will try to fix the article