Upcoming expiration and expiration reminders are custom fields with time-based alerts designed to prompt timely action. This feature is especially useful for pet businesses that need to maintain up-to-date vaccination records. As the expiration date approaches, an orange badge will appear on the client, pet, or family member profile and in the appointment modal, indicating that attention is needed soon. Once the expiration date has passed, a red badge will be displayed to signal that immediate action is required.
Things to know:
- The ability to configure upcoming expiration and expiration reminders is governed by the "Manage Client Setup" access control setting.
- Expiration reminders are particularly useful for:
- Vaccination expiration
- Haircut/Colouring reminders
- Dietary reminders
- Registration Expiration
- For franchise businesses, if the expiration reminder is set up as a custom field at the parent level, changes like renaming the field or adjusting how many days before expiration the reminder appears can only be made at the parent level. If the custom field is created at the child level, those changes can be made at the child level instead.
- To help you stay on top of pet safety and compliance, our system displays expiration tags ("Expired" and "Expires Soon") across different areas of the platform. Because an upcoming appointment might happen after a vaccine expires, these tags calculate dates differently depending on where you are looking:
- Client Profile: Tags are determined based on today's current date.
- Appointment Modal & Tile: Tags are determined based on the appointment's scheduled end time, ensuring you know if a vaccine will be invalid during their stay. Examples: To see how this works, let’s look at a pet whose Bordetella vaccine is set to expire on June 30. Depending on when you are looking at the account and when the appointment is scheduled, here is what you will see:
- Scenario 1: Viewing on June 25 for an appointment on June 26
- Client Profile: Displays "Expires Soon" because today's date is close to the expiration date.
- Appointment Modal & Tile: Displays "Expires Soon" because the vaccine is still fully valid at the time the appointment ends.
- Scenario 2: Viewing on June 28 for an appointment on July 2
- Client Profile: Displays "Expires Soon" based on today's date.
- Appointment Modal & Tile: Displays "Expired" because the vaccine will have already expired by the time the appointment actually takes place.
- Scenario 3: A multi-day appointment (e.g., Starts June 25, Ends July 1)
- Client Profile: Displays "Expires Soon" (if you are viewing it before June 30).
- Appointment Modal & Tile: Displays "Expired" because the vaccine will expire before the appointment ends.
- Scenario 4: Viewing on June 30 or later
- Client Profile: Displays "Expired" based on the current calendar date.
- Appointment Modal & Tile: Displays "Expired" for this appointment and any future appointments scheduled to end on or after June 30.
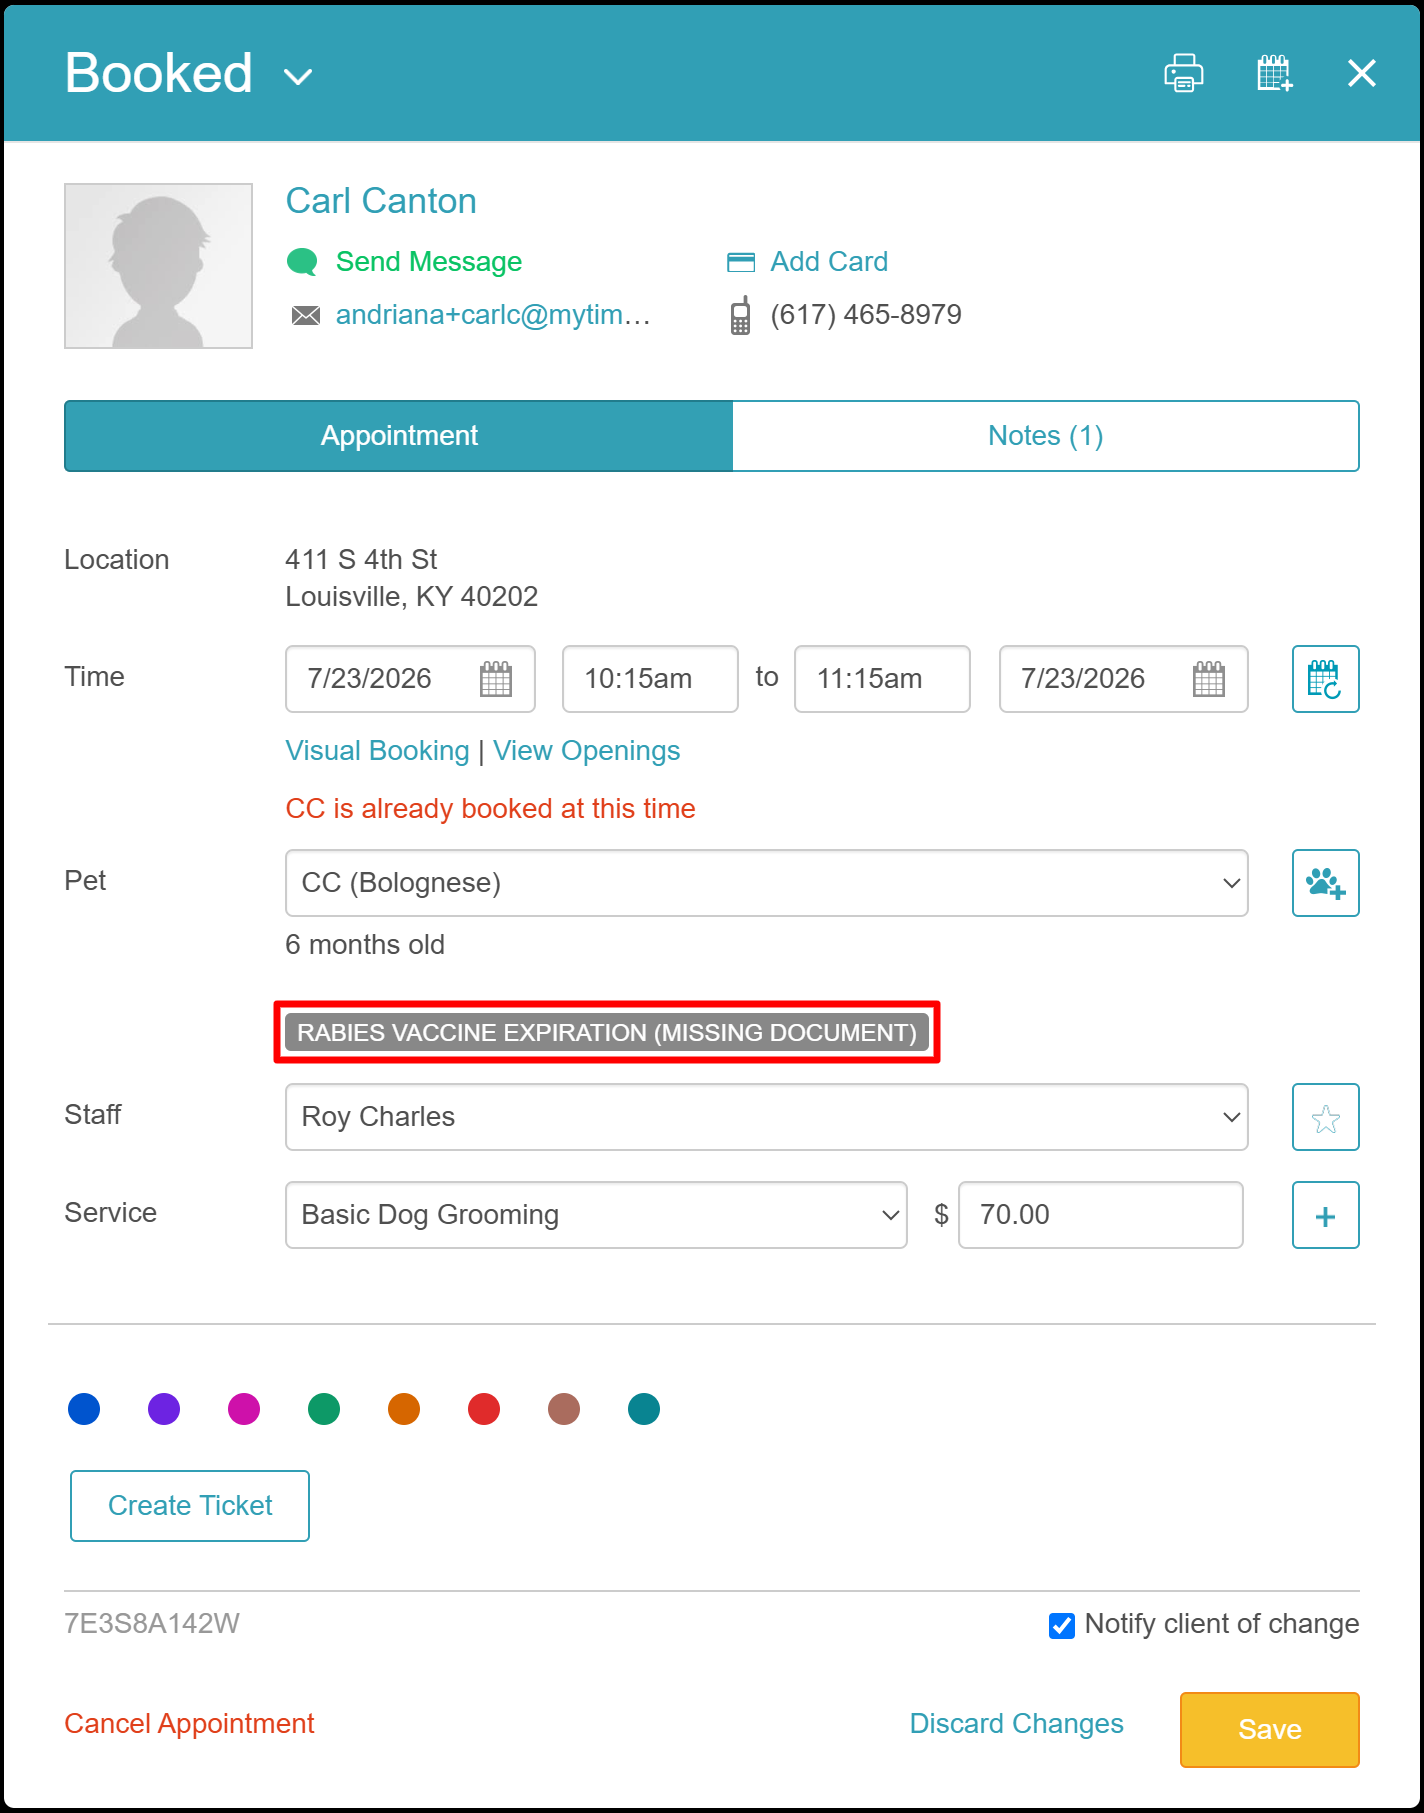
- A missing document always takes priority over date-based vaccination statuses. Even if a valid expiration date is logged in the system, the appointment will flag a missing document warning until the required file is uploaded.
- Appointment Tile: A gray icon displays directly on the appointment tile across Day, Week, and Agenda views if a pet is missing a required vaccination file.
- Appointment Modal Label: A gray warning label (e.g., [Rabies Vaccine Expiration (Missing Document)]) appears within the appointment modal.
- Both the schedule icon and modal label remain gray until the missing document is formally uploaded to the pet's profile.
- Only one tag can be visible at a time:
- If the expiration date is approaching but not yet passed, the orange "Expires Soon" tag appears.
- If the expiration date has passed, the red "Expired" tag is shown.
- Both tags will never display simultaneously.
- You can view a pet's exact vaccine expiration date directly from the appointment modal by hovering your mouse over any vaccine reminder tag (such as the orange Expiring Soon or red Expired flags). A tooltip will appear showing the exact date (e.g., Expires: 05/12/26), allowing you to quickly verify compliance.
- The expiration reminder field can be included as a question in the intake form if you want clients to enter this information when they book online, or you can manually fill out the field in each client/pet profile.
- You can collect and display attachments in the expiration reminder custom fields. This feature is commonly used to collect legal, medical, or vaccination records with an expiration date, providing support for the expiration
- To learn how to configure automated expiration reminder notifications, see here
Contents:
- Create Expiration Reminders
- Adding Expiration Reminders on Profiles
- Adding Expiration Dates and Expiration Reminder Attachments on the Booking Widget
Create Expiration Reminders
To create expiration reminders:
- Navigate to the Clients tab
- Select Manage Clients
- Select Customize Client Fields

The following screen will appear, showing Default Fields and Custom Fields. Default Fields are either automatically collected upon booking (such as name and contact information) or are available as options to add to your intake form (such as date of birth and gender).

You can add expiration reminders to any field category: client fields, family member fields (for family businesses), pet fields (for pet businesses), or automotive fields (for automotive businesses). For example, you would enter a pet vaccination expiration under "Custom Pet Fields."
At the bottom of the section:
- Click Add Field
- Click the dropdown in the 'Field Type' section and select Expiration Reminder
- Next, complete the field options :
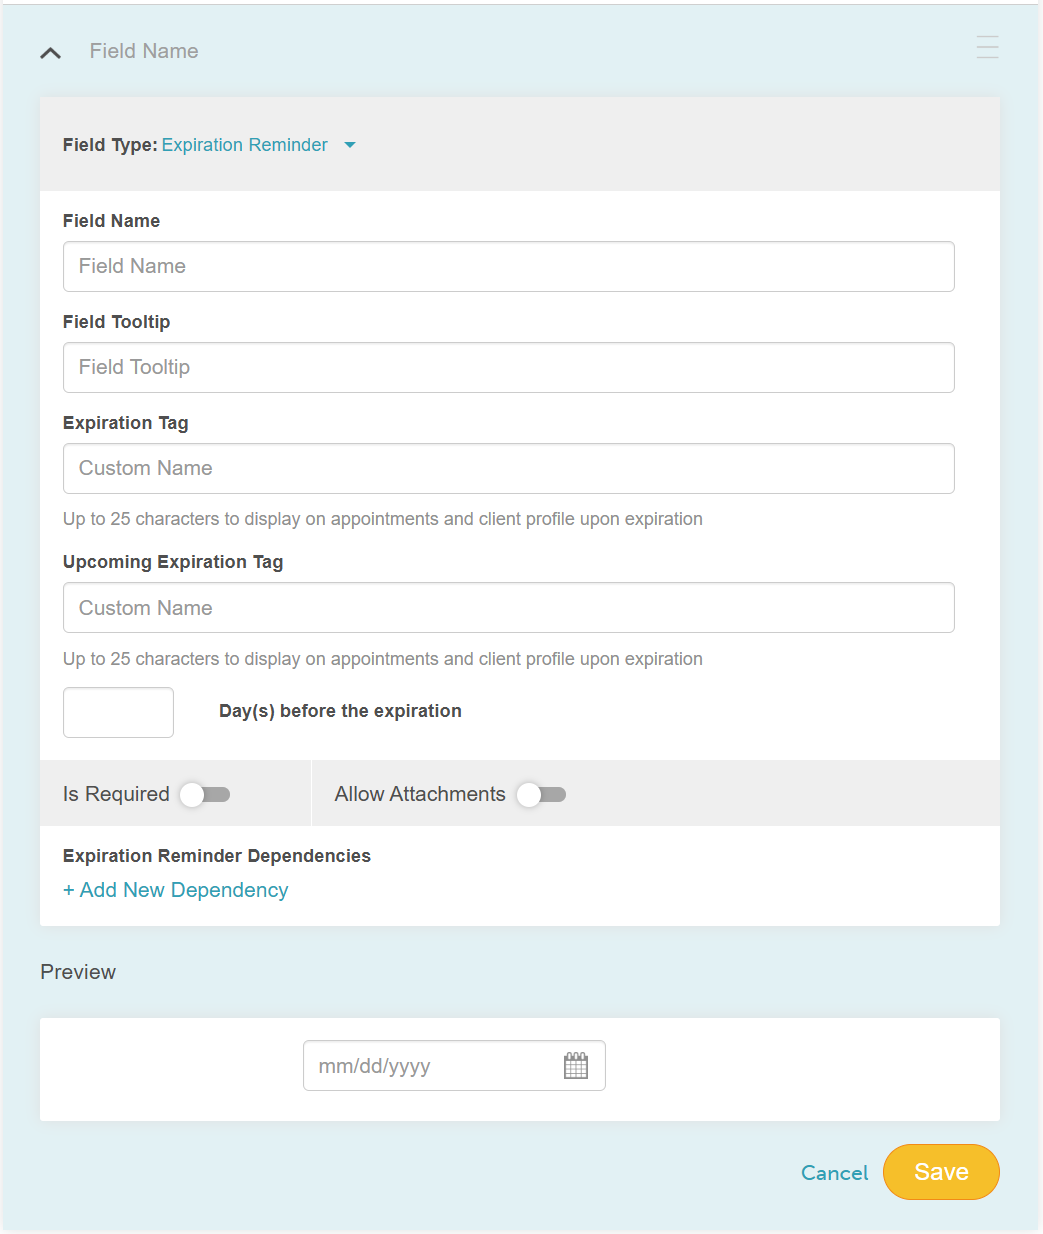
- Field Name: The title of the field. The client entering the expiration date will see the field name and respond with the date.
- Field Tooltip: This is the additional information about the field seen when in hover mode. This is optional
- Expiration Tag: This label appears on the client, family member, or pet profile, as well as in the appointment modal, once the expiration date has passed. It is visible to staff only—clients will not see the expiration tag.
- Upcoming Expiration Tag: This label appears on the client, family member, or pet profile, and in the appointment modal, a set number of days before the expiration date, based on your configuration. It is visible to staff only—clients will not see the upcoming expiration tag.
- X Day(s) before the expiration: Enter the number of days prior to the expiration date when the Upcoming Expiration tag should appear. This helps ensure staff are alerted in advance and can take timely action.
- Is Required: You can decide whether this field should be mandatory or not by toggling the button. Enabling "Is Required" will add an asterisk (*) to the field, indicating it as a required entry. You won't be able to save any forms unless a date is provided in this field.
- Allow Attachment: You can decide if you want your clients to be able to attach documents when entering the expiration date. When toggled on, two additional options will be exposed:
- Display expiration tag if no date is set: When checked, the expiration tag configured above will be displayed if there is no date entered
- Hide Input: When checked, the custom field input will be hidden, and only the file uploader will be visible.
- Require file attachments: When checked, your clients will not be able to save any date entered without adding an attachment
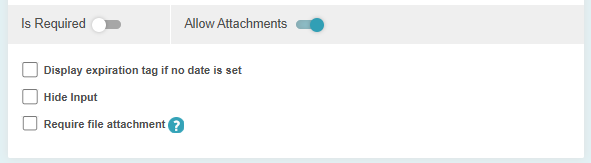
- Expiration Reminder Dependencies: Here you can set rules that change the behavior of a custom field based on the state of a "Source" field. You can trigger an action when the source field meets one of the following criteria:
- Has Value: The action triggers if the source field contains any data (it is not blank).
- Is Empty: The action triggers if the source field is left blank.
- Equals: The action triggers only if the source field exactly matches a specific value you define.
- Once the condition is met, the dependent field responds in one of two ways:
- Disable: The field remains visible on the screen but is "grayed out" and cannot be edited.
- Hide: The field is completely removed from view and only reappears if the condition changes.
- Example Scenario:
- Source Field: A dropdown field labeled "Pet Type."
- Condition: Equals "Cat."
- Action: Hide the "Bordetella Vac Expiration" field.

You can preview the field name and expiration label at the bottom. When you are finished editing, click Save

Adding Expiration Reminders on Profiles
To add the expiration reminder date from the client/pet/family member profile:
- Select Clients tab
- Select a client's name to open the client profile
- Click the edit icon in the client section (for client fields) or in the pet section (for pet fields)
- A popup will appear with all the pet's details and the custom pet fields. Enter the expiration date and an attachment if required

- Click save

Pet Profile: The expiration date will now be displayed in the profile. When the expiration date has passed, a red label will appear beneath the expiration date in the pet profile.

If the expiration date is still in the future and falls within the specified period for displaying the upcoming expiration tag, the profile will show the tag in orange to draw attention that action is needed soon.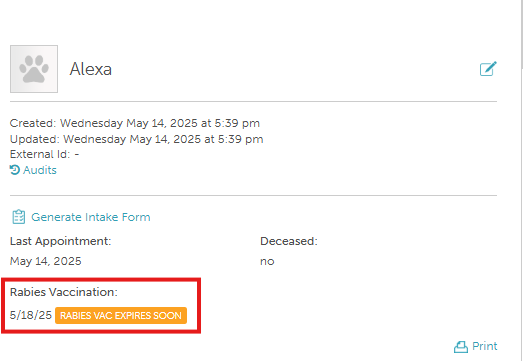
Appointment Modal:
The red expiration tag will also appear on any appointments scheduled after the expiration date.

The orange tag will appear on any appointments scheduled within the specified period for showing the upcoming expiration tag. 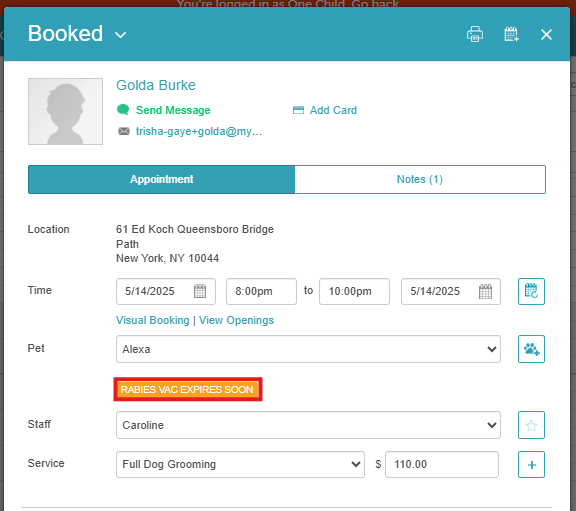
The gray label tag will appear on appointments if the required document is missing from the pet profile
Adding Expiration Dates and Expiration Reminder Attachments on the Booking Widget
Your clients would:
- Navigate to your booking page using the booking URL or book button on your website
- Select the desired location (if the account has multiple locations)
- Clients can sign in if they already have an account with the "Sign In" link, sign in using their Facebook or Apple accounts, or create a new account.
- Select their pet, the desired service, and add on service (if necessary)
- Click "Select Time" to proceed to the date and time picker. Choose a date and time and staff (if they are interested in seeing a specific staff)
- On the checkout page, clients can complete the expiration reminder fields in the intake form
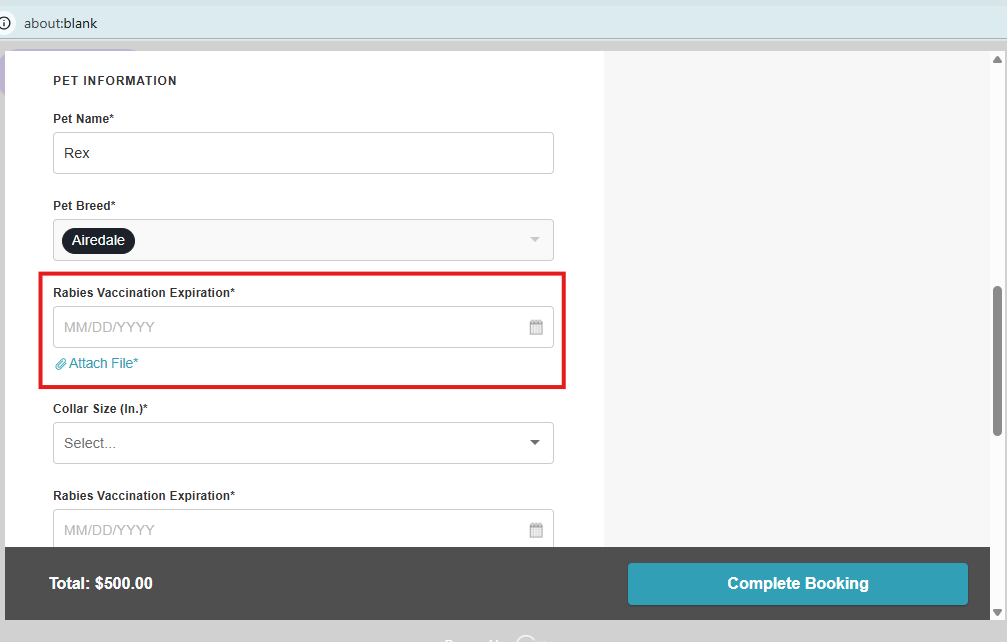
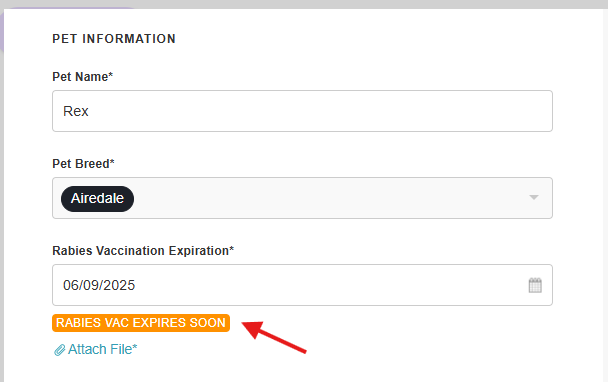
- Click the field to pick a date, and the corresponding expiration or upcoming expiration tag will be displayed based on your selection.
- The expiration tag will appear if the expiration date has already passed.
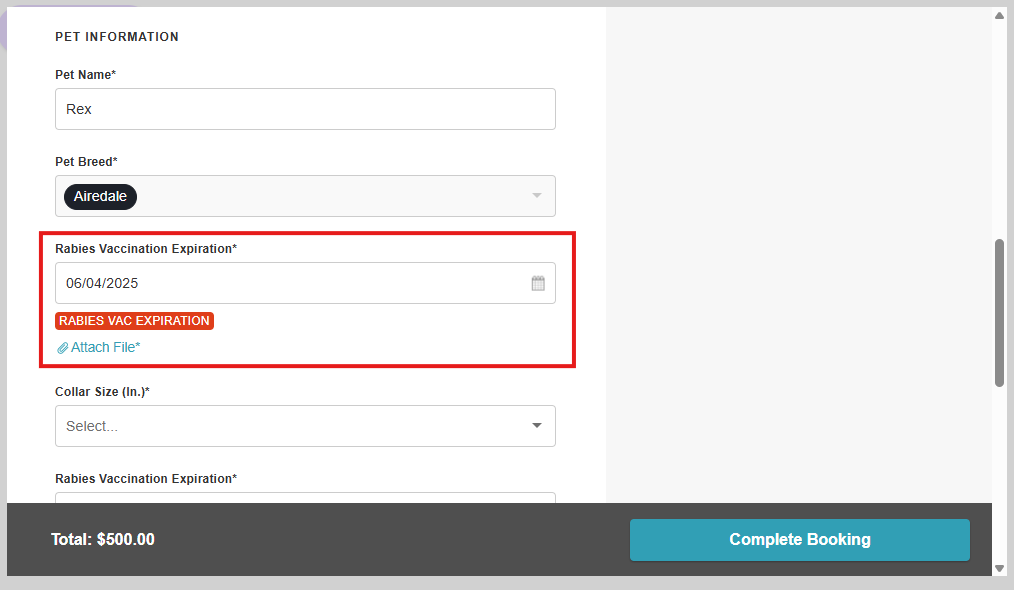
- The upcoming expiration tag will appear if the expiration date is still upcoming and falls within the specified period for displaying the upcoming expiration warning.
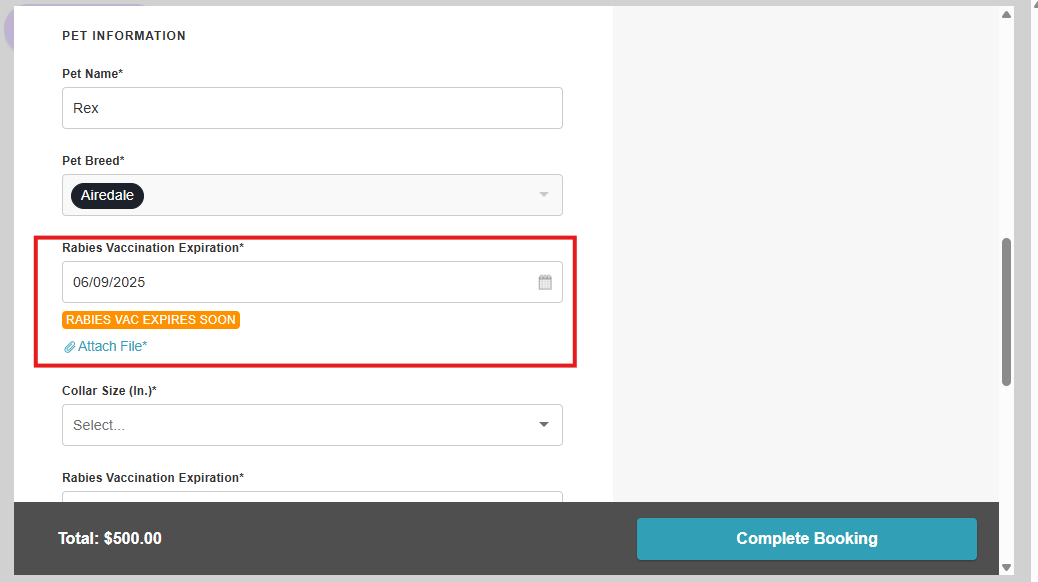
- The expiration tag will appear if the expiration date has already passed.
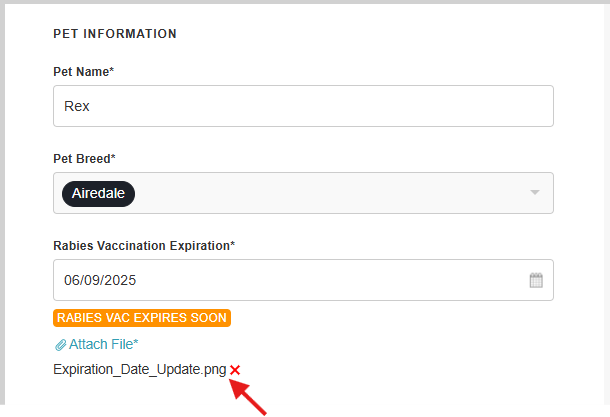
- Click the 'Attach File' link to add the vaccination record in the form of images or document
- Choose the file from your computer file > Click Open
- Once added, the file attached will be visible below the expiration date
- Add card details (if applicable) then complete the booking

For more information, contact us at support@mytime.com.
Related Articles:
Was this article helpful?
That’s Great!
Thank you for your feedback
Sorry! We couldn't be helpful
Thank you for your feedback
Feedback sent
We appreciate your effort and will try to fix the article