In MyTime, a purchase order (PO) is used to request and track the products you order from suppliers, while also keeping your inventory updated. It acts as both a request to the vendor and a way to manage stock levels within the system.
Things to know:
- Permissions & Access Control:
- The ability to create purchase orders is governed by the "Manage Purchase Orders" access control setting.
- Access to POs strictly depends on vendor visibility. Roles with View, Receive, or Manage access to POs must also have at least View or Manage access to Vendors.
- PO access assigned to All Locations or Their Location(s) requires identical location access for Vendors.
- If a user's role blocks access to product quantities, prices, or costs, a dash (-) will appear in place of those values.
- General Constraints:
- Purchase order creation is not supported on the Mobile Scheduler App.
- If your account has more than 1,000 vendors, only the first 1,000 will appear in the vendor dropdown menu.
- All PO timestamps reflect the local time zone of the assigned business location (not the browser/user location).
- Draft Behavior:
- In MyTime, a Purchase Order (PO) is used to request and track products from suppliers while keeping your inventory updated. It acts as both an order request to the vendor and a tool for managing stock levels.
- Saving a draft displays a confirmation pop-up with the PO number and save status.
- Editing product Min and Max stock levels on a draft immediately updates those values on the main Inventory page.
- Drafts display current Quantity on Hand (Retail & Back Bar) and the target Max stock level used for reorder calculations.
- Post-Submission & Export:
- Once submitted, POs can be printed, emailed to the vendor, or exported as a CSV.
- Order-level discounts applied in Draft, Ordered, or Check-in stages will be reflected in the Purchase Order Reconciliation Report.
- Editing Submitted Purchase Orders
- Editable columns depend on whether the "Allow Updating Cost of PO After Submission" setting is enabled or disabled:
- When Setting is Enabled:
- Ordered Status: Cost and Shipping Fee
- Checked-In Status: Cost, Vendor Discount, Net Cost, Price, % Margin, Add to Retail, Add to Back Bar, Damaged/Defective, and Notes
- Completed Status: All cost-related columns are visible but read-only
- When Setting is Disabled:
- Ordered Status: Shipping Fee only
- Checked-In Status: Add to Retail, Add to Back Bar, Damaged/Defective, and Notes (Cost is read-only; other cost-related columns are hidden)
- Completed Status: All cost-related columns are visible but read-only
- Quantity Source Indicators & Tooltips
- An icon next to the Quantity Ordered field shows how a product's quantity was determined:
- Blue Icon: Quantity was entered manually.
- Orange Icon: Quantity was auto-generated by Max thresholds.
- Grey Icon: Quantity was auto-generated by Forecast tools.
- Note: Hovering over the icon displays a tooltip confirming its source. Manually editing an auto-generated quantity updates the icon to Blue. Restoring the exact generated number switches the icon back to its original state.
- Product Forecasting & Consumption Tools
- Icons next to each product help predict and evaluate inventory needs:
- Product Forecast Chart: Opens a trend analysis modal featuring:
- Training Data (Blue): Historical usage trends.
- Forecast Data (Orange): Predicted future demand.
- Controls: View by Day, Week, or Month, with pan/zoom tools and gap smoothing. (Note: Forecast data only displays for SKUs with active historical trends).
- Consumption History: Displays actual product usage over the past 30, 60, and 90 days (including zero-usage periods) to help distinguish low demand from out-of-stock scenarios.
- Fractional quantities can be added to purchase orders, allowing you to specify quantities using decimals instead of whole numbers. This feature is controlled by the "Enable Fractional Quantities" setting. When enabled, you can enter fractional quantities while the purchase order is in the draft or check-in status.
Contents
Creating Purchase Orders
To create a purchase order:
- Navigate to POS > Inventory
- Select Purchase Orders from the left panel
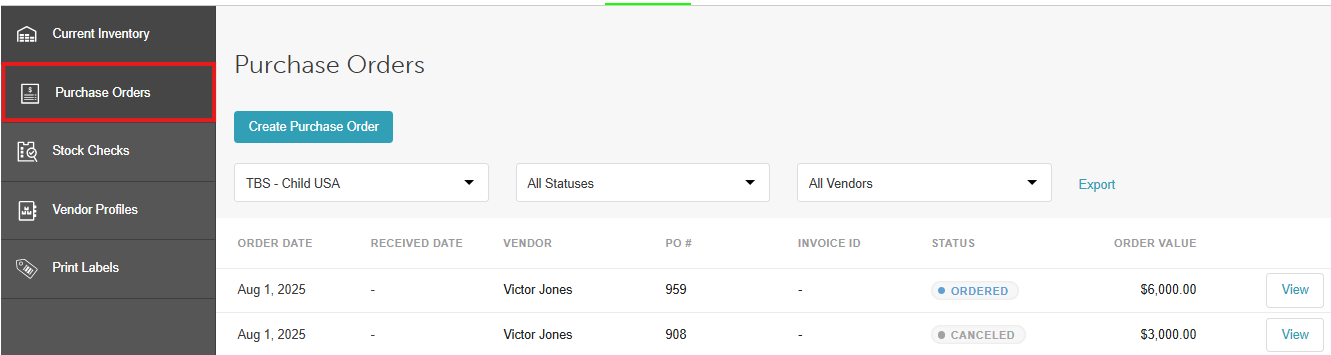
- Click the Create Purchase Order button in the upper right corner
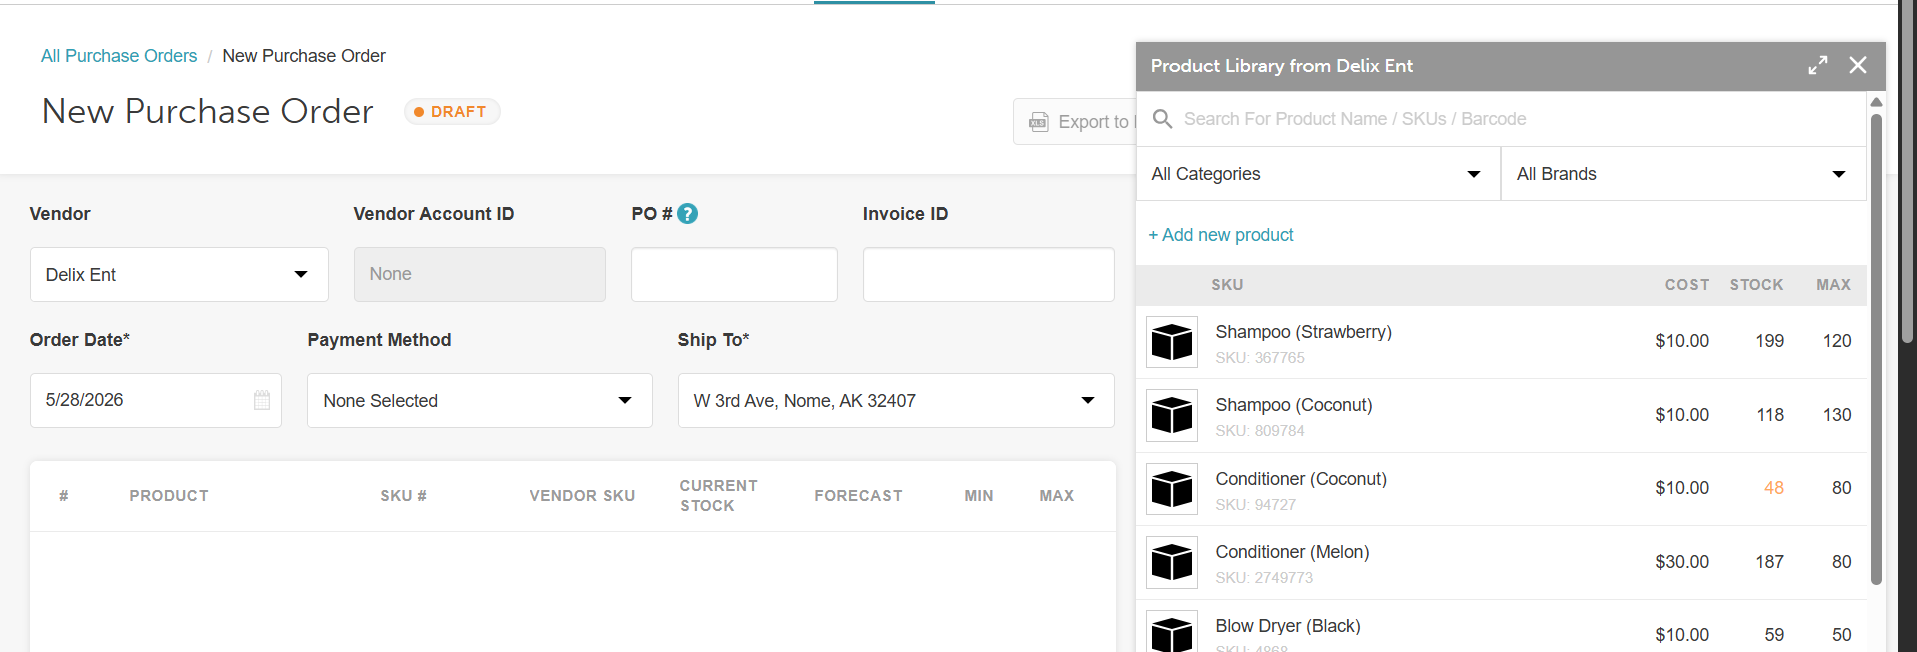
- Choose a supplier from the Vendor list, then select Next
- Add products to your purchase order
- Option 1: To add products, expand the product library at the bottom left of the page. Search for a product by using the product name, SKUs or barcode, then select the Product Name. (Important: If you choose Auto Generate PO after searching, it will override your search terms.)
- Option 2: Auto-Generate Purchase Orders - Automatically create draft purchase orders using one of the following methods:
- By Max Quantity: Compares the current stock levels to the maximum quantity set for each SKU at the selected location. A draft purchase order is generated to replenish stock up to the max quantity. Learn more here.
- By Forecast: Uses predictive analytics based on seasonality, business trends, and SKU popularity to estimate demand and generate a draft purchase order accordingly. Learn more here.
- Once the products are added, you can:
- View vendor details, including the vendor name and account number.
- Add a Purchase Order (PO) ID and Invoice ID.
- Select the order date (by default, it’s set to the current date, but you can change it to a past or future date).
- Choose the payment method if multiple options are configured.
- Select the location where the products will be delivered.
- Review all products in the purchase order, along with SKU numbers, vendor IDs, and current stock levels.
- Click the forecast chart or icon next to a product to view detailed data such as historical usage, predicted demand, and past consumption, helping staff make informed inventory decisions.
- Edit the minimum or maximum stock levels by clicking on the current value and entering a new one.
- Update the cost field to reflect the amount you will pay the vendor for the product.
- Adjust the quantity to specify how much you will order from the vendor.
- You can apply specific vendor discounts to each individual product within a purchase order. To do this, click the discount amount to open the Edit Vendor Discount modal. From there, you can enter the discount as either a percentage (%) or a fixed dollar amount ($). To save time when the same discount applies to the entire order, click Apply to All. This will automatically apply the discount to every product in the purchase order.
- View the subtotal of the purchase order before adding any shipping fees or discounts
- Add a shipping fee, representing the shipping cost charged by the vendor
- Add a discount to the purchase order total instead of to individual items
- See the overall total of the purchase order
- Add a note if needed
- Remove items from the purchase order by clicking the trash icon next to each product
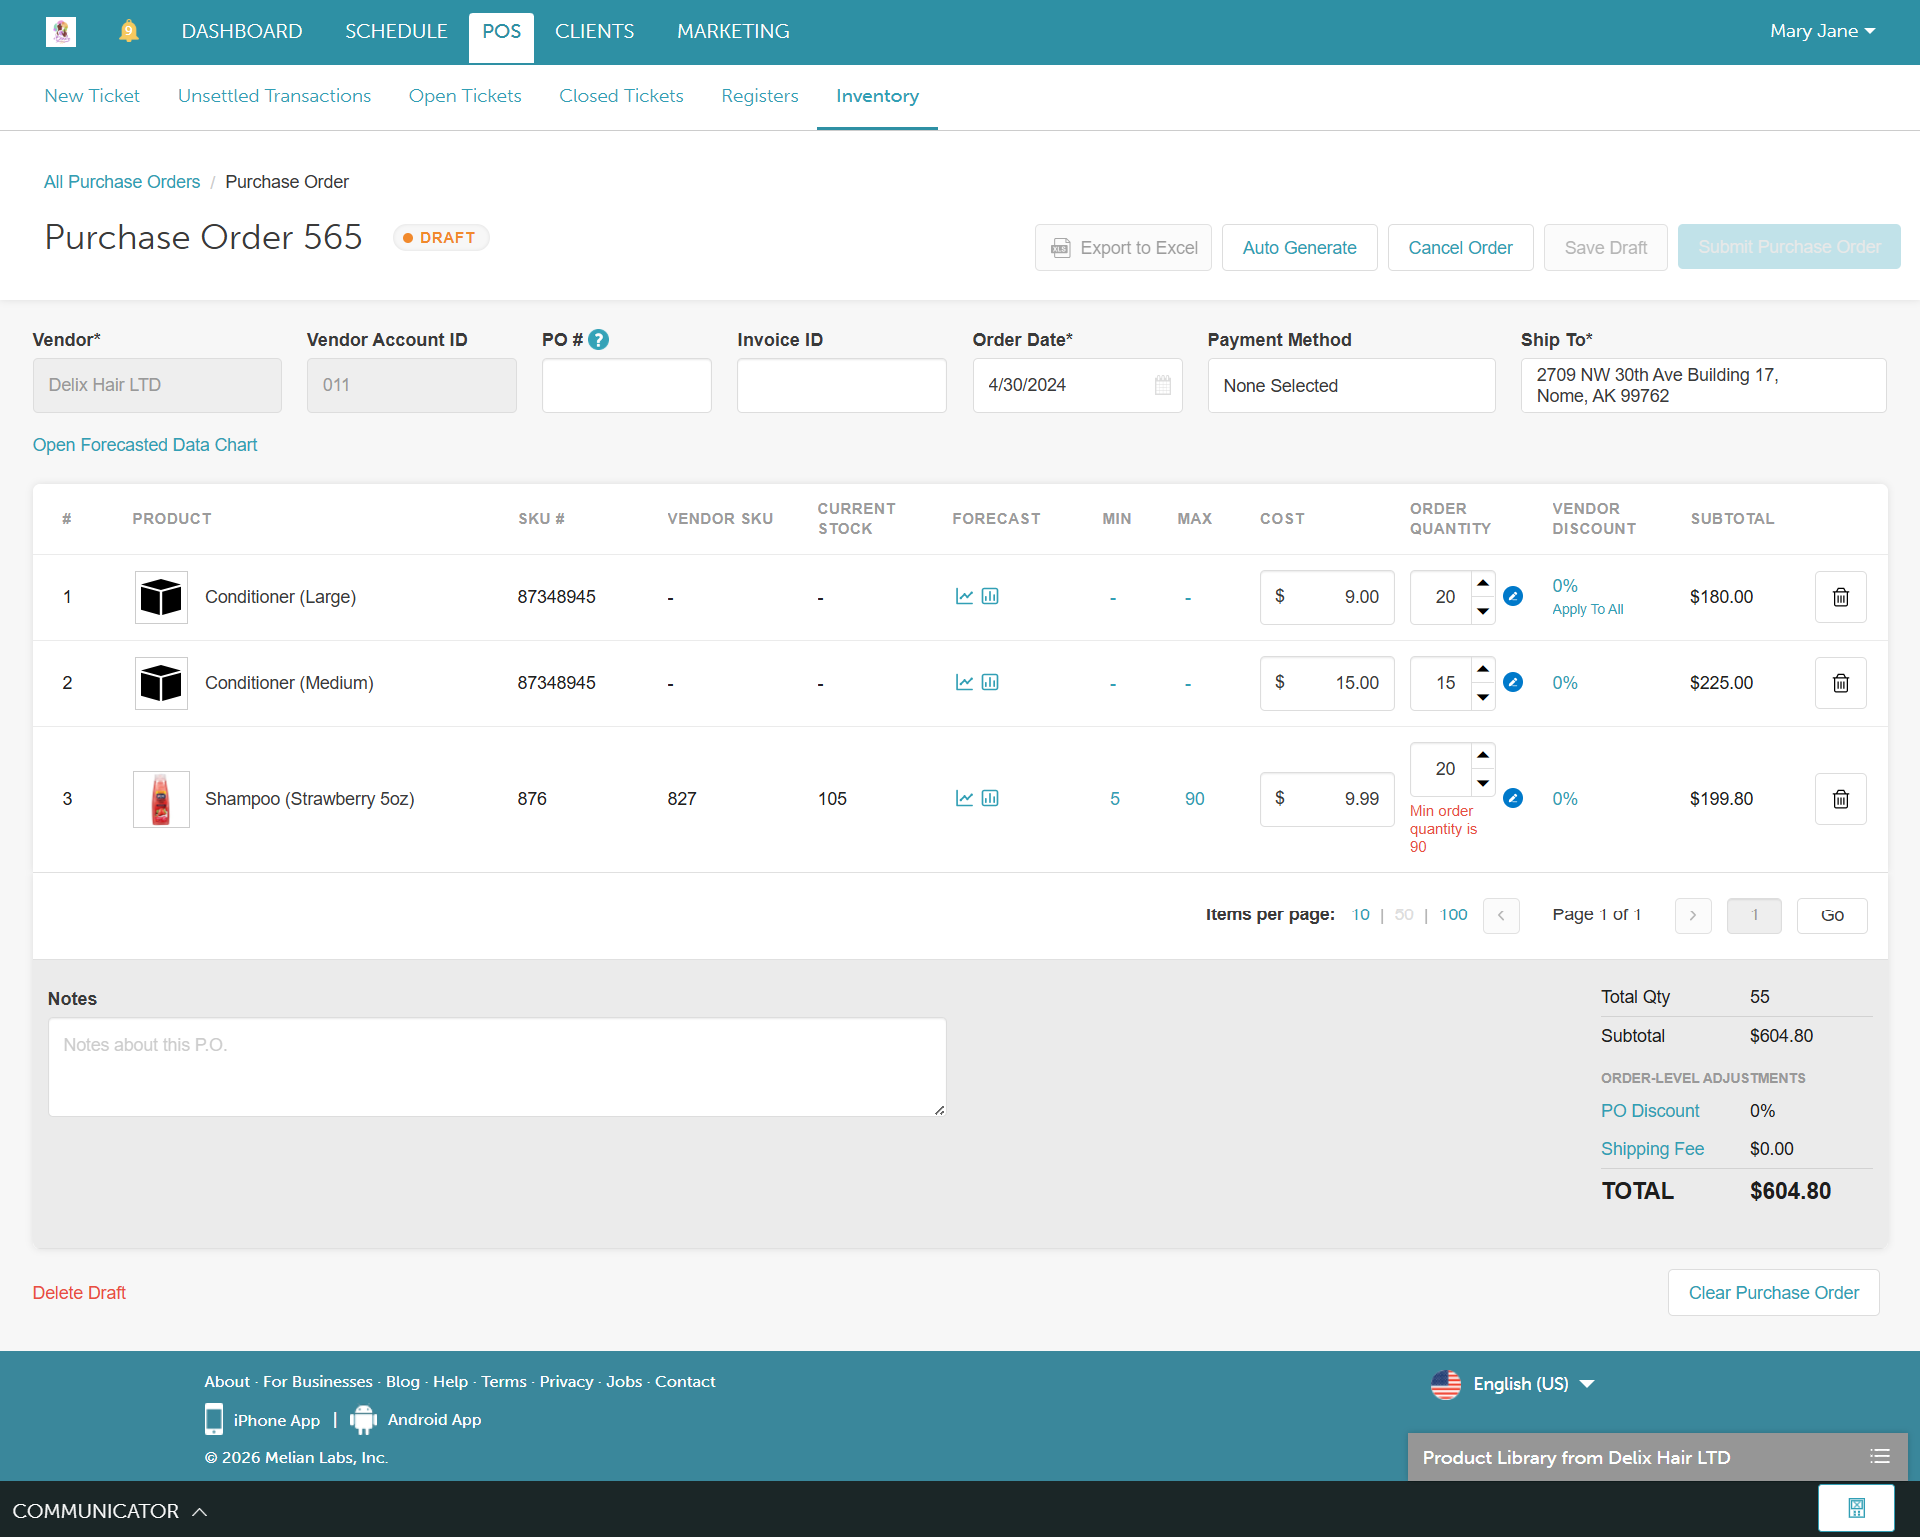
- You can submit the purchase order or save it as a draft

Once submitted, you can export it as an excel or a PDF, print it, or email the PO to the vendor.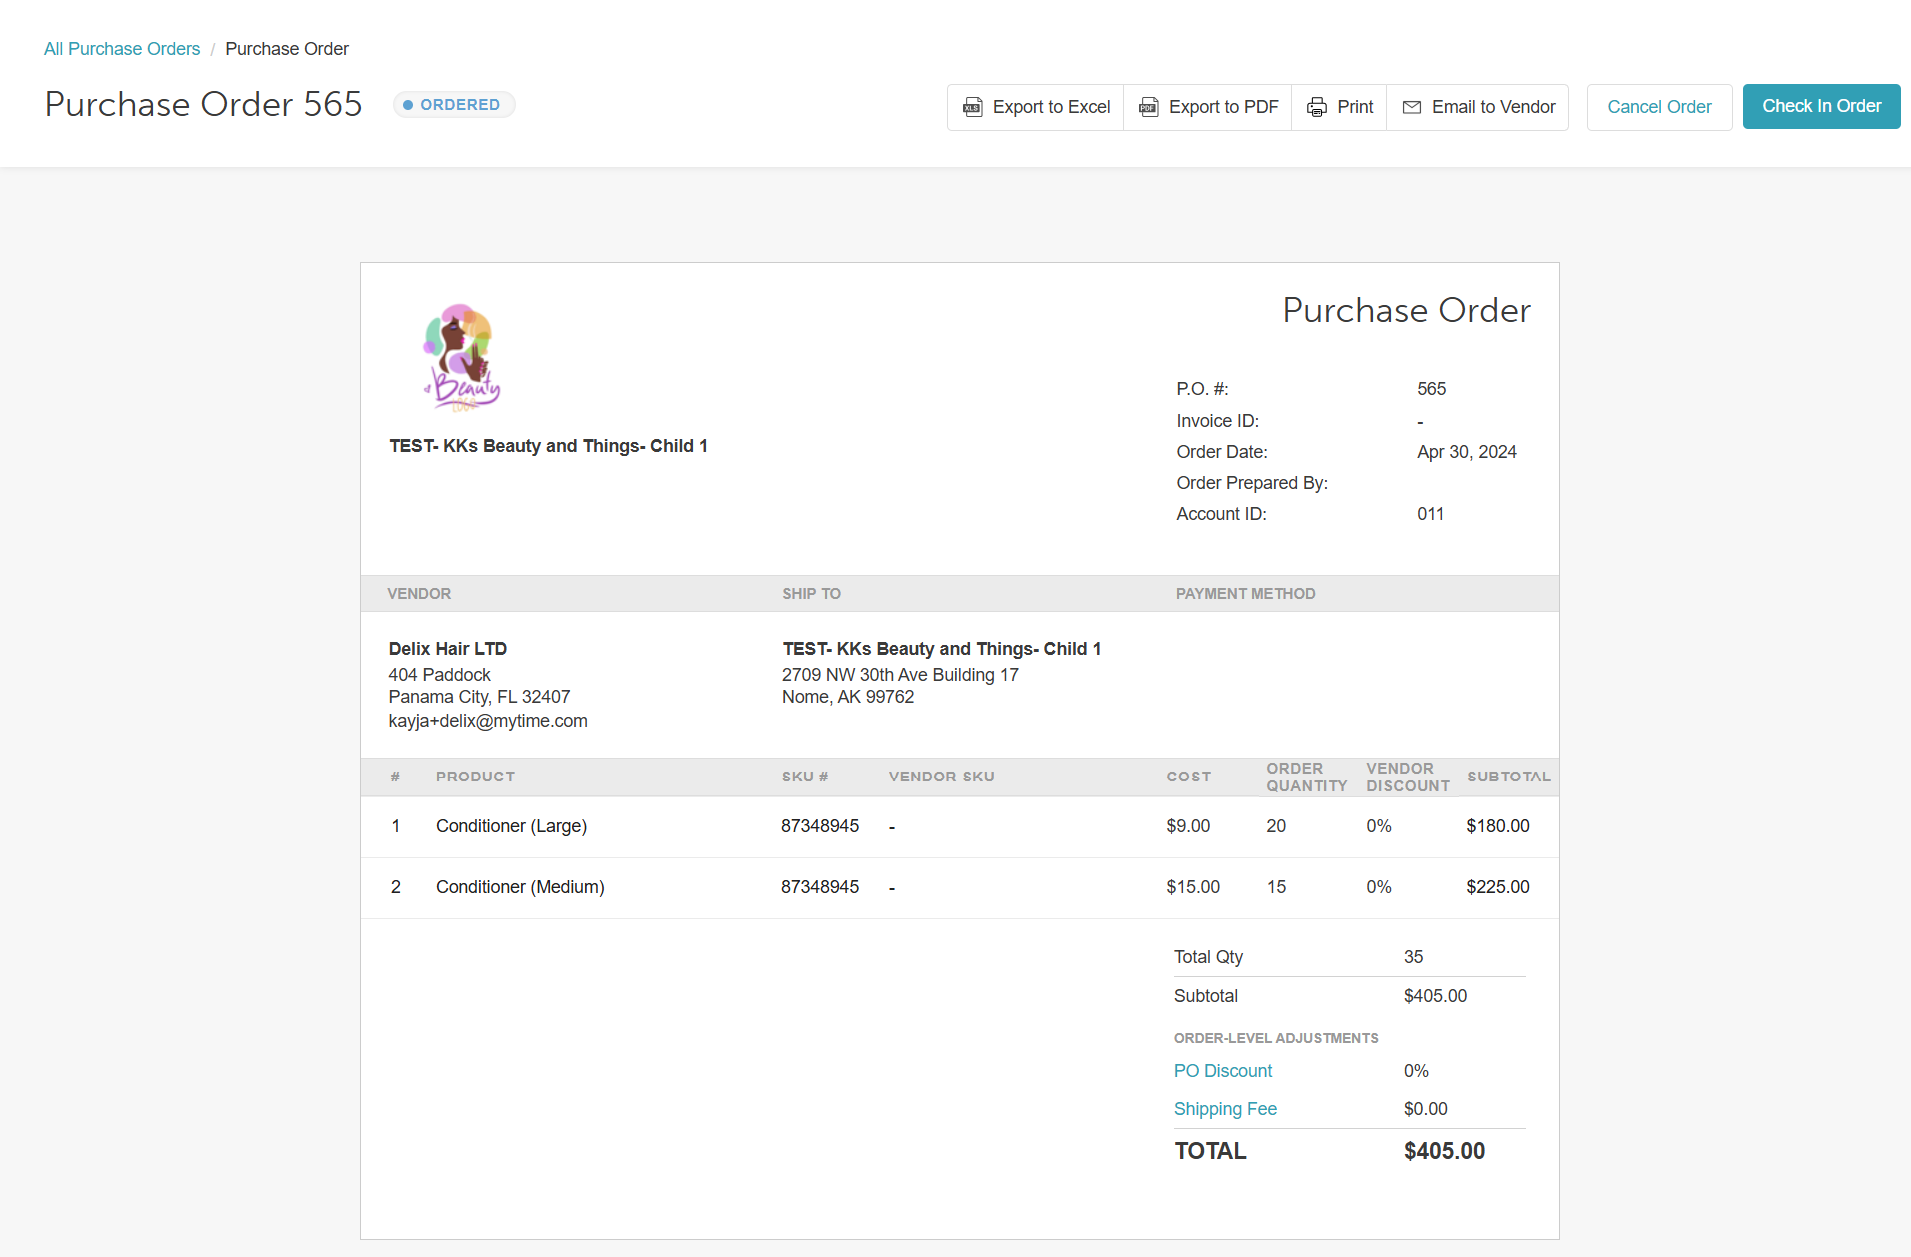
Creating New Products While Creating a Purchase Order
Things to know:
- You can add new products one at a time directly from the purchase order page by clicking the + Add new product link each time.
- The ability to create new products while creating a purchase order depends on two access control settings: Access to Inventory Details and Manage Purchase Orders.
- If Access to Inventory Details is set to View Only and Manage Purchase Orders is set to Manage, attempting to add a new product using the +Add New Product link will display a permission error.
- If Access to Inventory Details is set to Edit and Manage Purchase Orders is set to Manage, new products can be created successfully and will be added to both the purchase order and the inventory.
- When creating a purchase order, if a global vendor is selected, the option to add a new product will not be available.
- When you add a new product, the quantity ordered will default to 1, but you can adjust it to your desired amount.
To create a new product while creating a purchase order:
- Navigate to POS > Inventory.
- Select Purchase Orders from the left panel.
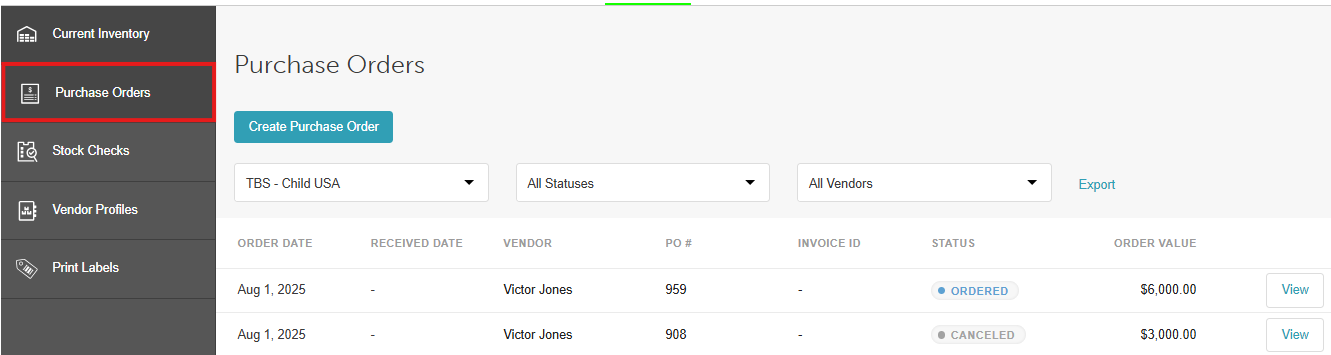
- Click the Create Purchase Order button in the upper right corner.
- Choose a supplier from the Vendor list, then click Next.
- In the product library, click the + Add New Product link.
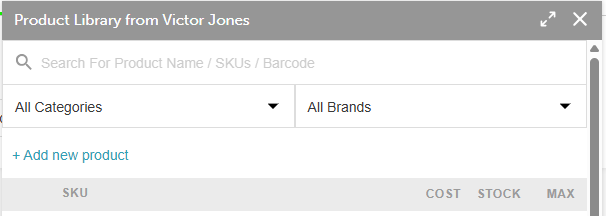
- The product modal will appear. Enter the product details as follows:
- Photo: Add an image of the product (optional).
- Product Name: Enter the product name associated with the SKU. This field is required.
- Category: Select the product category. This field is required.
- Brand: Specify the brand of the product.
- External ID (Product): A custom identifier to help identify products and assist with updates or data imports. This ID will also show in inventory exports.
- Active: Indicate whether this product can be ordered.
- Vendor: Automatically filled based on the vendor selected for the purchase order.
- Description: Add a text description, often provided by the manufacturer.
- Sell to Clients (And Apply Taxes): Specify if the product should be sold to customers via POS.
- Commission Eligible: Select Yes if employees earn commissions on selling this product; otherwise, select No.
- SKU Name: Name the specific SKU (including size, color, flavor, etc.).
- Manufacturer SKU #: The unique stock-keeping unit for this product version.
- Barcode: Enter the barcode number (UPC or EAN format) found below the barcode image.
- Vendor SKU: The SKU number assigned by the vendor, if different from the manufacturer SKU.
- Cost: The price paid to the vendor for the product.
- Retail: The price clients will pay for the product.
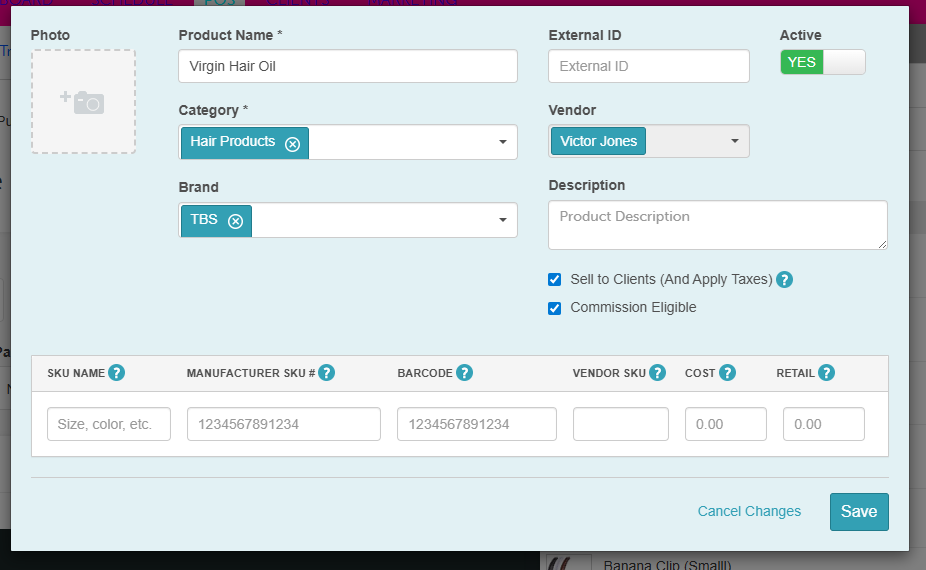
- After entering all product details, click Save.
The new product will be added to both the purchase order and the inventory. The order quantity defaults to 1, but you can adjust it as needed and update the product’s minimum and maximum stock levels.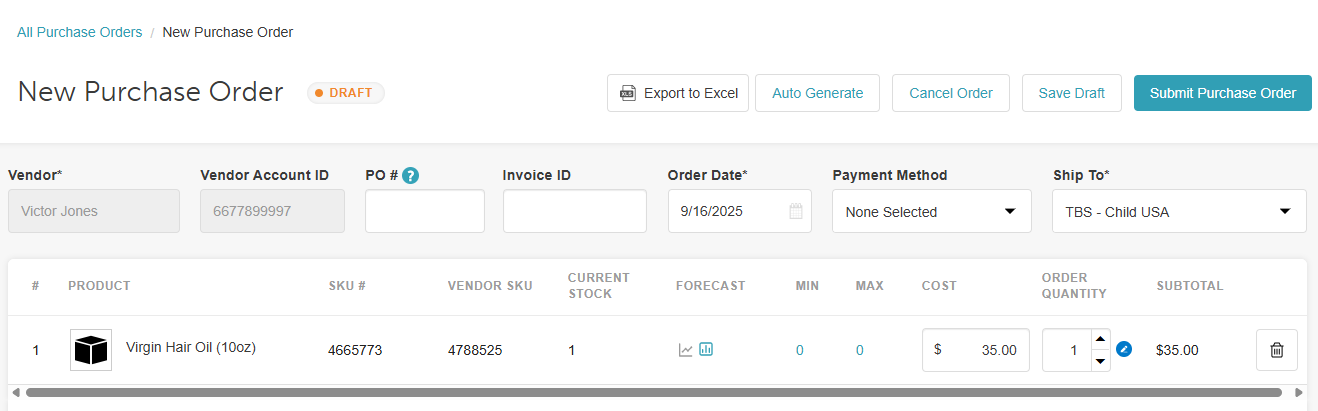
Related Articles:
Was this article helpful?
That’s Great!
Thank you for your feedback
Sorry! We couldn't be helpful
Thank you for your feedback
Feedback sent
We appreciate your effort and will try to fix the article