Clients can schedule appointments for multiple family members within a single online booking, making the process simple and efficient. They can choose the start time for each appointment, allowing services to begin simultaneously or at different times. Once the booking is confirmed, each appointment will appear individually on the schedule, and notifications will include details for all family members.
Things to Know:
- The ability to book appointments for multiple family members online is controlled by the "Allow Online Booking for Multiple Family Members or Pets" company setting.
- Online booking must be enabled for the client to utilize this feature.
- A staff member must be assigned to a service and work hours must be set
- A client must either sign in with their current MyTime account, Facebook, Google or Apple login, or create a new one.
- Clients can choose whether to include themselves in the booking. In the “Who is this appointment for?” section:
The “I'm booking for myself” option is selected by default
This option cannot be unchecked unless a family member is selected
Once a family member is selected, clients can choose to exclude themselves by unchecking the box
- When booking for multiple family members, each family member’s tab will appear in the order they were added.
- The same service cannot be selected multiple times within a single booking. If a client wants to book the same service for their family member multiple times, they must complete the first booking and then repeat the booking process to add additional instances of the service.
- For mobile businesses, services that are unavailable at the selected location are hidden in the online booking widget. When clients choose “In-Store,” any services offered only at the client’s location are not shown. Similarly, selecting “At Your Location, up to X mile(s)” hides services that are available only in-store.
- Each family member tab displays a checkmark when a service is selected and a circle when a service is still required.
- After selecting a service for the first family member and choosing the "Next Family Member" option, clients will be redirected to the second family member tab. The system will automatically scroll to the top of the service list, allowing them to view all available services for selection.
- The 'Select Time' button remains disabled until a service is selected for all family members. Hovering over the button will display a specific reminder: 'Please select a service for: [Family Member Name].
- If the Multi-Staff Appointments setting is enabled, clients will see a checkbox labeled Use same start time on the Pick a Time page. This allows scheduling all appointments to start simultaneously, if desired.
- No Preference option on booking widget:
- When a client books an appointment online and selects the "No Preference" option, the system uses a round-robin mechanism to assign a staff member to the service. Learn more here.
- If the "Can customers book a specific staff member?" setting is disabled, the "Book With" section will be hidden. In this case, appointments will be booked as if "No Preference" was selected, meaning the round-robin assignment will apply.
- If a client selects a specific staff member, only the services that can be performed by that staff member will be visible.
- If an appointment is booked with the staff option set to “No Preference,” the client-facing view will continue to display “No Preference” on both the appointment confirmation screen (after refresh) and the My Account > Bookings page even if a staff member is assigned later.
- If a specific staff member is selected during booking, any changes to the assigned staff will be reflected in the client-facing view on both the appointment confirmation screen (after refresh) and the My Account > Bookings page.
- Booking Appointments with Add-On Services
- Accounts with Multi-Staff Appointments Feature Enabled:
- If a staff member is selected for the core service and "No Preference" is chosen for the add-on, the same staff member will be assigned to both.
- If "No Preference" is selected for both the core service and add-on, the system will assign the same staff member to both service. However, if the assigned staff member is not eligible to perform the add-on service, a different staff member will be assigned to the add-on.
- When booking a core service with one or more add-ons online, if the “Enforce Same Staff and Resource for Add-Ons and Service” setting is enabled, both the core service and all add-ons must be assigned to the same staff member and resource.
- If there is any mismatch in staff or resource assignments between the core service and the add-ons, the system will block availability and prevent the booking from being scheduled.
- If a core service does not have a resource assigned, it will conflict with add-ons that require a specific resource (e.g., a room), resulting in no available time slots.
- Similarly, if the staff assigned to the core service is not assigned to the add-on, the booking will not be allowed.
- Accounts with Multi-Staff Appointments Feature Disabled:
- If "No Preference" is selected, the system will automatically assign the same staff member to both the core service and the add-on.
- If the selected staff member cannot perform both the core service and the add-on, the option to select an add-on will not be visible.
- Accounts with Multi-Staff Appointments Feature Enabled:
- When booking an appointment online, the error message "Time is no longer available" may appear if any of the following conditions apply:
- There is a scheduling conflict with another appointment booked at the same time
- The staff member’s available hours have changed, making the selected time unavailable
- The selected time slot is no longer available for the chosen staff member
- By default, selecting "Book Again" pre-fills appointment details from the client’s previous booking. This behavior can be disabled using a hidden setting managed by the MyTime team. To enable this setting, contact support@mytime.com.
- If “Can customers book a specific staff member?” is enabled and prefill is not disabled:
- If the previous appointment was booked with a specific staff member, the Book With field shows that staff member.
- If the previous appointment used No Preference, the system applies round-robin logic and displays No Preference.
- Examples:
- Last appointment with Staff B → Book With: Staff B
- Last appointment with No Preference → Book With: No Preference
- Behavior When Prefill Is Disabled: The "Book With" field always displays "No Preference," regardless of the previous booking.
- Clients who book appointments—whether for themselves, or family members, will receive a notification listing all services booked:
- Booked in-store: The Booked by Business notification is sent.
- Booked online: The Booked by Client notification is sent.
- If the setting "Accept online payments through MyTime?" is configured to either "Yes, require online payment to book online" or "Let clients choose whether to pay online or in person," and the client opts to pay online, the following will occur:
- When an appointment requiring a deposit is booked online, the client's card on file will be charged for the deposit, and a hold will be placed on the card for the remaining balance.
- If the hold amount cannot be charged successfully, the location manager will be notified that the pre-authorization attempt failed and will need to collect the remaining balance from the client at the time of the appointment.
- For businesses that require online payments but do not enforce a cancellation policy, clients can book $0 services—such as services covered by a package or membership, or services that are free—without needing to enter a credit card.
- When booking a service online that requires a deposit, clients can choose to pay a partial amount using a gift card or pay the full amount using any available method.
- Pay In Person
- If the gift card balance covers the full deposit: The client can enter their gift card code at checkout. The gift card will be applied to the deposit, and any remaining balance on the gift card can be used toward the service total when paying in-store. If needed, another payment method can be used to pay the remaining amount in person.
- If the gift card covers only part of the deposit: The system will apply the gift card for the available amount. The remaining portion of the deposit will be charged to the client’s credit card at checkout. The client can then pay any remaining service balance in person.
- Pay Online
- If the gift card covers the deposit and the remaining service balance: The entire amount will be paid using the gift card once it is applied at checkout.
- If the gift card covers only the deposit: The gift card will be applied to the deposit, and the credit card will be charged for the remaining service balance.
- If the gift card covers only part of the deposit: The system will apply the gift card to the portion it can cover. The client’s credit card will then be charged for the remainder of the deposit and any remaining service fees at checkout.
- This feature is controlled by the 'Enable Paying Deposit via Gift Card' setting, which can only be enabled by MyTime Support.
- On the checkout page, if an appointment does not require a prepayment or deposit but still requires a card for cancellation policies, the following message appears: "Card required to hold your appointment. No charge today." This ensures clients understand that their card is being held for policy compliance rather than an immediate payment.
- Clients can use the Cancel All Bookings button online to cancel all appointments within a multi-pet or multi-family member booking in a single step. If the cancellation occurs outside of the policy window, the system combines the applicable cancellation fees for each appointment into a single total charge. Processing one consolidated transaction—rather than multiple separate charges—helps prevent banks or credit card providers from flagging the payments as duplicate transactions. Example: If a client has three appointments booked and each carries a $20 late cancellation fee, the system will apply a single $60 charge instead of processing three separate $20 transactions. This reduces the likelihood of the charges being declined or flagged as duplicates by the payment processor.
- For family accounts with the loyalty program enabled, clients can use loyalty points to pay for appointments involving multiple family members.
When booking online for multiple family members, clients can select services that require a deposit. The deposit fee is charged per service. For example, if a client books the same service for two family members with a $30 deposit each, the total deposit charged will be $60.
When an appointment is booked for a family member online, a ticket is automatically created.
Clients can book $0 services without a credit card. However, a card will be required if you have a Cancellation Policy or if the "Store Client Credit Cards?" company setting is set to "Yes, and also require them to schedule appointments."
If the "Show Location Phone Number and Email When No Slots Are Available" setting is enabled, clients will see your location's phone number and email address when there is no availability for a specific date, allowing them to contact you directly.
You can configure your account to automatically attach a PDF receipt to a client's confirmation email whenever they pay a deposit online for an appointment booking. Once enabled, the receipt will be included in the Appointment Booked Online by Client template. This feature is controlled by a hidden setting, please contact the MyTime Support team to have it enabled.
- Multi-Family Member Booking Order: When booking for multiple family members in a single session, the system maintains the chronological order in which the family members were initially selected. This sequence remains consistent throughout the entire process, including scheduling, the checkout screen, and the final booking confirmation.
- Example: Imagine a client, Sarah, is booking grooming appointments for her three family members. She selects them in this specific order:
- Astro
- Bella
- Cooper
- Because of the system's chronological logic, the booking flow will first ask for Astro’s specific service details, followed by Bella, and finally Cooper. This ensures that the information collected matches the order Sarah expects to see at checkout.'
To schedule appointments for multiple family members, your clients should:
- Navigate to your business website or booking widget
- If your business has multiple sites, select their preferred location to ensure they are viewing the correct booking calendar
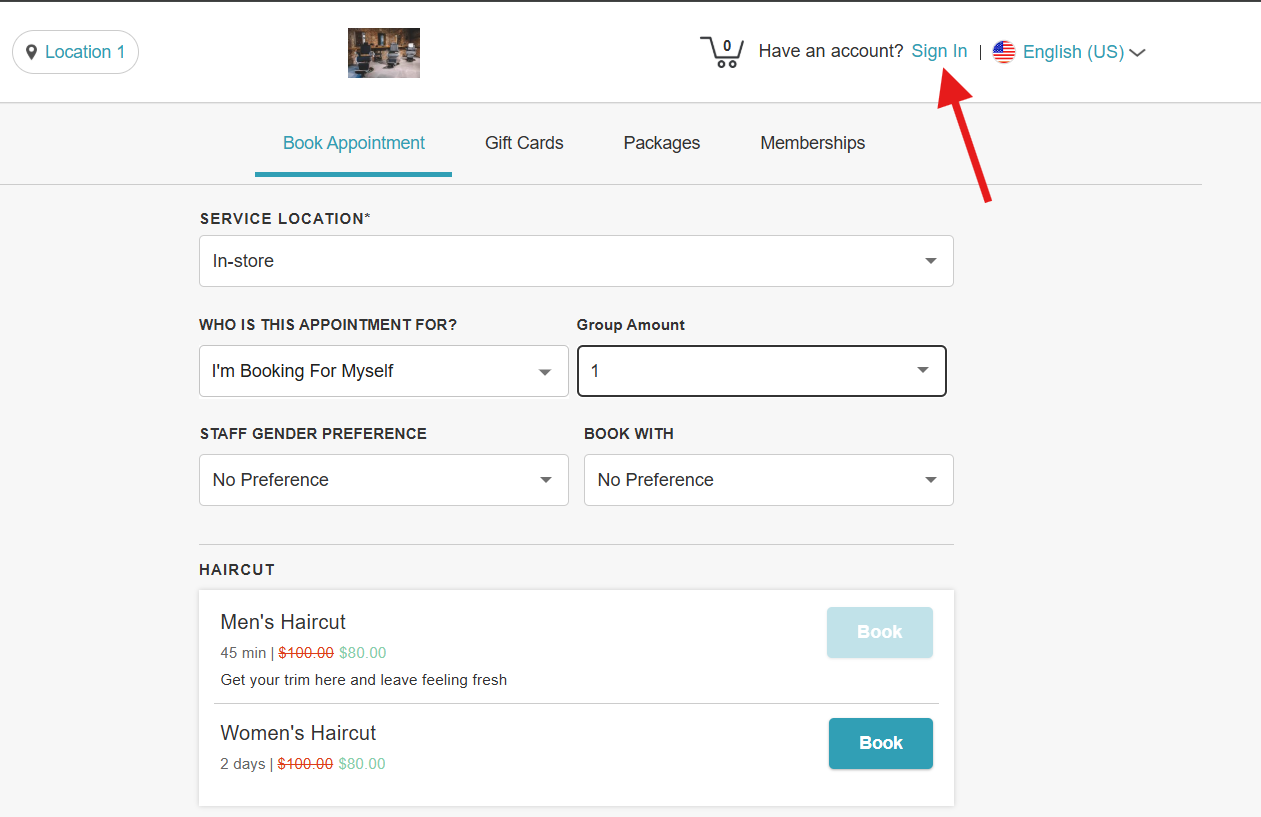
- Click the "Sign In" button at the top of the page
- Choose their login method:
- Standard: Enter their registered email address and password, then click 'Sign In'
- Social Login: Select 'Continue with Google,' 'Continue with Apple,' or 'Continue with Facebook' to use their existing social media credentials
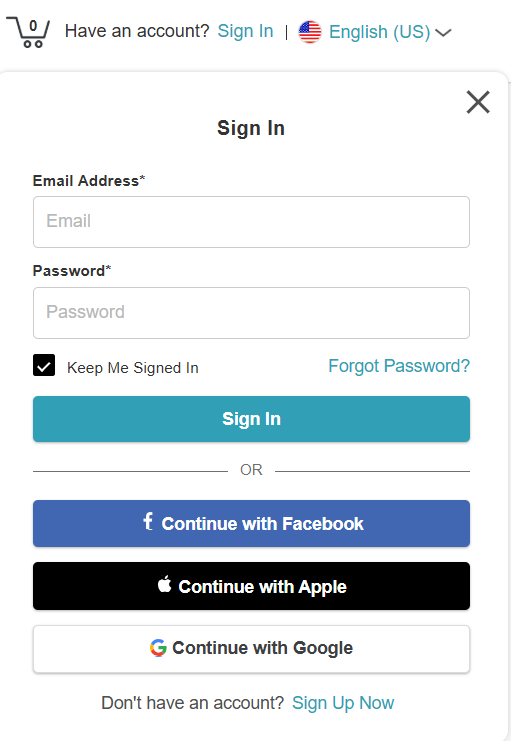
- Once their credentials or social accounts are authenticated, they will be instantly logged into the booking widget and can proceed with scheduling appointments.
- In the "Who is this appointment for?" section:
If family members are already linked, select the appropriate individual(s)
If there are no family members listed or only one, click "Add New Family" to include others

Tabs labeled with each family member’s name will appear below "Select Services For"

Choose a service for the first family member, then click "Next Family Member" to continue

- Repeat the process for each additional family member
- Once all services are selected, click "Select Time" button
- To schedule all appointments to start at the same time, check Use same start time (if available). Otherwise, click "Select" beside the desired time for the first family member, then repeat for each additional family member.

If the "Use same start time" checkbox is not selected, you can choose a specific service provider for each family member’s appointment.
- Click "Continue to Checkout" to proceed
- At checkout, clients can:
- Add notes or special requests.
- Enter payment details, if required
- Complete required intake forms for each family member (if applicable) by clicking the family member’s name in the Family Member Intake Form section.

- Click "Complete Booking" to finalize the appointment
The confirmation page will show the appointment details for each family member. Additionally, an appointment summary will display the total number of bookings, the names of the family members, the services and staff booked, and the total cost of all services.
Once the booking is confirmed, each appointment will appear individually on the schedule, and notifications will include details for all family members.
Email notification received
Appointment for each family member on the schedule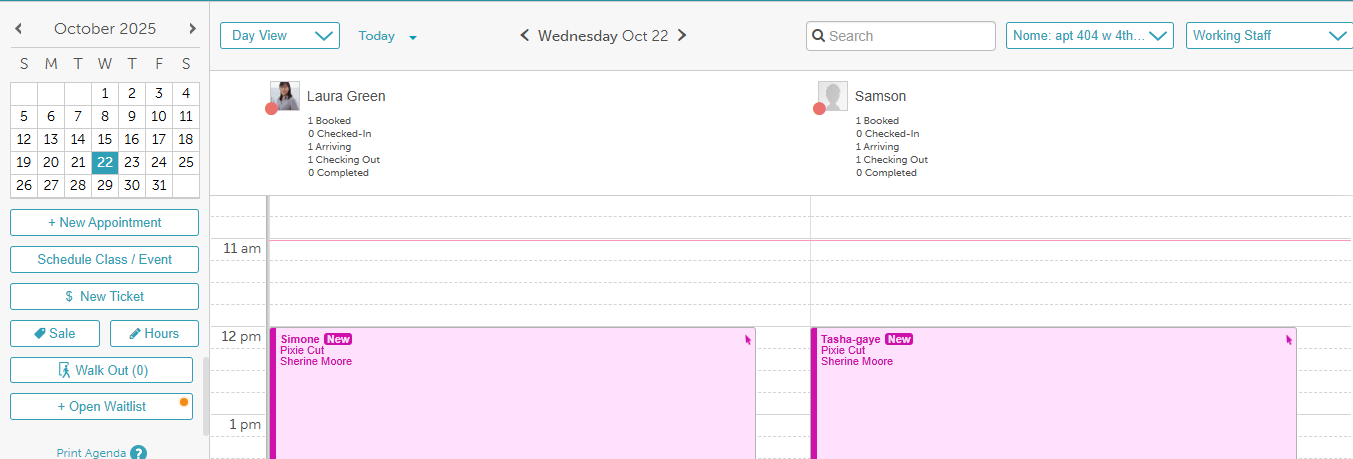
If you have any questions, please contact Customer Support at support@mytime.com.
Related Articles:
- Booking Appointments Online for a Single Family Membe
- Booking Appointments Online for a Single Family Member
- Scheduling Appointment for Family Members
- Booking Appointments Online for a Single Pet
- Booking Appointments for Multiple Pets Online
- Scheduling Appointment for Pets
- Scheduling Appointments for Pets
Was this article helpful?
That’s Great!
Thank you for your feedback
Sorry! We couldn't be helpful
Thank you for your feedback
Feedback sent
We appreciate your effort and will try to fix the article