Building a seamless booking experience means being available when your clients have questions. Adding a chat widget to your online booking flow can significantly reduce drop-off rates by providing real-time support right when a client is about to make a purchase. In this article, we will walk through how the MyTime chat widget works and how to set it up.
Things to know:
- The ability to configure the widget on your website is controlled by the “Accessing Website Tools” access setting.
- The chat widget is disabled by default. Once enabled, your express checkout page will update instantly; however, if you are using the standalone embed on your own website, you will need to re-embed the updated code snippet for the widget to appear.
- The widget is designed for maximum flexibility and can be implemented in several ways:
- Standalone Embed: Add the widget as a dedicated communication tool on any specific page of your website.
- Integrated Workflow: Incorporate the chat directly into your existing booking widget or express checkout flows to assist clients during the scheduling process.
- Lead vs. Client Profiles:
- Accounts with Lead Management: New profiles created via chat will appear in the Leads tab.
- Accounts without Lead Management: New profiles will be added directly to the Clients tab.
- Note: The system automatically checks for matching profiles to prevent duplicates.
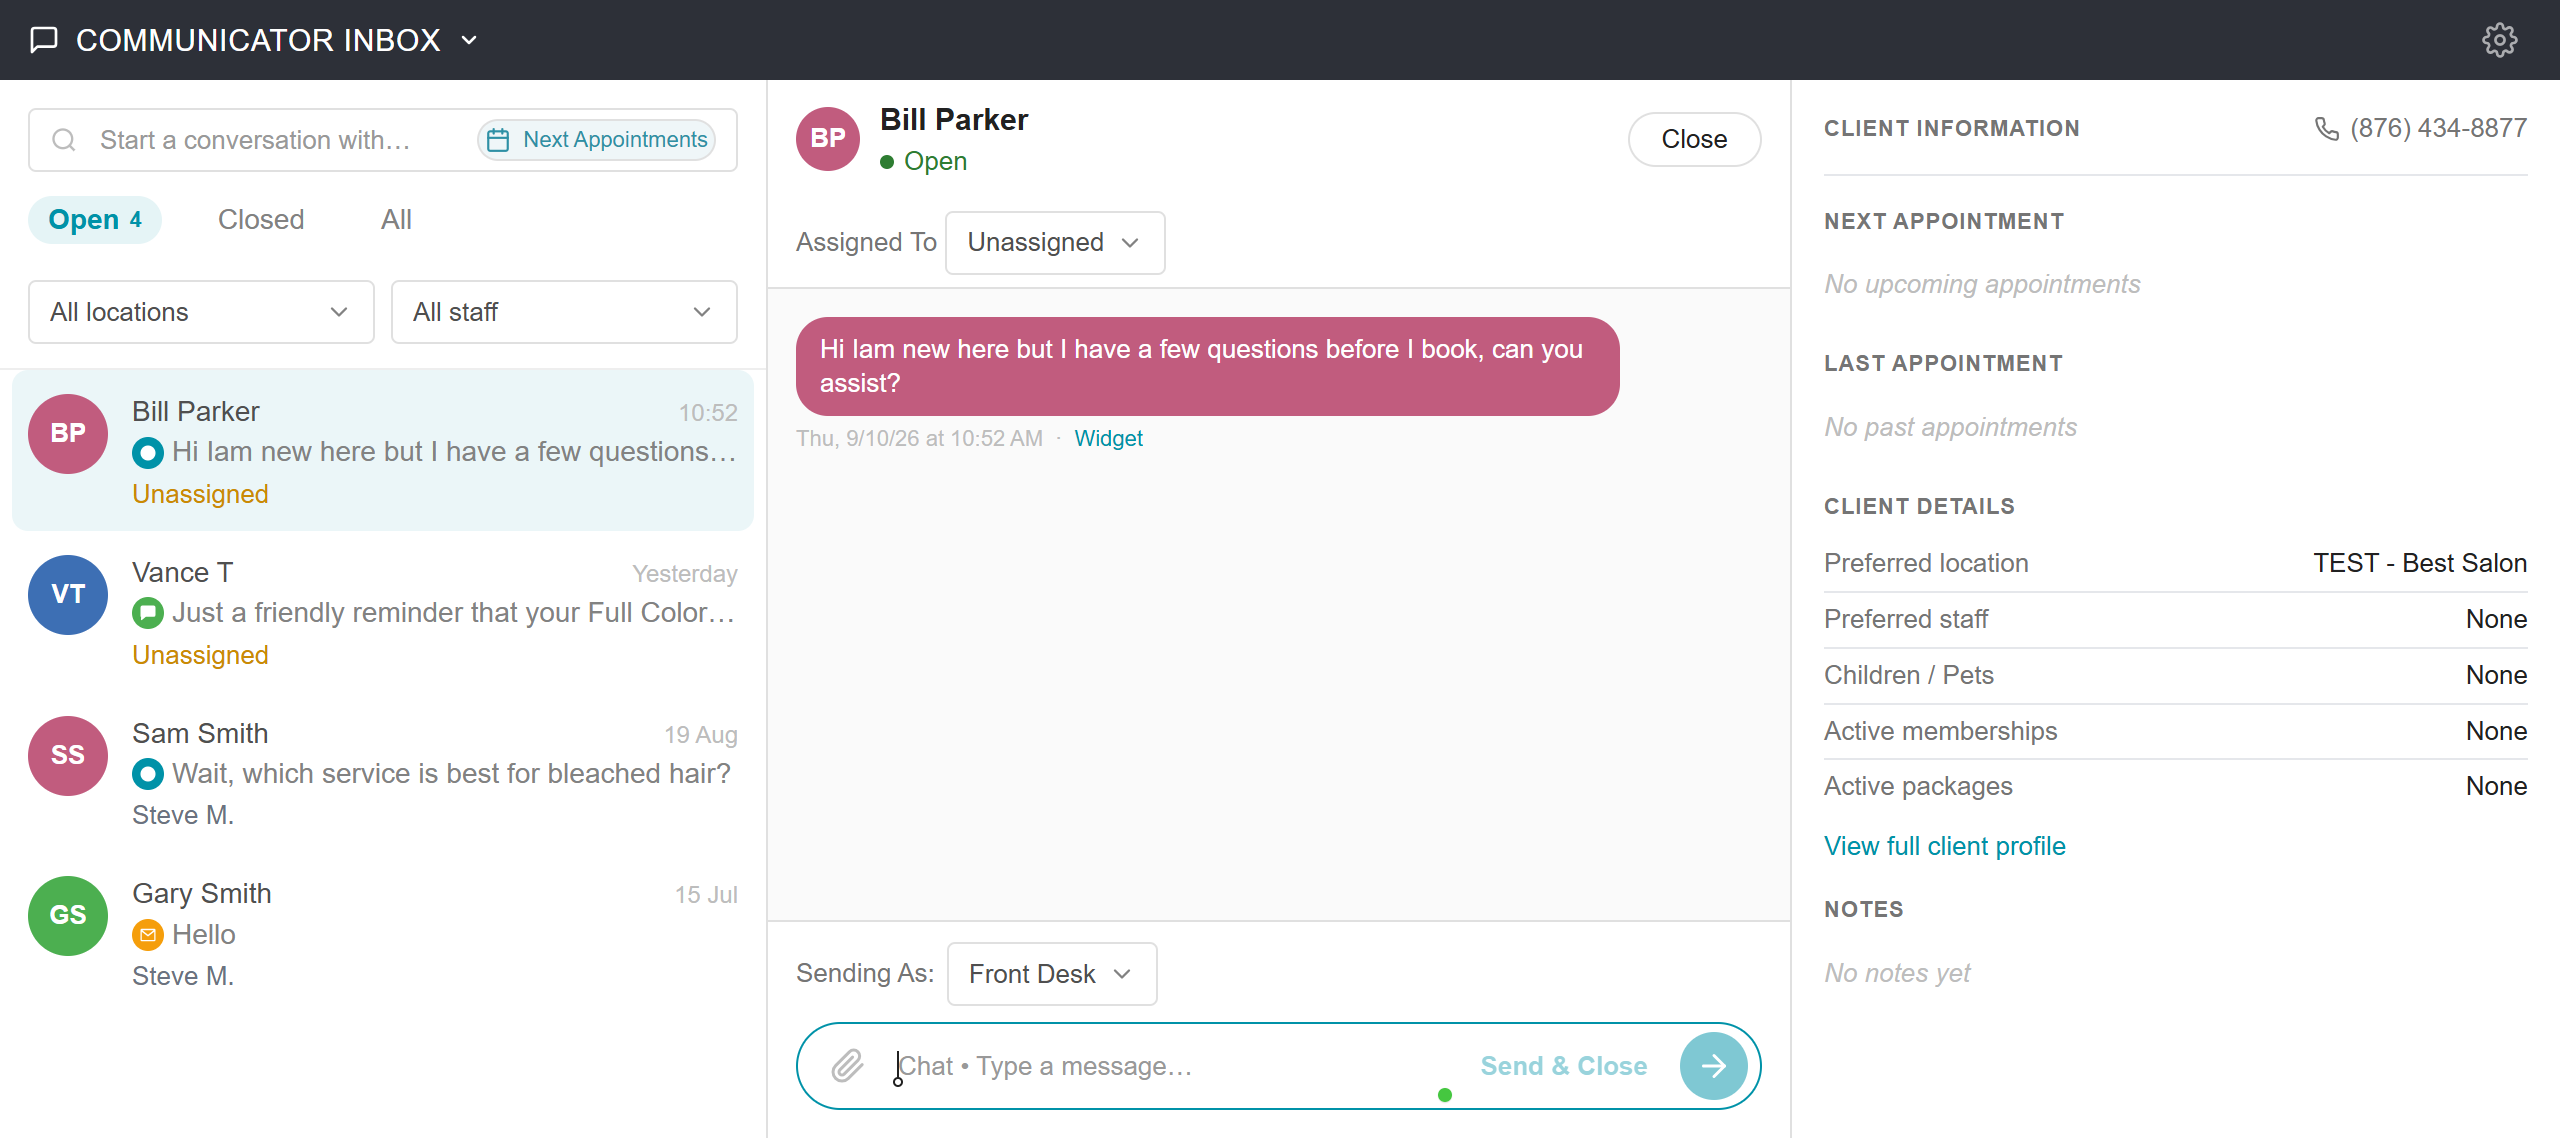
- Messages are stored in the Communicator and on the client / lead profile.
- Responses sent within the chat widget do not incur any fees. Charges only apply if a client has left the chat and your response is delivered via SMS or email. In such cases, the message will count toward your email or SMS usage.
- Inactive Chats:
- If a chat is left open without activity for more than 5 minutes, a timer will be displayed. The conversation will automatically close after 10 minutes of inactivity.
- If a user refreshes their browser or closes the page, the conversation will be closed immediately.
- In the event that the above mechanisms do not trigger and a conversation remains active, the system will automatically close the chat on the backend after 12 hours.
- Currently, the chat widget cannot be restricted to business hours. It is available 24/7, and any messages sent outside of business hours will appear in your Communicator the next time staff log in.
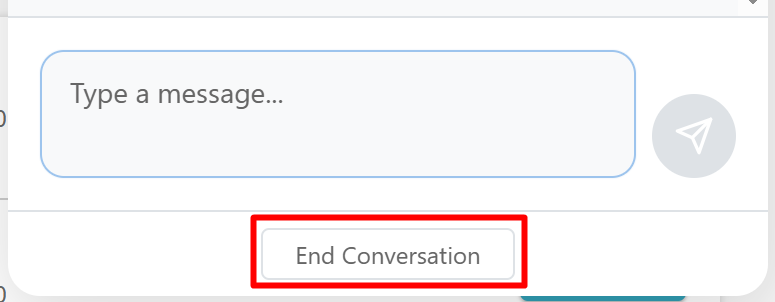
- Clients can click the "X" to minimize the widget at any time without ending the conversation, allowing them to continue browsing while keeping the chat active. To fully close a session, they can select the "End Conversation" option within the window.
- When a new client initiates a conversation through the chat widget, the system automatically creates a new client profile and links it to that specific business location. Staff members can browse, open, and review client profiles directly during live chat conversations without leaving the chat panel.
- Signing in through the chat widget is independent of the booking experience; it does not automatically sign the client into the booking widget or express checkout page. However, clients who are already logged into their booking account will be automatically signed into the chat for a seamless experience.
- Custom JS Snippets: MyTime generates a unique JavaScript (JS) snippet for each of your locations.
- Per-Location Control: Simply copy and paste the specific code onto the corresponding page of your website to activate the widget for that location.
- The status dot next to a staff member's name indicates whether they are currently working their scheduled shift:
- Green Dot ("Available now"): The staff member is currently on shift. Note: A staff member remains green throughout their shift even if they are fully booked for the day.
- Gray Dot ("Away"): The staff member is not currently working or is scheduled off.
- Time Off & Closures: One-off closures, vacations, or sick days immediately change a staff member's status to Gray ("Away"), overriding their standard working hours.
- Overnight Shifts: Shifts that cross midnight into the current day are automatically recognized, keeping the staff member’s status as Green ("Available now") for the entire duration of the shift.
- The setup option displayed in the top-right user menu depends on how you access the account and your assigned role:
- When navigating from the Parent Account (Location Management tab):
- Admin: Displays Business Setup when viewing the location account.
- Login As: Displays Location Setup when viewing the location account.
- When logged in directly at the Location Level:
- Location Owners & Location Managers: Display Location Setup.
- Service Providers & All Other Roles: Display Profile Setup.
Contents:
- Configuring the Standalone Chat Widget
- Configuring The Chat Widget For Your Booking Widget/Express Checkout Link
- Engaging with the Chat Widget: The Client Experience
- Managing the Conversation
Configuring the Standalone Chat Widget
Follow these steps to customize the standalone chat widget on your website:
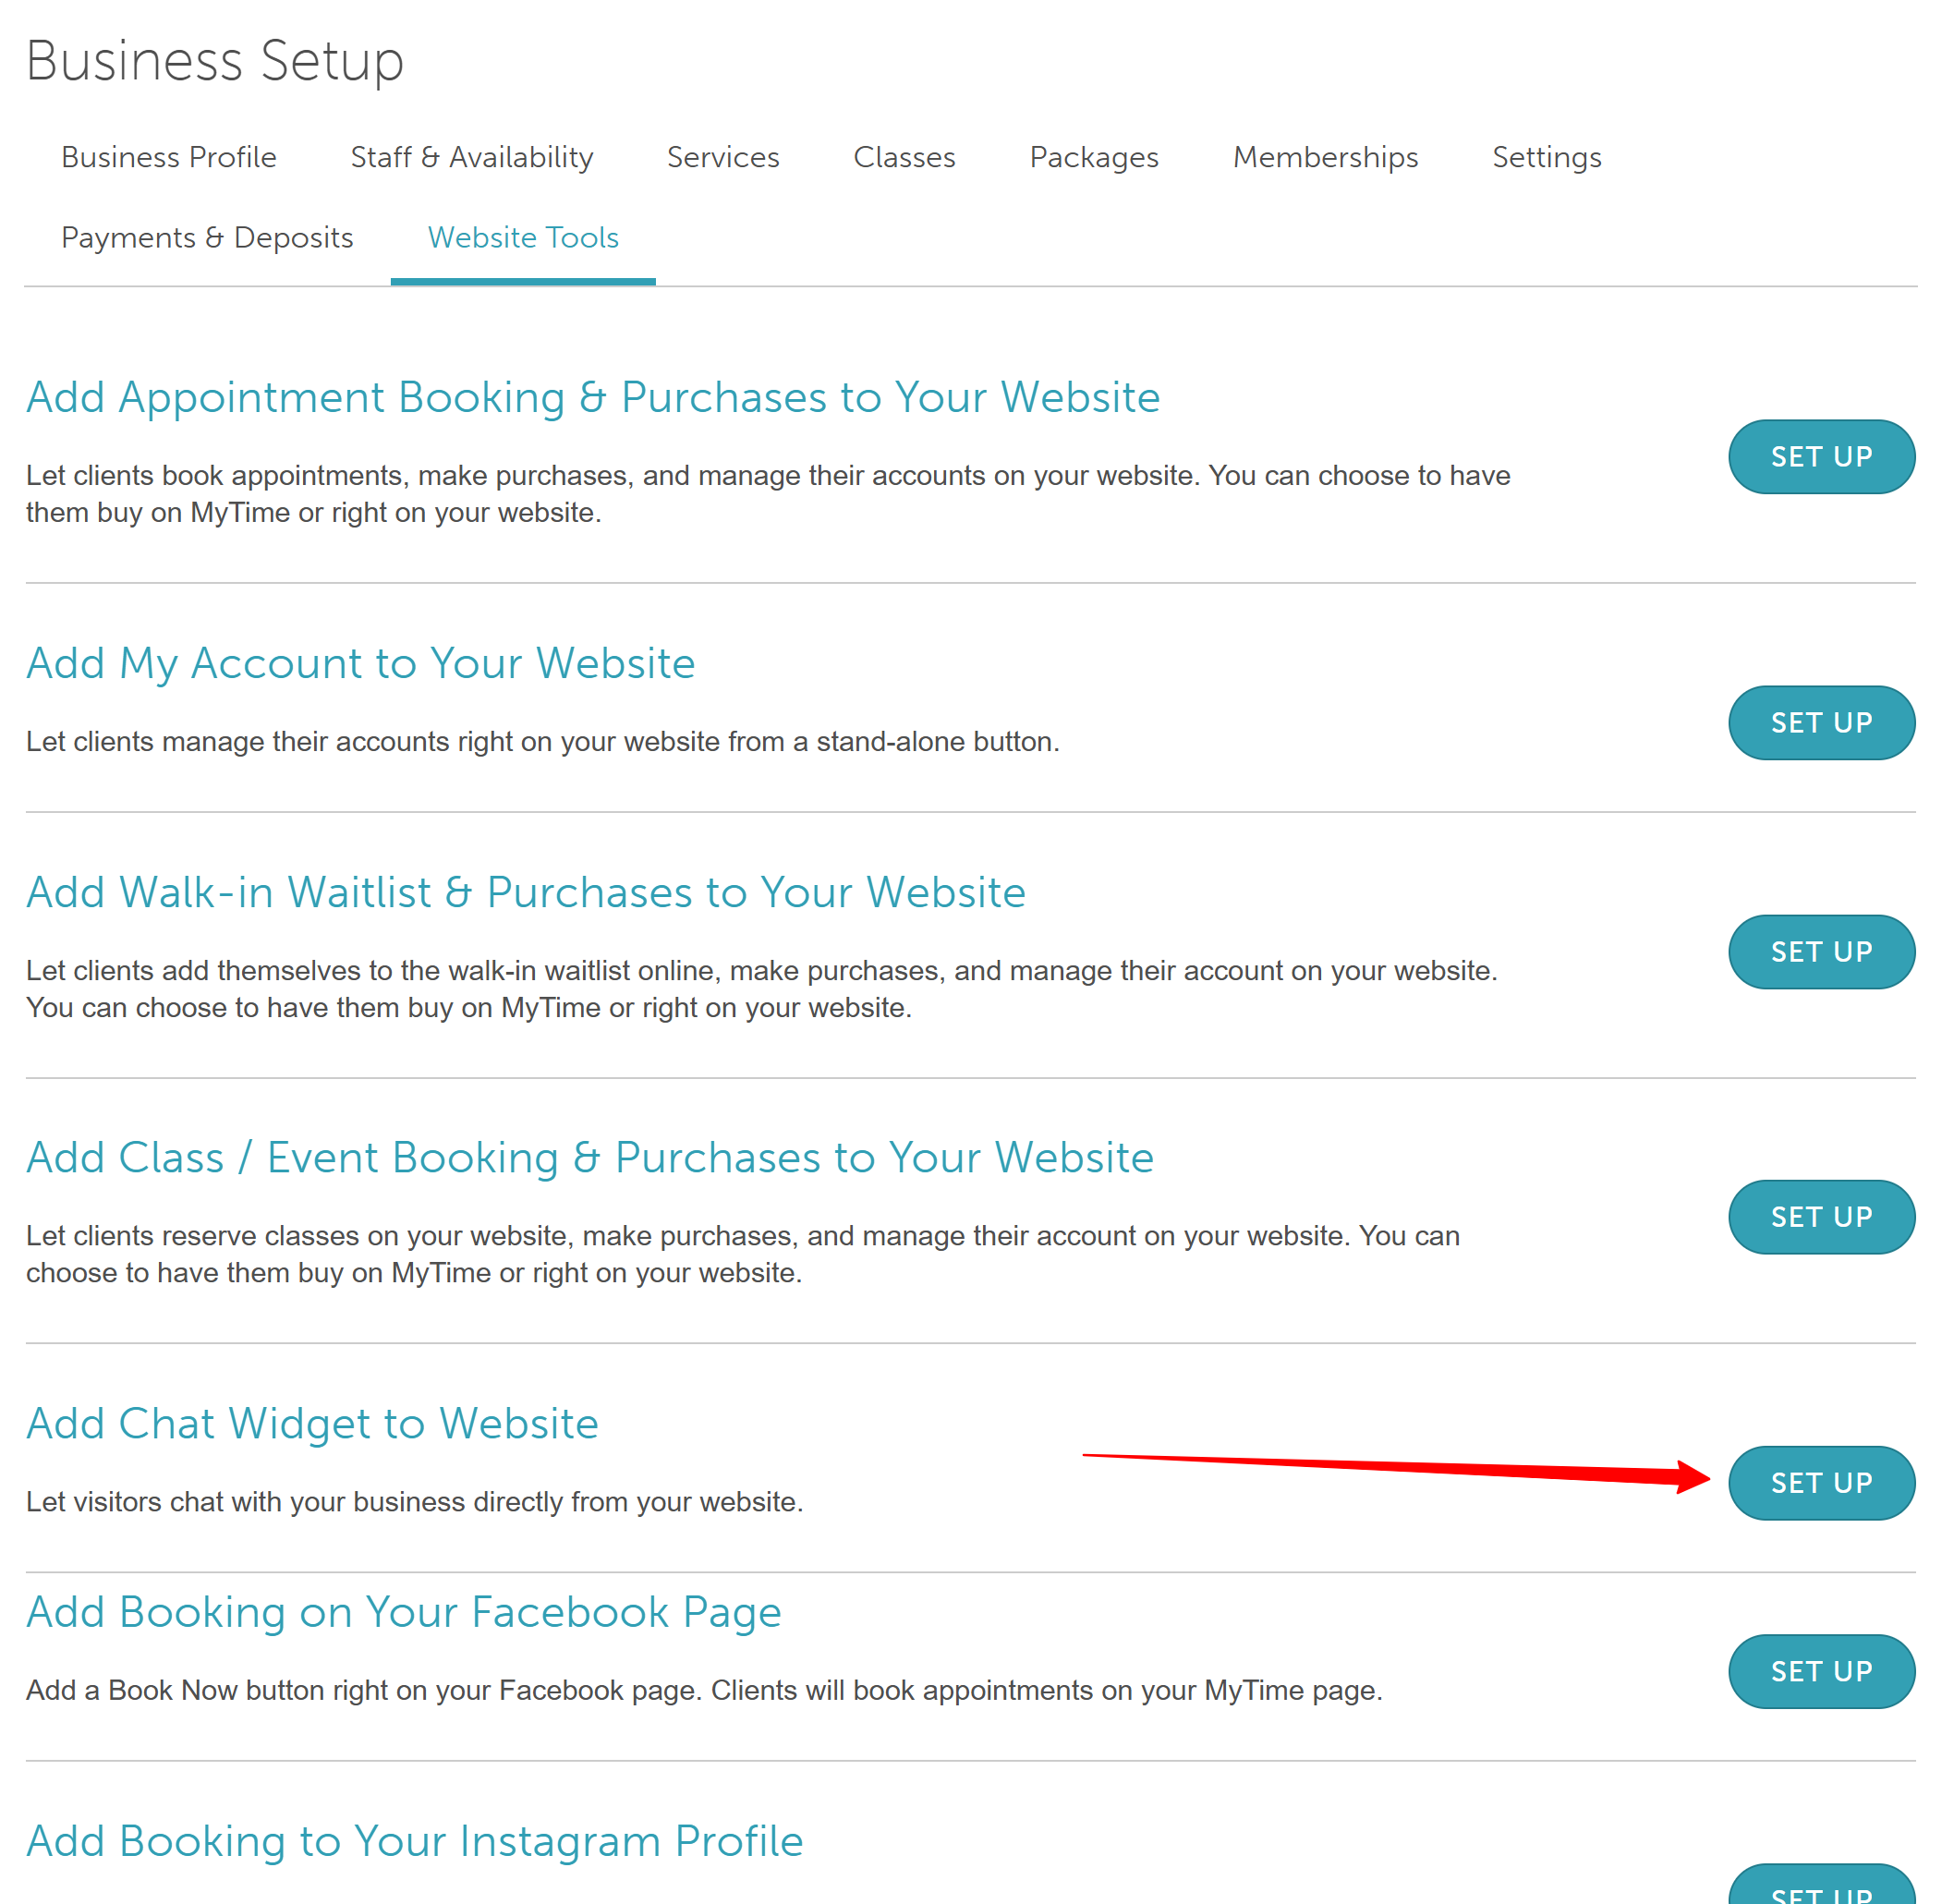
- Navigate to Business Setup / Location Setup > Website Tools
- Locate "Add Chat Widget to Website" and click the 'Set Up' button
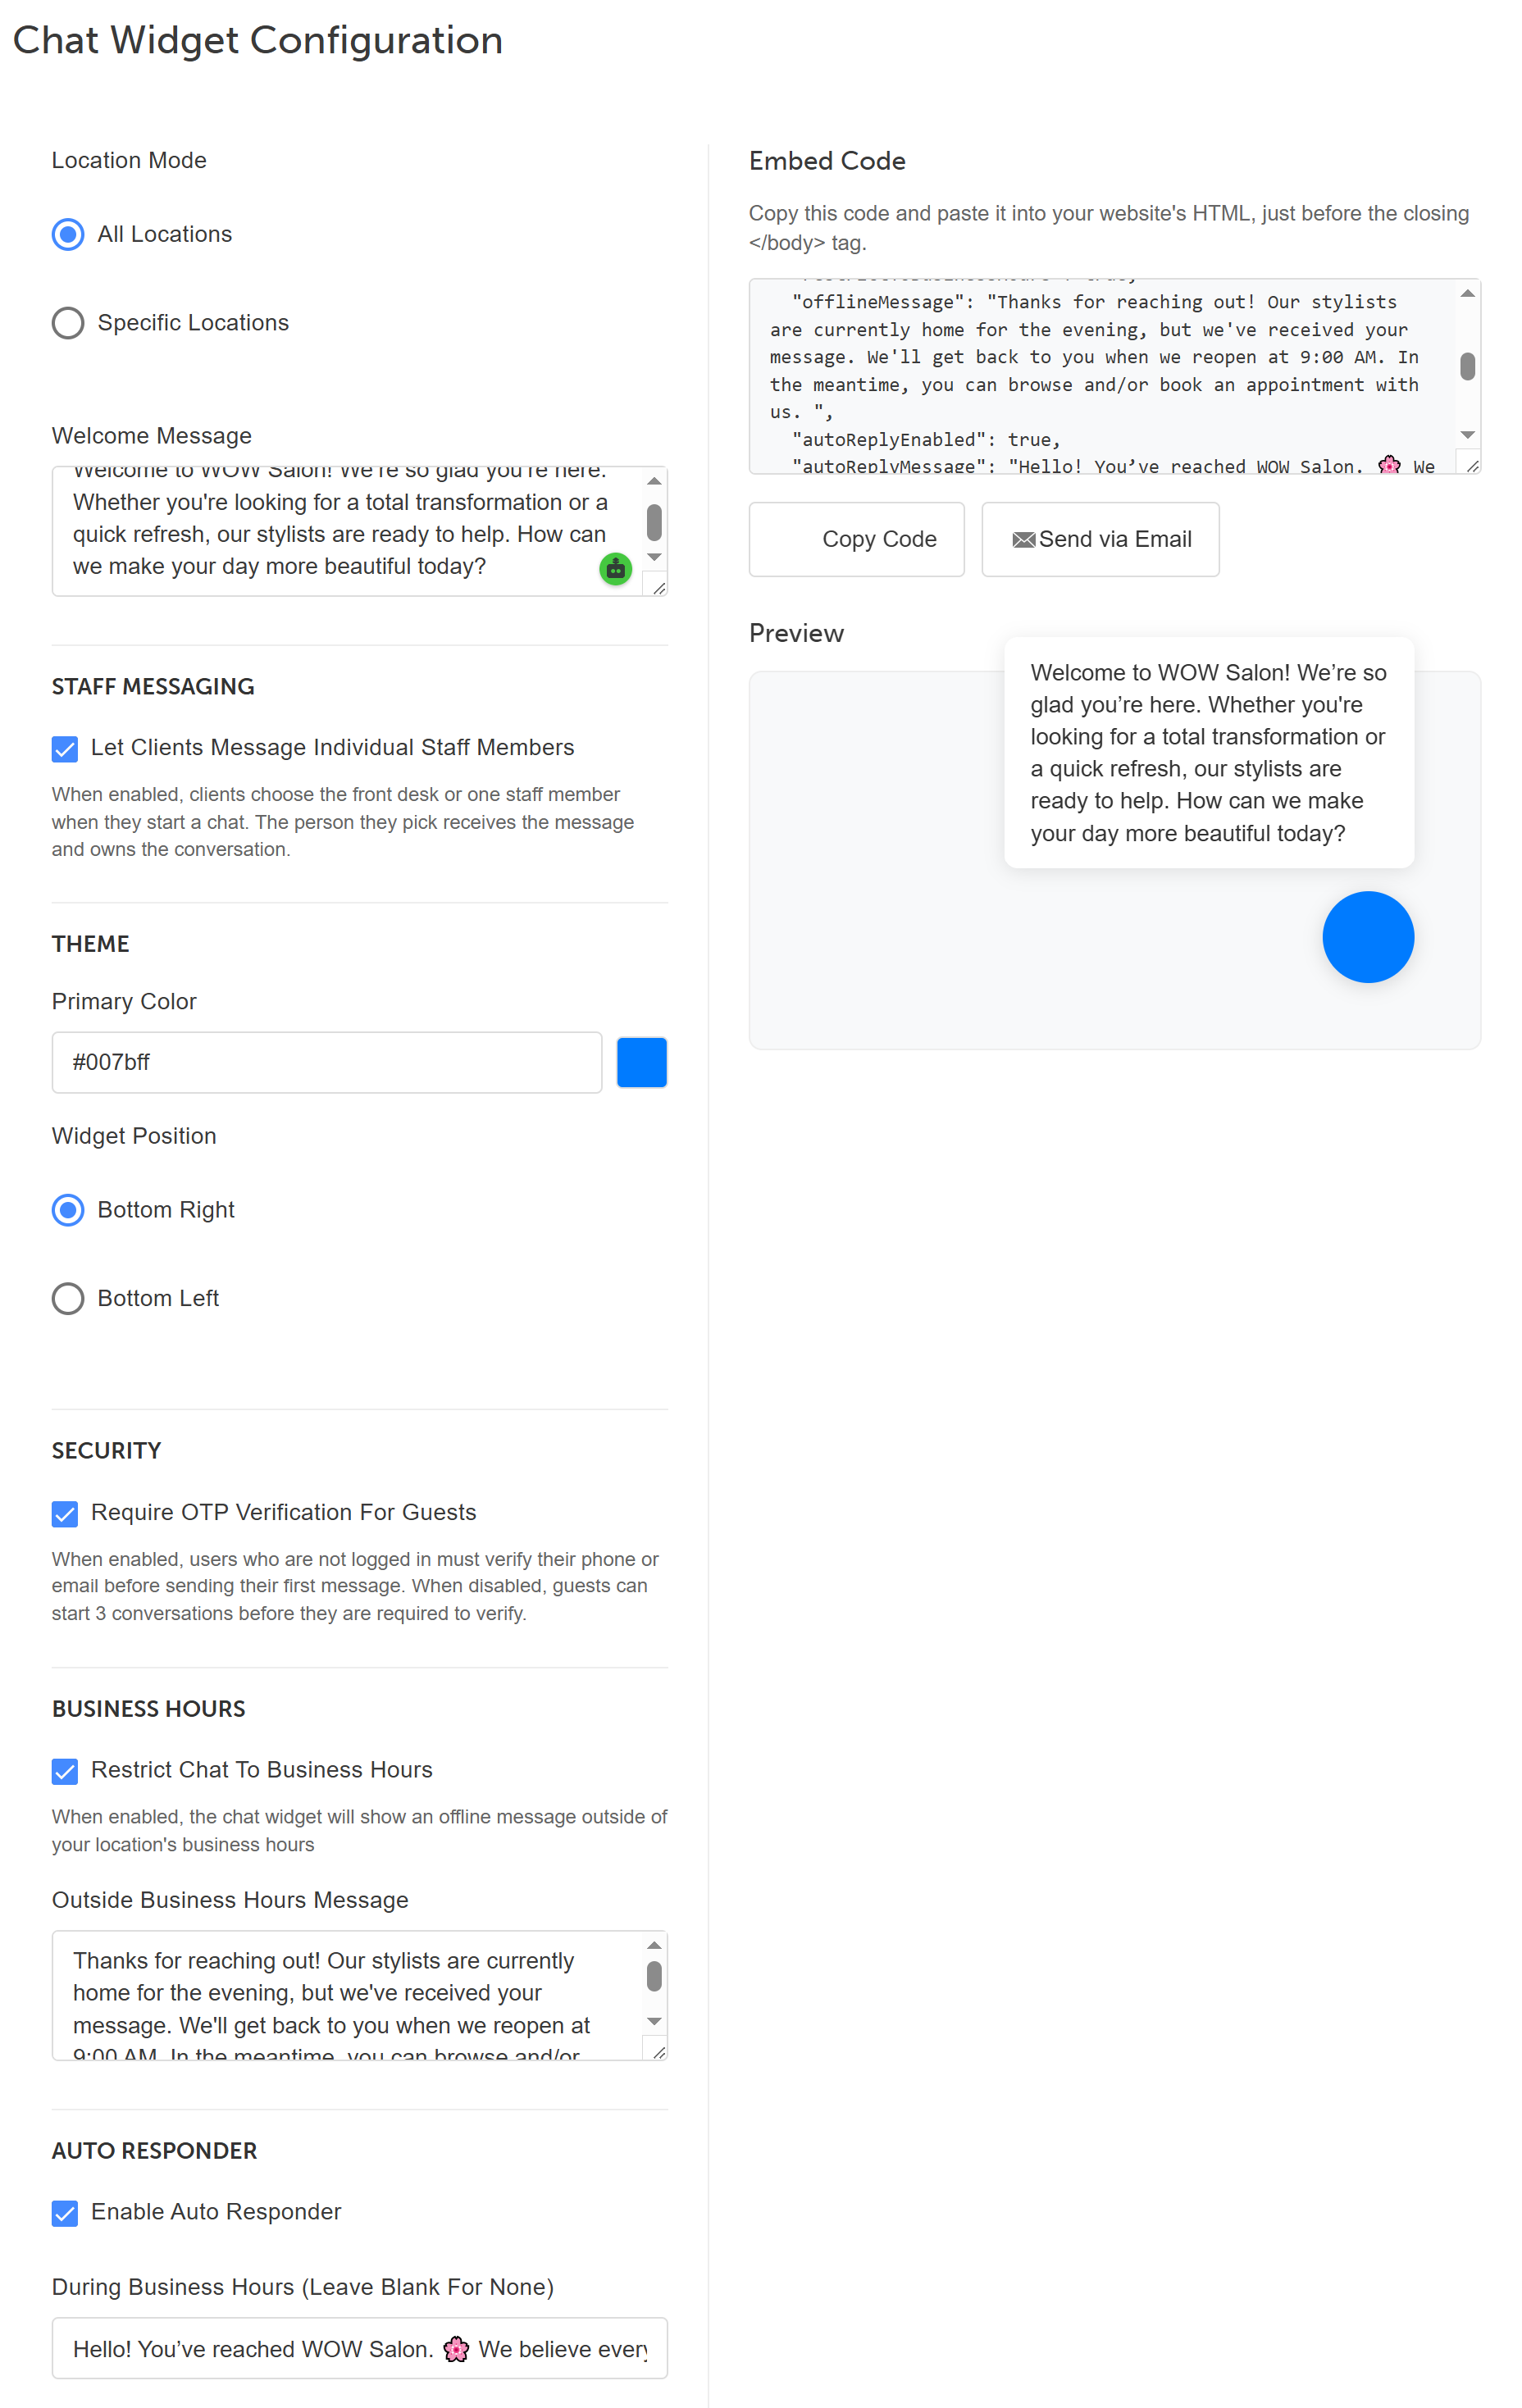
- On the configuration page, you can adjust the following settings:
- Location Selection: Choose which locations will feature the chat widget.
- All Locations: Includes all current sites and automatically adds any future locations.
- Specific Locations: Only selected locations are included. If you add a new location later, you must manually update this setting and re-embed the code. If multiple locations are selected, the widget will automatically prompt the client to pick a location.
- Welcome Message: Enter the greeting clients see when they first open the chat.
- Staff Messaging: You can choose to allow your clients to message your Front Desk or select a specific staff member directly when using the online booking widget or chat widget by checking the 'Let clients message individual staff members' checkbox. This checkbox is available for accounts with the default or inbox version of the Communicator.
- Theme & Position: Choose your brand color and select where the widget sits on your webpage (e.g., bottom right).
- Security (OTP): Check "Require OTP Verification for Guests" to force non-logged-in users to verify their phone or email before their first message. If left unchecked, guests can send up to 3 messages before verification is required.
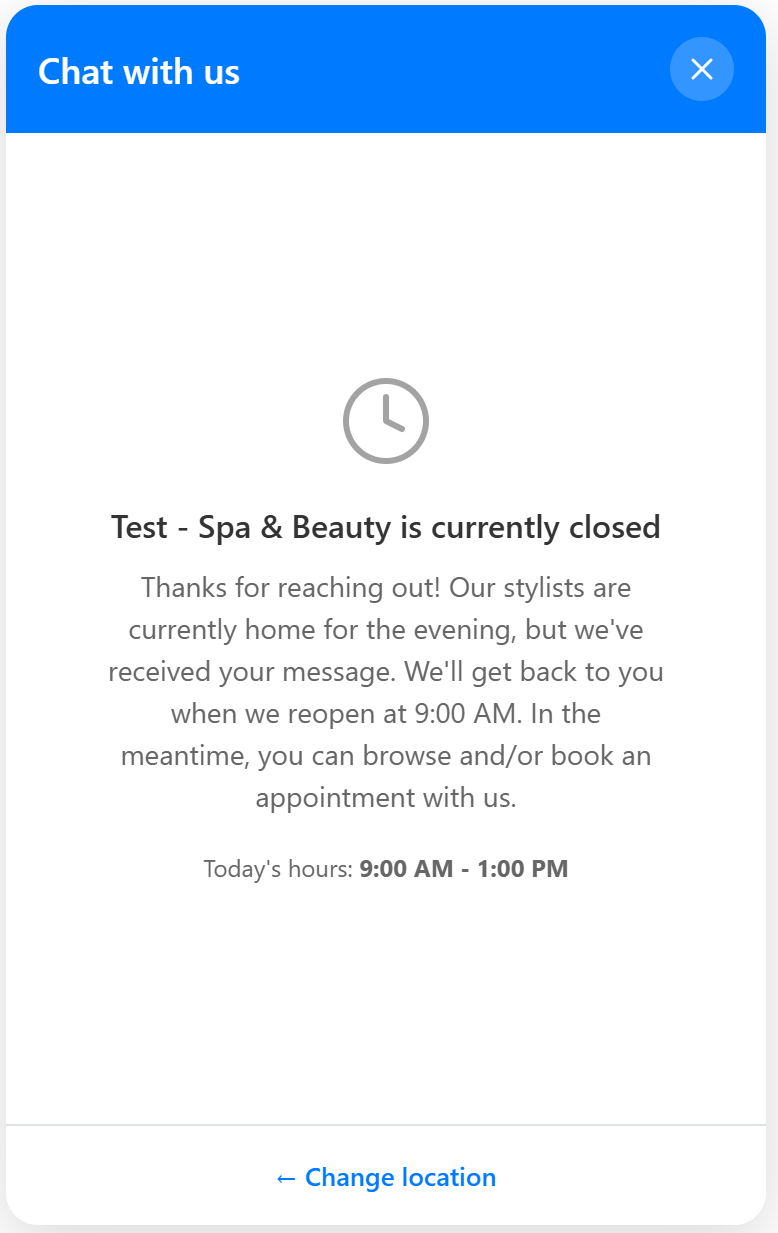
- Business Hours: Check "Restrict chat to business hours" to display a custom "away" message when your business is closed.
- Auto Responder: If chat is unrestricted, you can set separate messages for "During business hours" and "Outside of business hours. If restricted, the "Outside of business hours" field will be used for your away message.
- Embed Code: Copy this code to embed the chatbot on your website
- Preview: Use the preview tool on the right to see exactly how the widget will look to your clients.
- Location Selection: Choose which locations will feature the chat widget.
Configuring The Chat Widget For Your Booking Widget/Express Checkout Link
- Navigate to Business Setup / Location Setup > Website Tools
- Locate "Add Appointment Booking & Purchases to Your Website" and click the 'Set Up' button

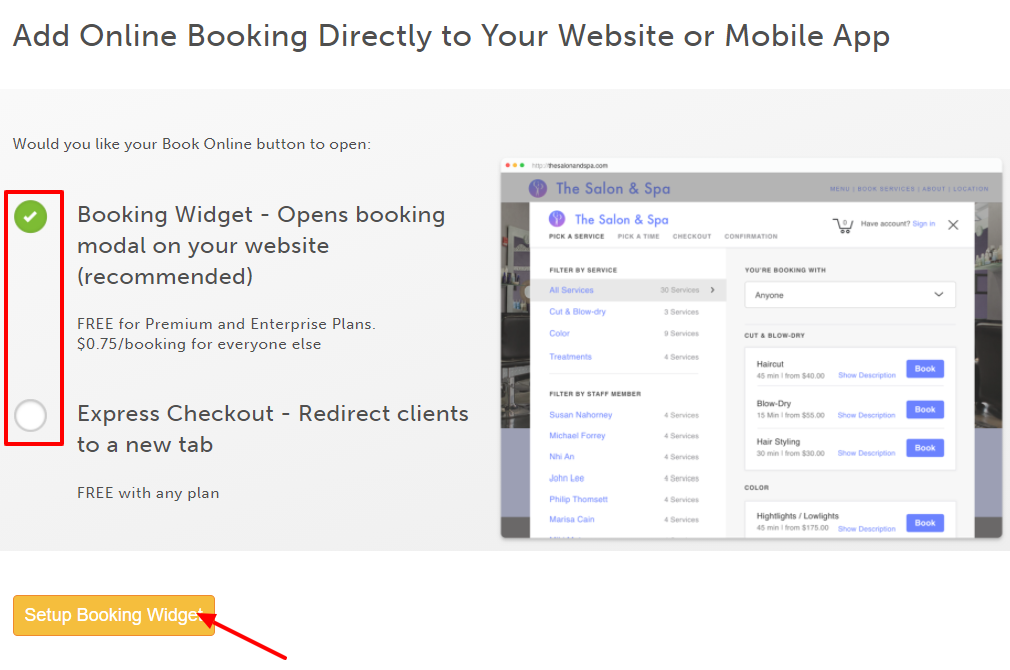
- Choose your preferred installation method:
- Express Checkout: Clients click the Book Now button and are redirected to your MyTime booking page. Available for free to all MyTime accounts.
- Booking Widget: Clients book directly on your website. A pop-up appears, allowing them to complete the booking.
- Free for Premier and Enterprise MyTime subscriptions.
- $0.75 per transaction for businesses without a Premier subscription.
- Click "Setup Booking Widget"
- On the installation page for either the Booking Widget or Express Checkout, locate and check the box for "Enable Chat Widget."
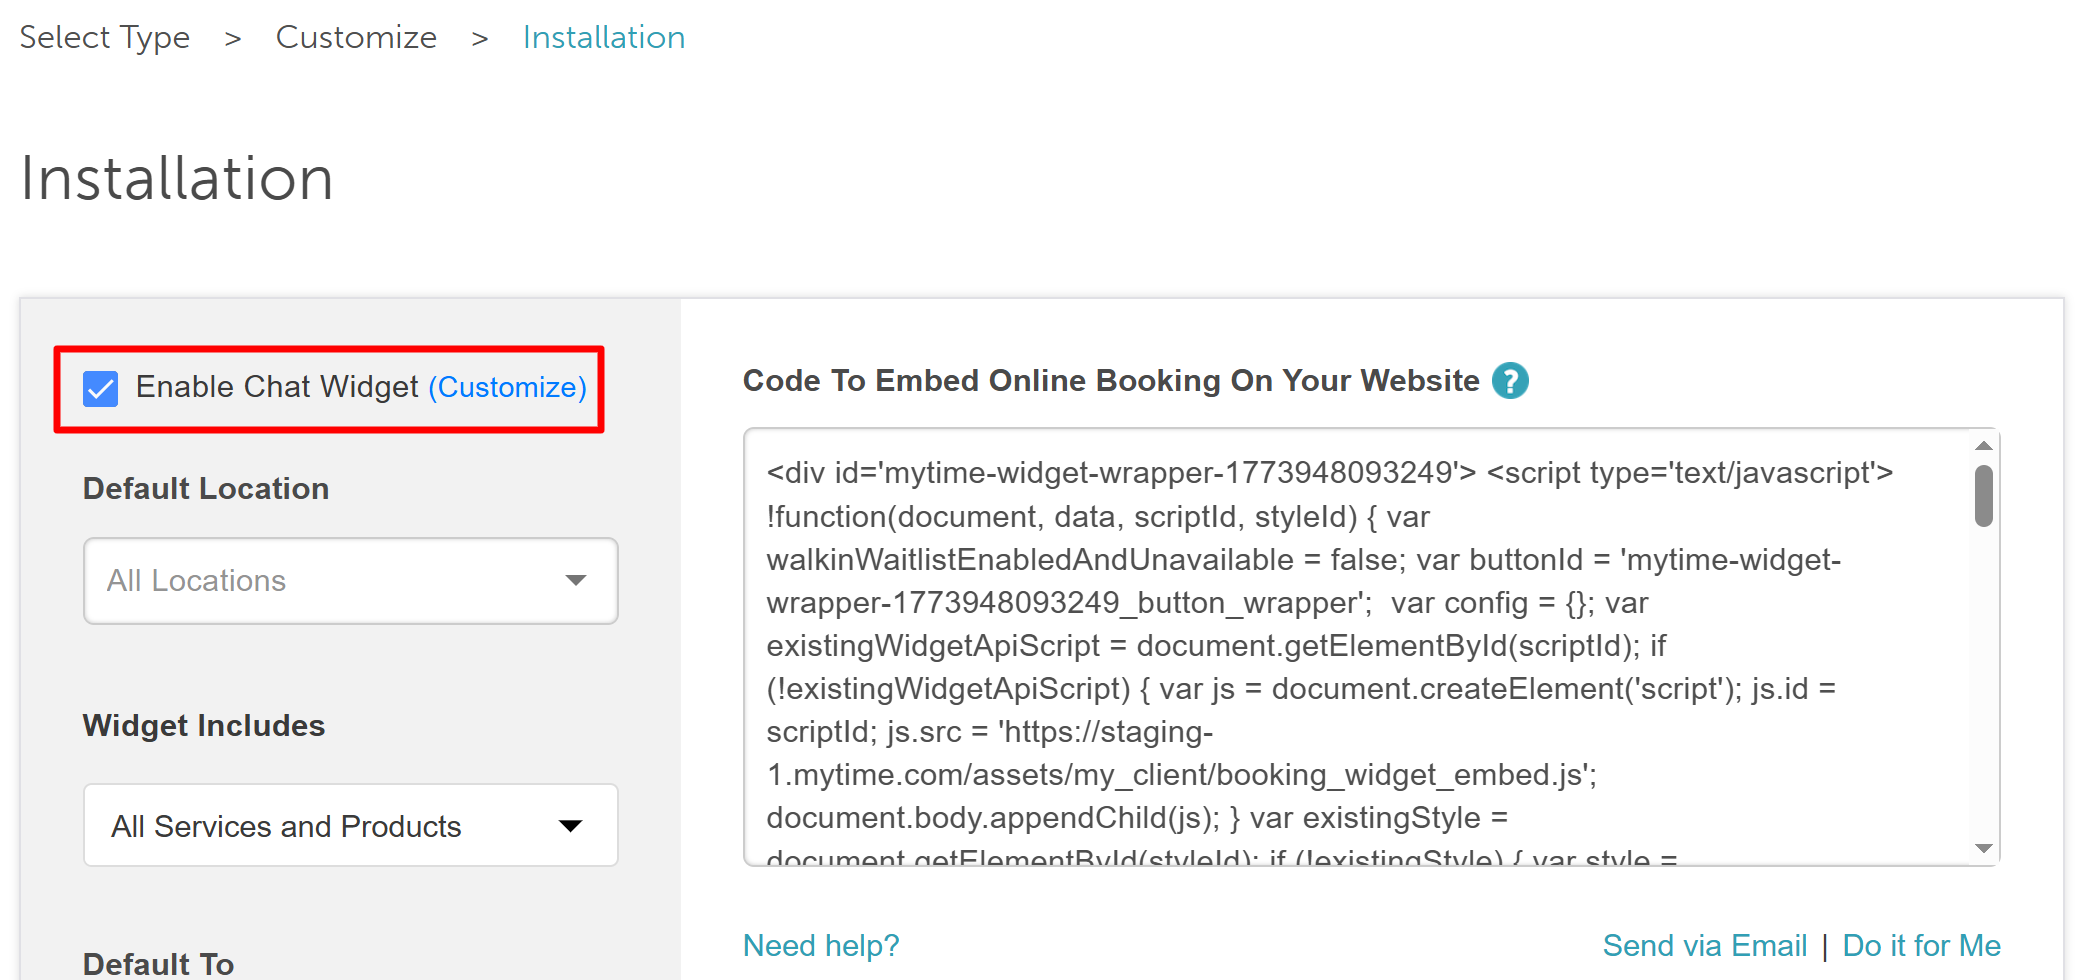
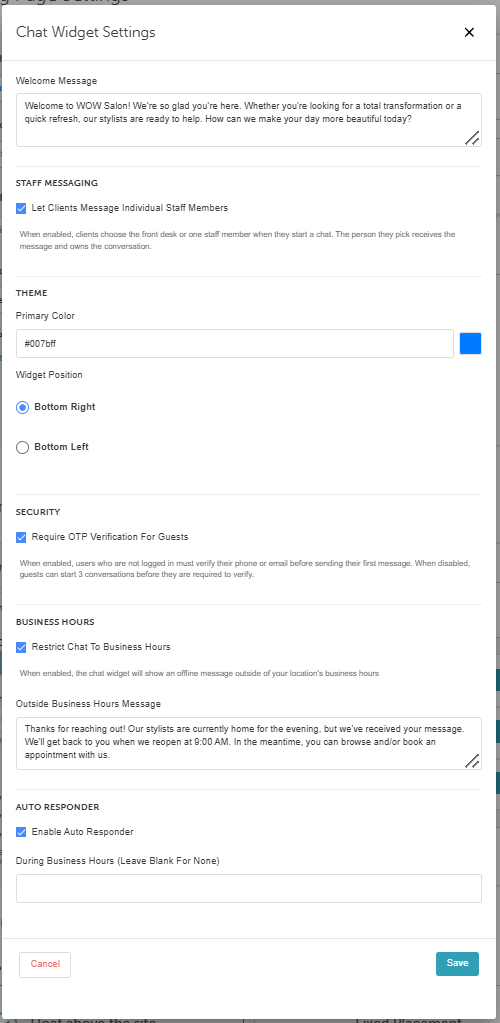
- Click the Customize hyperlink to open the configuration settings:
- Welcome Message: Enter the greeting clients see when they first open the chat.
- Staff Messaging: You can choose to allow your clients to message your Front Desk or select a specific staff member directly when using the online booking widget or chat widget by checking the 'Let clients message individual staff members' checkbox. This checkbox is available for accounts with the default or inbox version of the Communicator.
- Theme & Position: Choose your brand color and select where the widget sits on your webpage (e.g., bottom right).
- Security (OTP): Check "Require OTP Verification for Guests" to force non-logged-in users to verify their phone or email before their first message. If left unchecked, guests can send up to 3 messages before verification is required.
- Business Hours: Check "Restrict chat to business hours" to display a custom "away" message when your business is closed.
- Auto Responder: If chat is unrestricted, you can set separate messages for "During business hours" and "Outside of business hours. If restricted, the "Outside of business hours" field will be used for your away message.
- Click "Save" at the bottom of the customization window
Engaging with the Chat Widget: The Client Experience
The Chat UI will differ based on the 'Let clients message individual staff members' checkbox in the Staff Messaging section of the configuration page.
'Let clients message individual staff members' checkbox unchecked
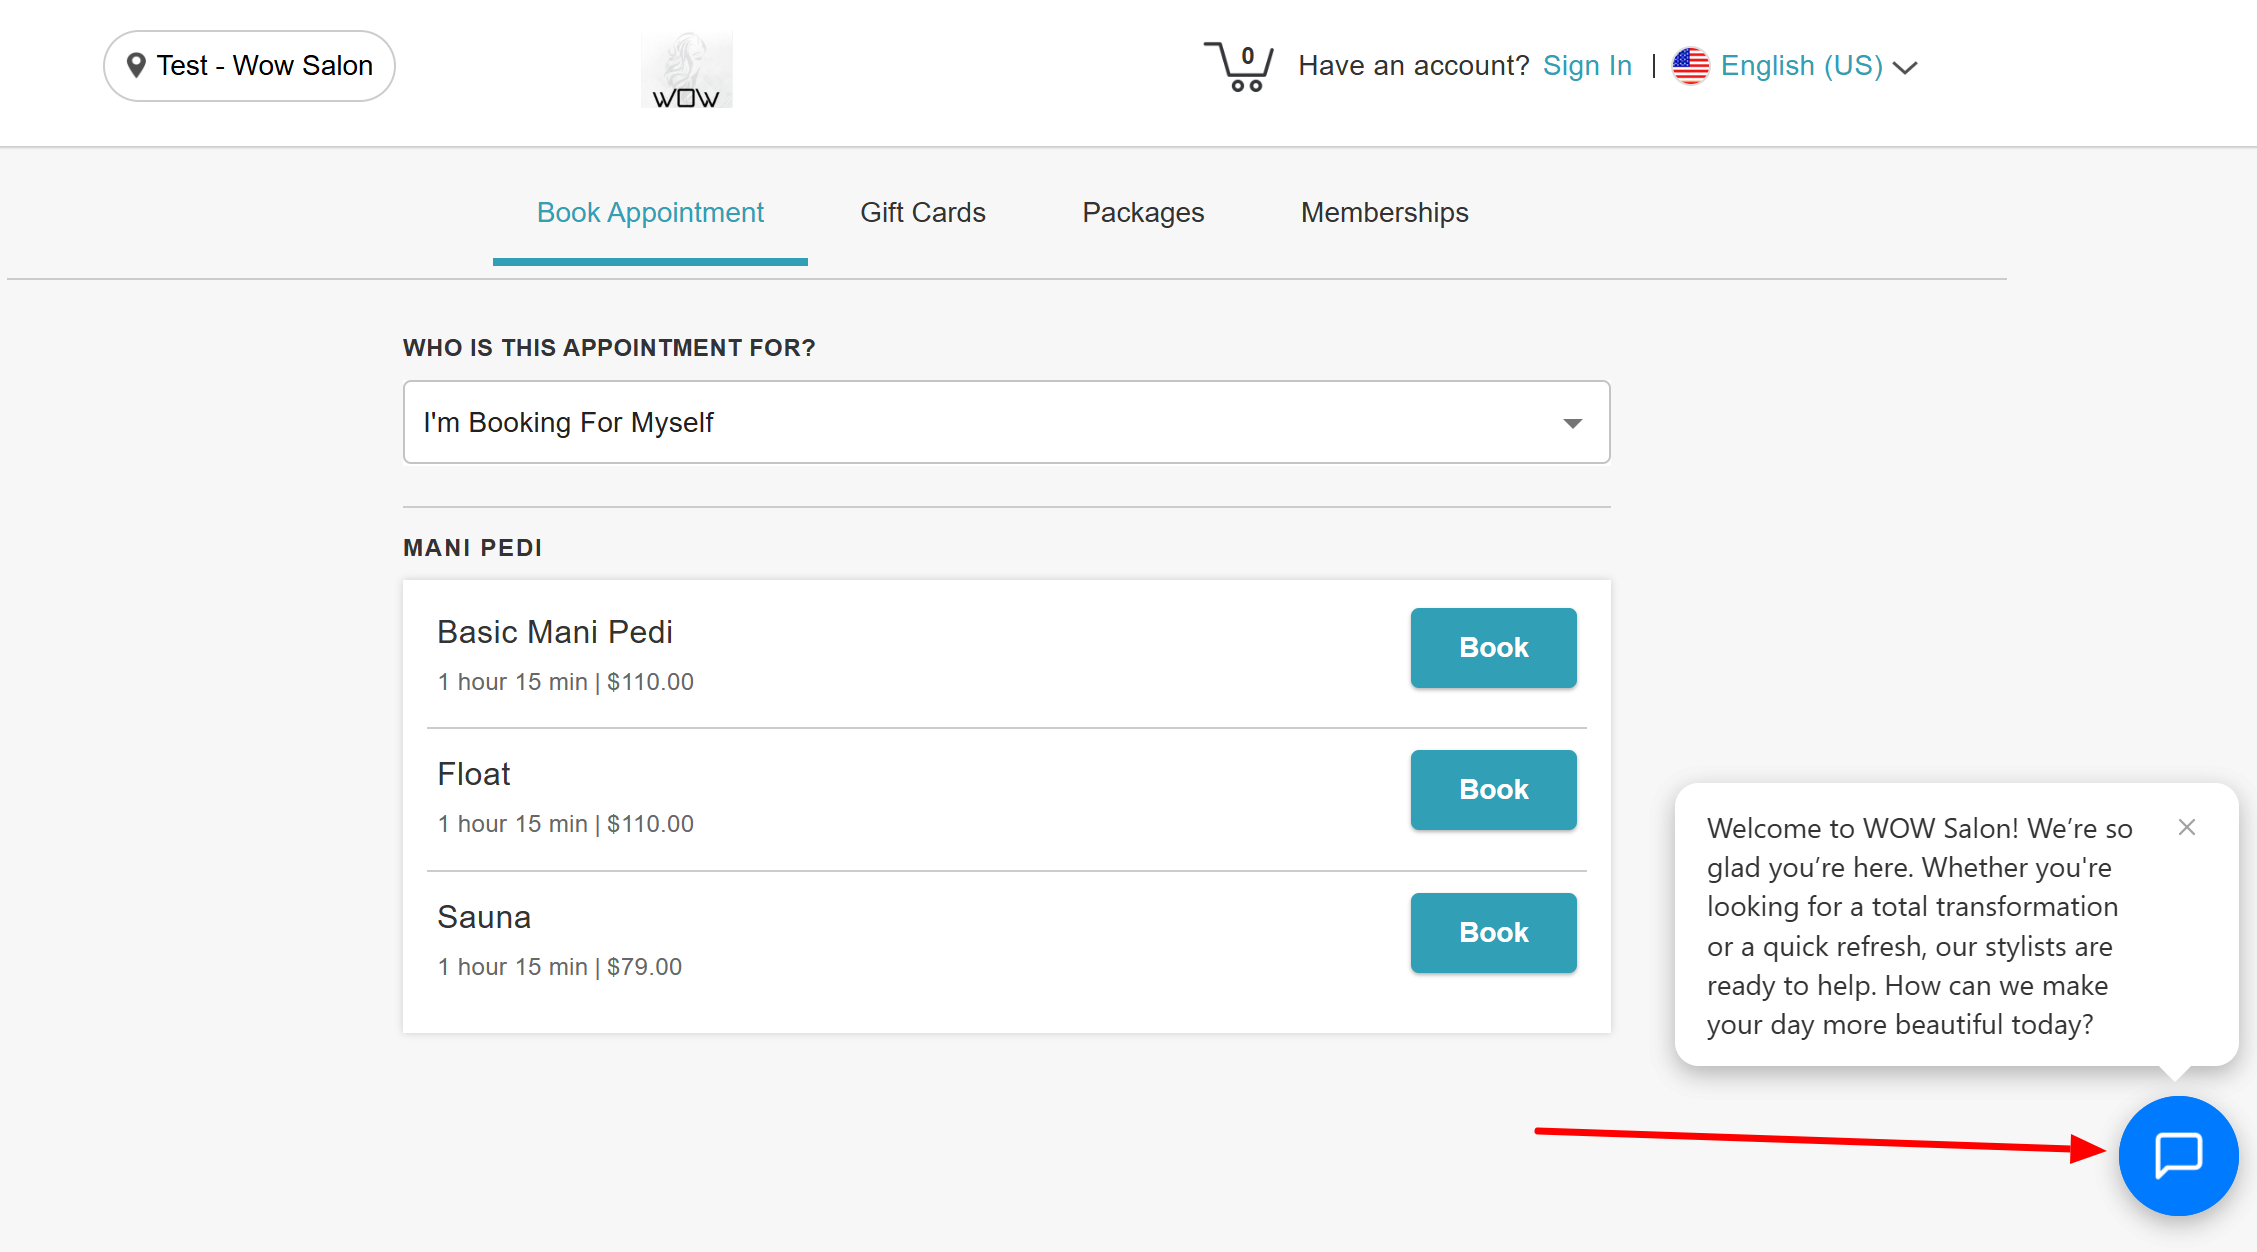
- Navigate to your website and find the chat icon in its designated position (e.g., the bottom-right corner). The configured welcome message will be floating above the chat icon
- Click the icon to open the chat window
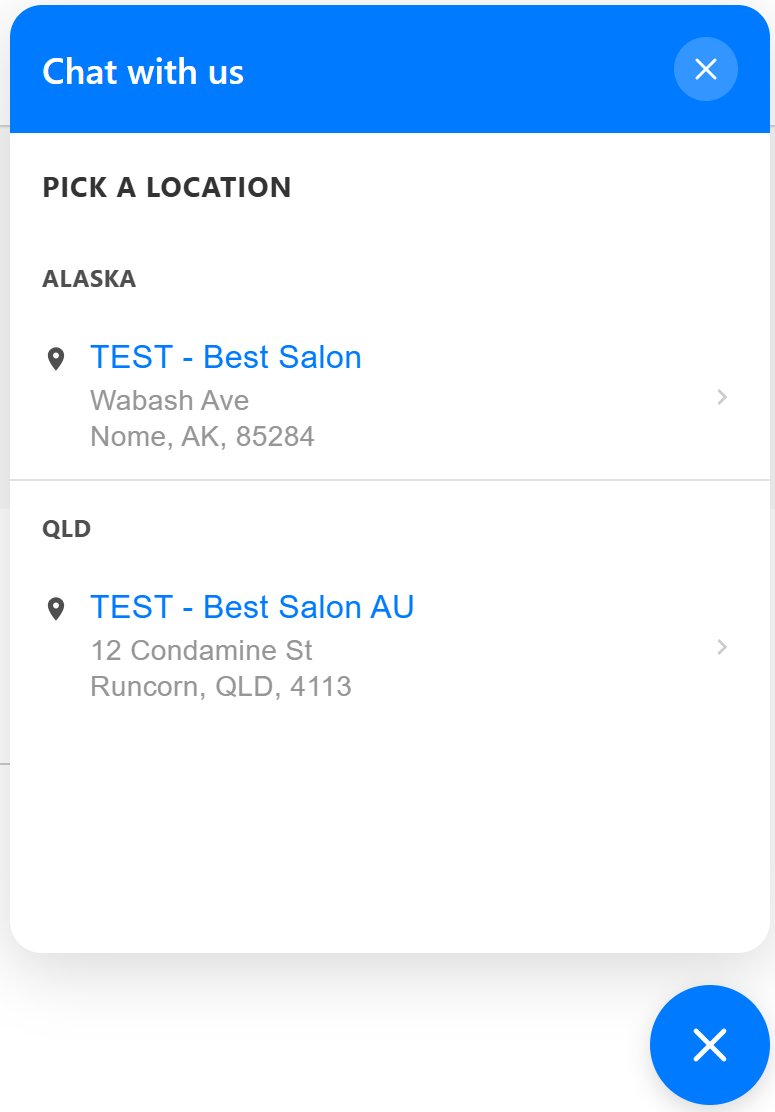
- If your business has multiple locations, the client will be prompted to select the specific site they are contacting
- Sign in to their existing account or enter their details to submit an inquiry as a guest:
- Guest Users or Clients Not Signed In: Will be asked to enter basic contact information along with their message so your staff can follow up.
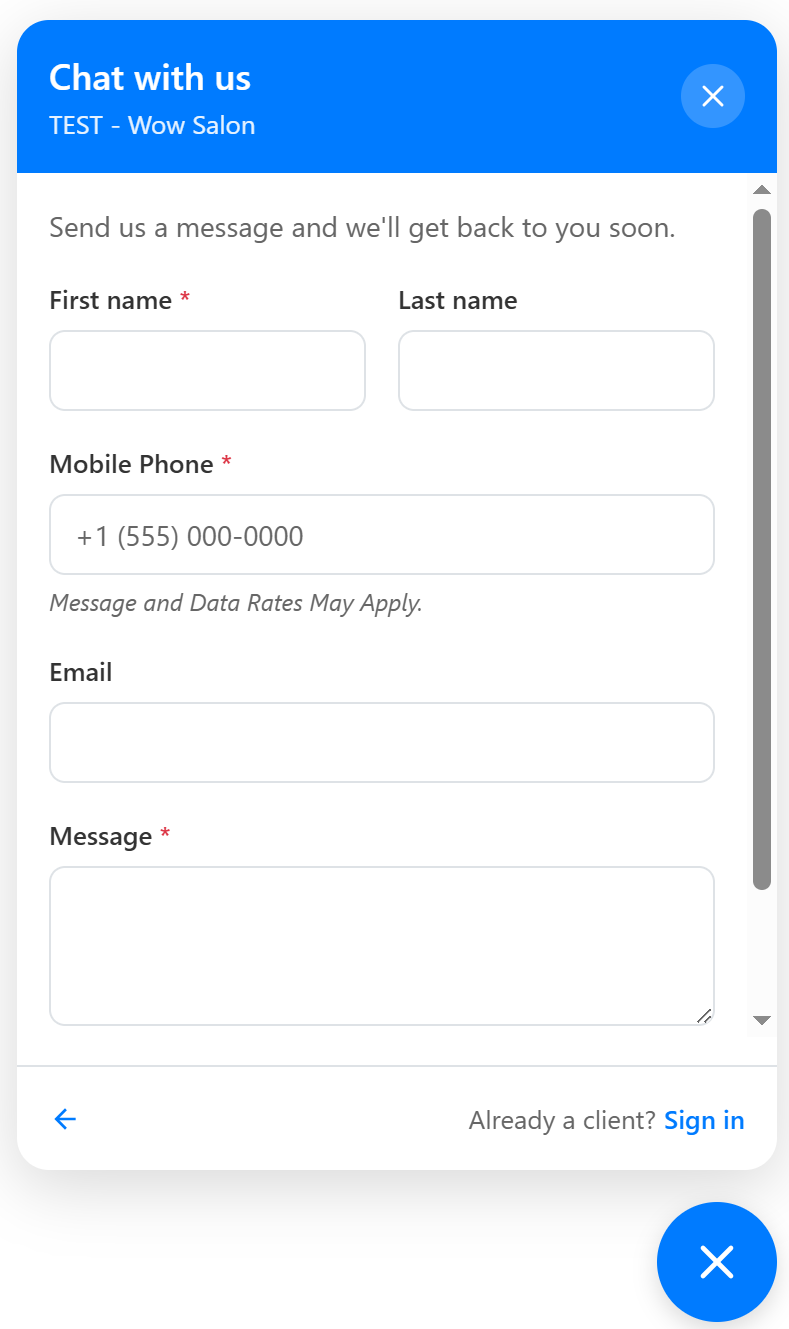
- Signed-in Clients: Can type their message directly into the text box immediately
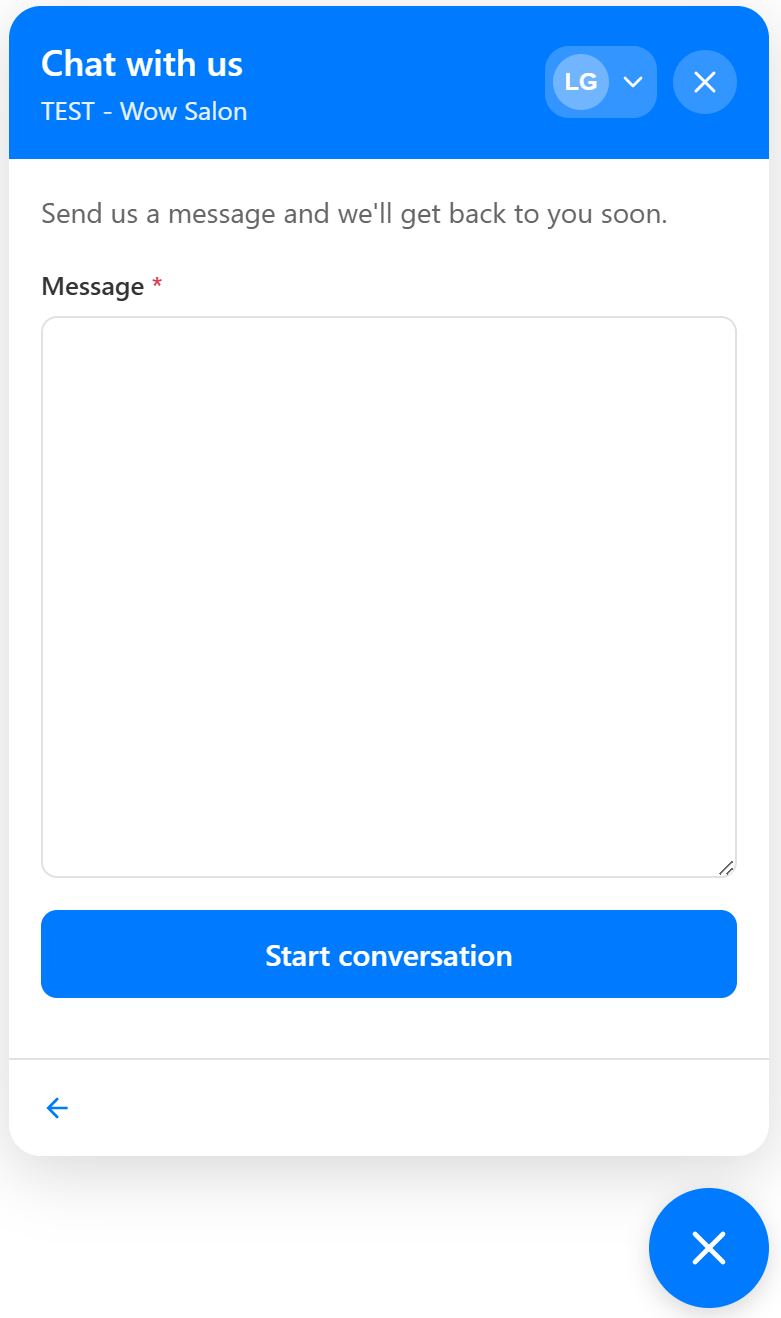
- Guest Users or Clients Not Signed In: Will be asked to enter basic contact information along with their message so your staff can follow up.
- Click "Start Conversation" to send their message
- If "Require OTP Verification for Guests" is enabled, guest users must verify their phone number or email via a one-time passcode before the message is sent
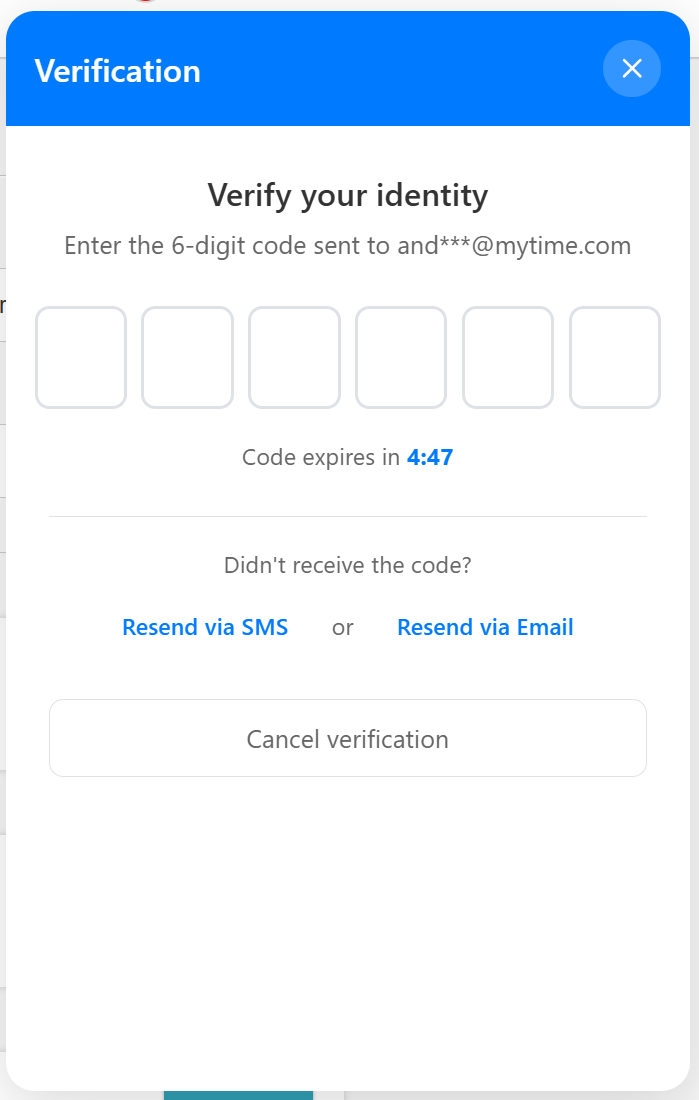
- Their conversation history will appear in the chat window
'Let clients message individual staff members' checkbox checked
- Navigate to your website and find the chat icon in its designated position (e.g., the bottom-right corner). The configured welcome message will be floating above the chat icon
- Click the icon to open the chat window
- If your business has multiple locations, the client will be prompted to select the specific site they are contacting
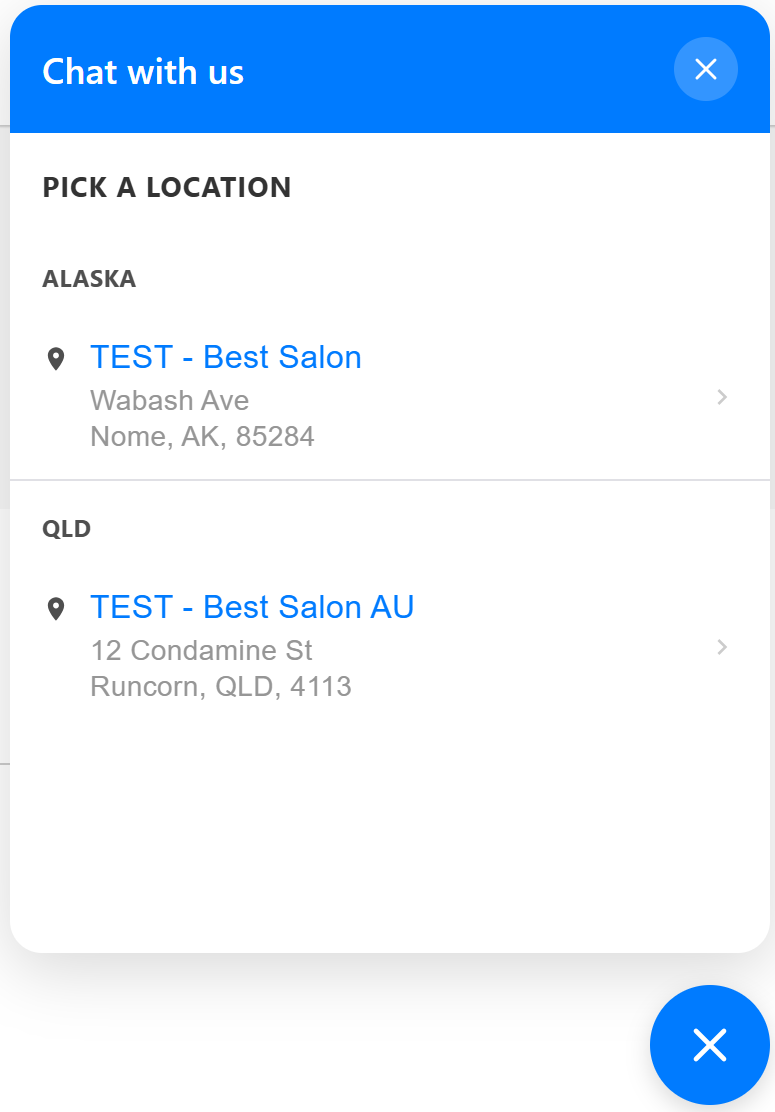
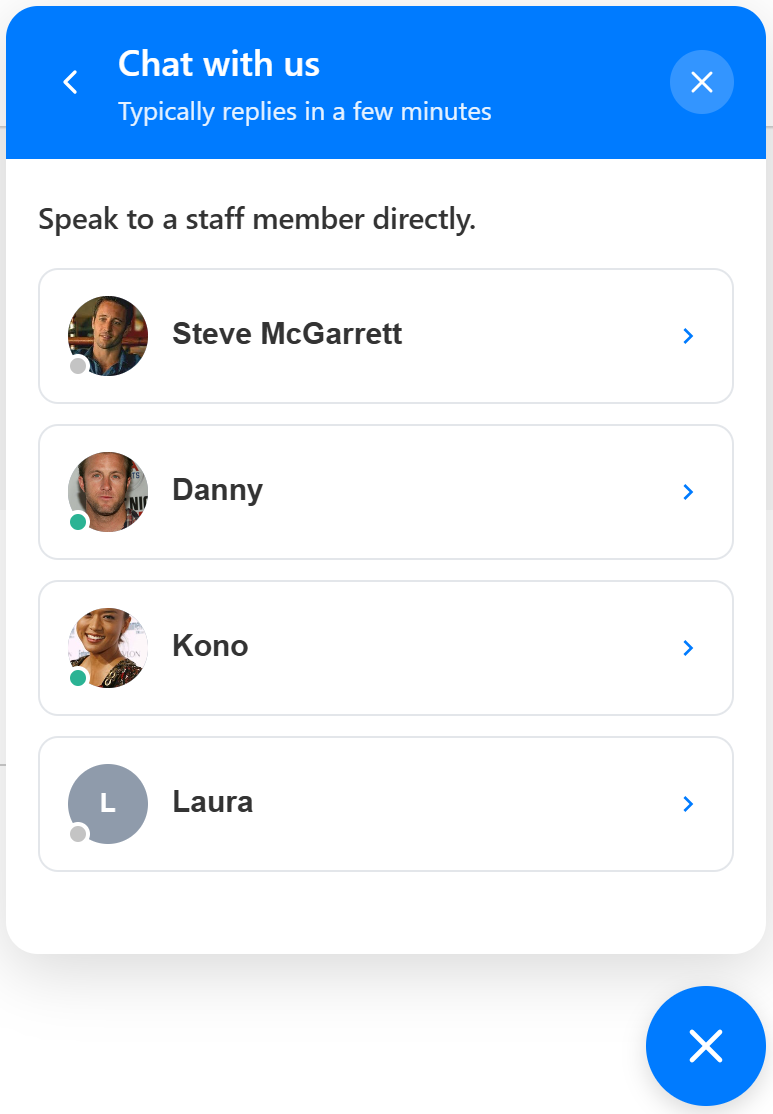
- If the 'Let clients message individual staff members' checkbox is checked, the client will get the option to select if they wish to speak with a specific staff member.
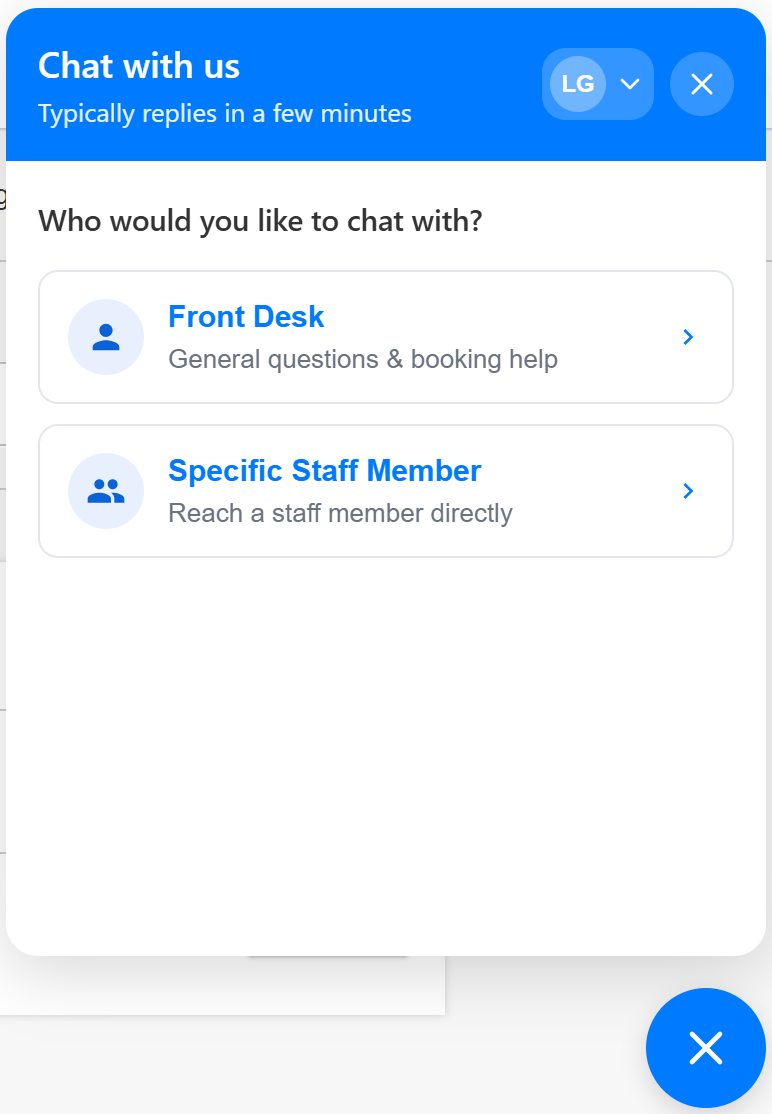
- Front Desk Messages: Messages sent to the Front Desk notify all staff members at that location and appear in the central inbox
- Staff Direct Messages: When a specific team member is selected, messages route directly to that staff member's Communicator Inbox and trigger push notifications exclusively on their device.
- For a team member to appear in the staff selection list, they must meet the following criteria:
- Be bookable online
- Be visible on the online booking widget
- Possess an active MyTime user login
- Sign in to their existing account or enter their details to submit an inquiry as a guest:
- Guest Users or Clients Not Signed In: Will be asked to enter basic contact information along with their message so your staff can follow up.
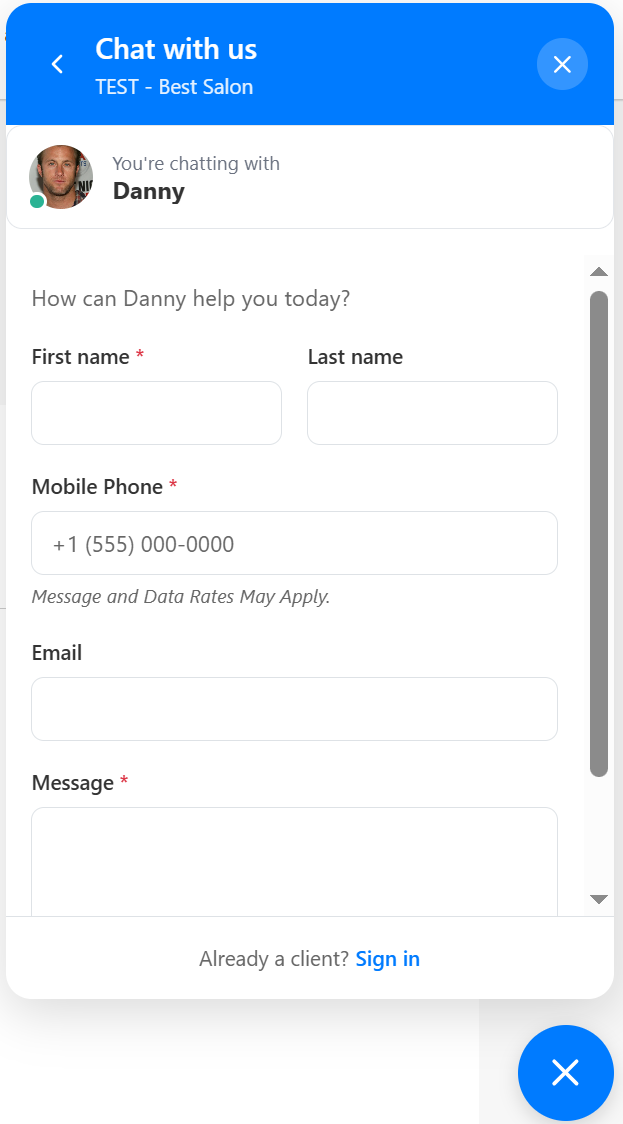
- Signed-in Clients: Can type their message directly into the textbox immediately
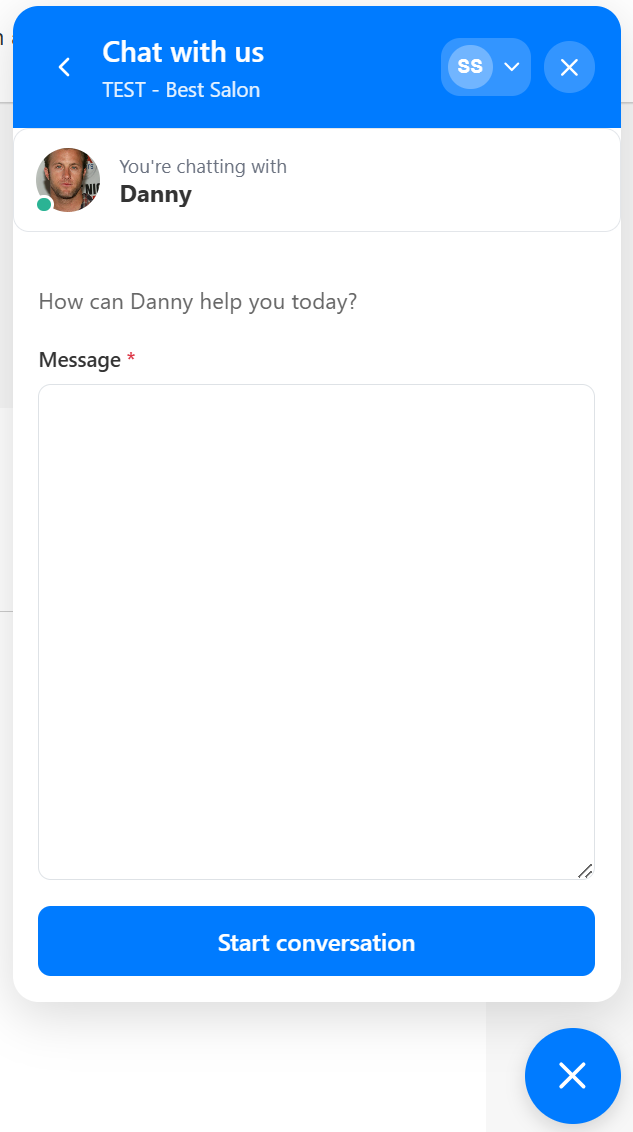
- Guest Users or Clients Not Signed In: Will be asked to enter basic contact information along with their message so your staff can follow up.
- Click "Start Conversation" to send their message
- If "Require OTP Verification for Guests" is enabled, guest users must verify their phone number or email via a one-time passcode before the message is sent
- Their conversation history will appear in the chat window
Managing the Conversation
Auto-Responders: Once the message is sent, the client will see your configured auto-response. 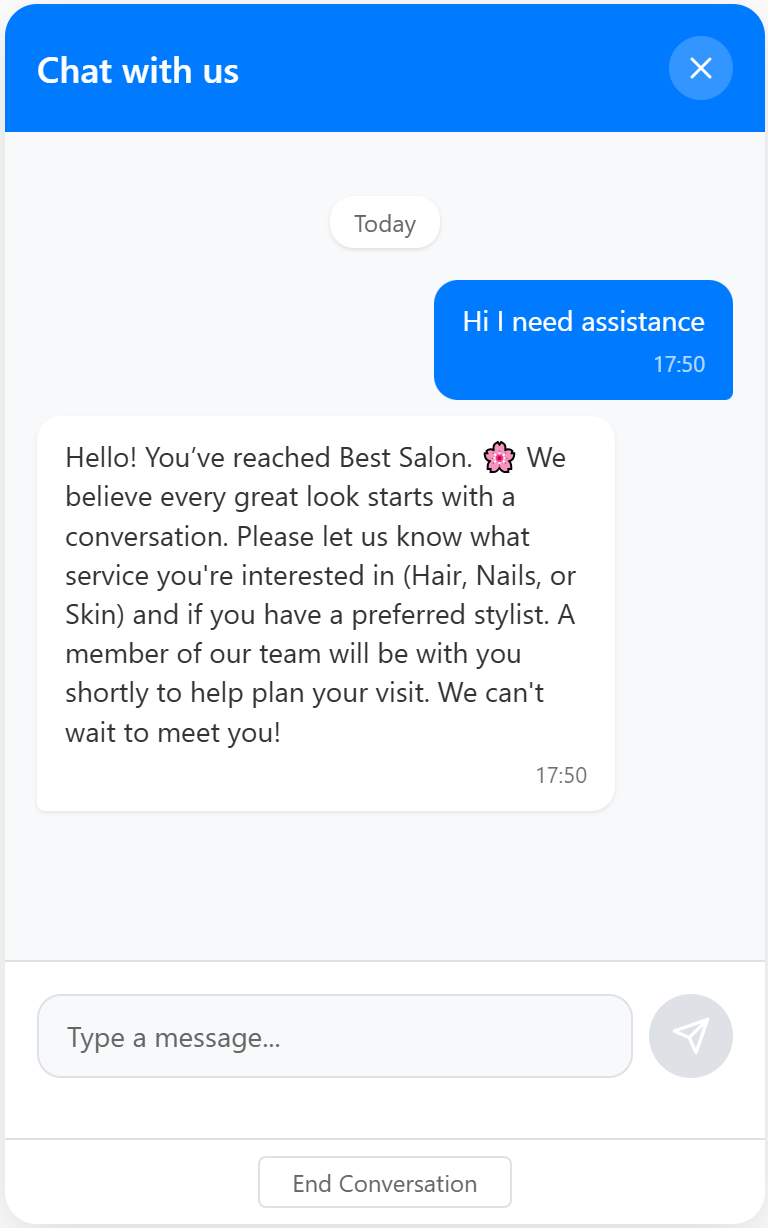
Live Responses: When a staff member replies from the MyTime Communicator, the auto-response will disappear and be replaced by the live message.
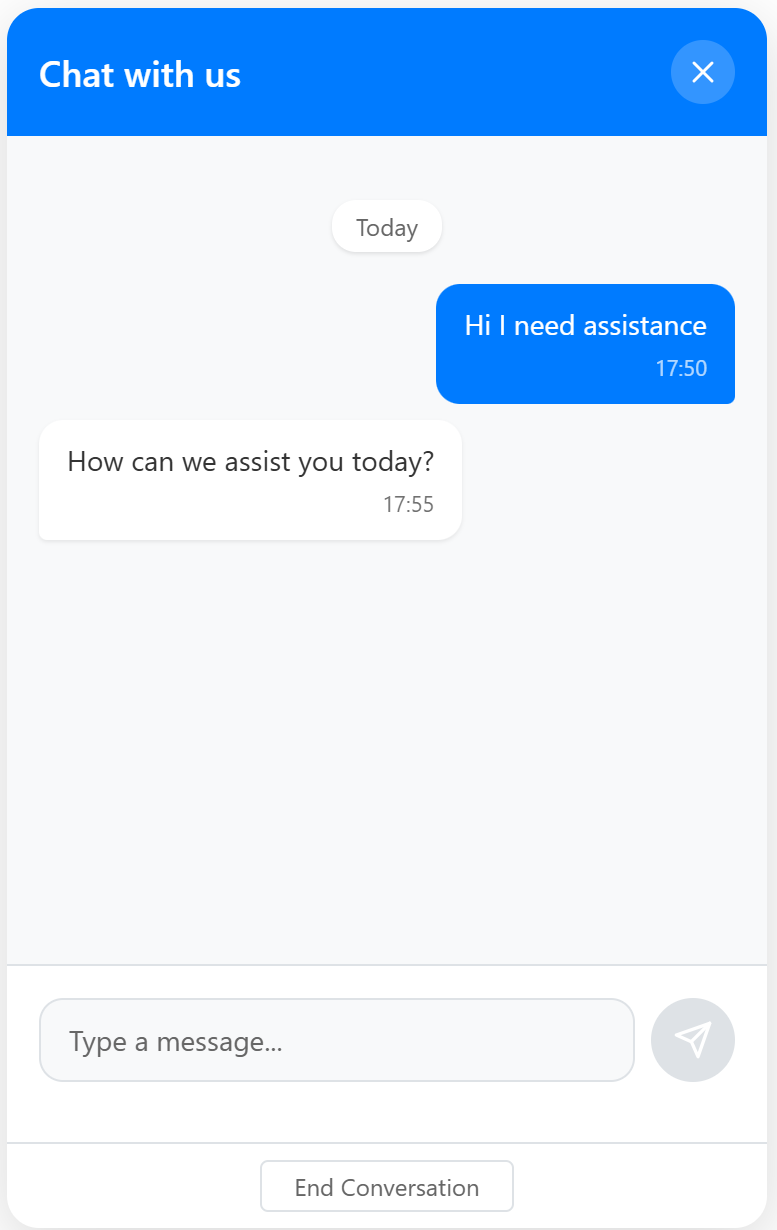
History: The full conversation history remains visible in the chat window for the duration of the session.
Ending the Chat: Clients can click "End Conversation" at any time to close the session.
Outside of Business Hours: If a client messages while you are closed, they will receive your "Away" message (if configured). Their inquiry will be saved in your Communicator for review when you reopen.
Message Received In-Store: Your team will receive an instant notification in the MyTime Communicator. New clients will have a profile automatically created to store this history.
Default Communicator
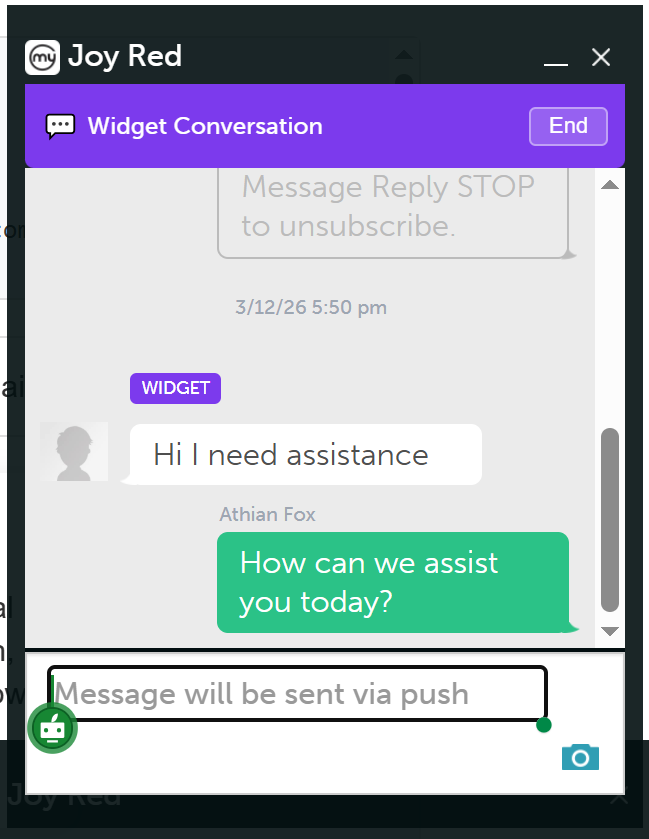
Communicator Inbox
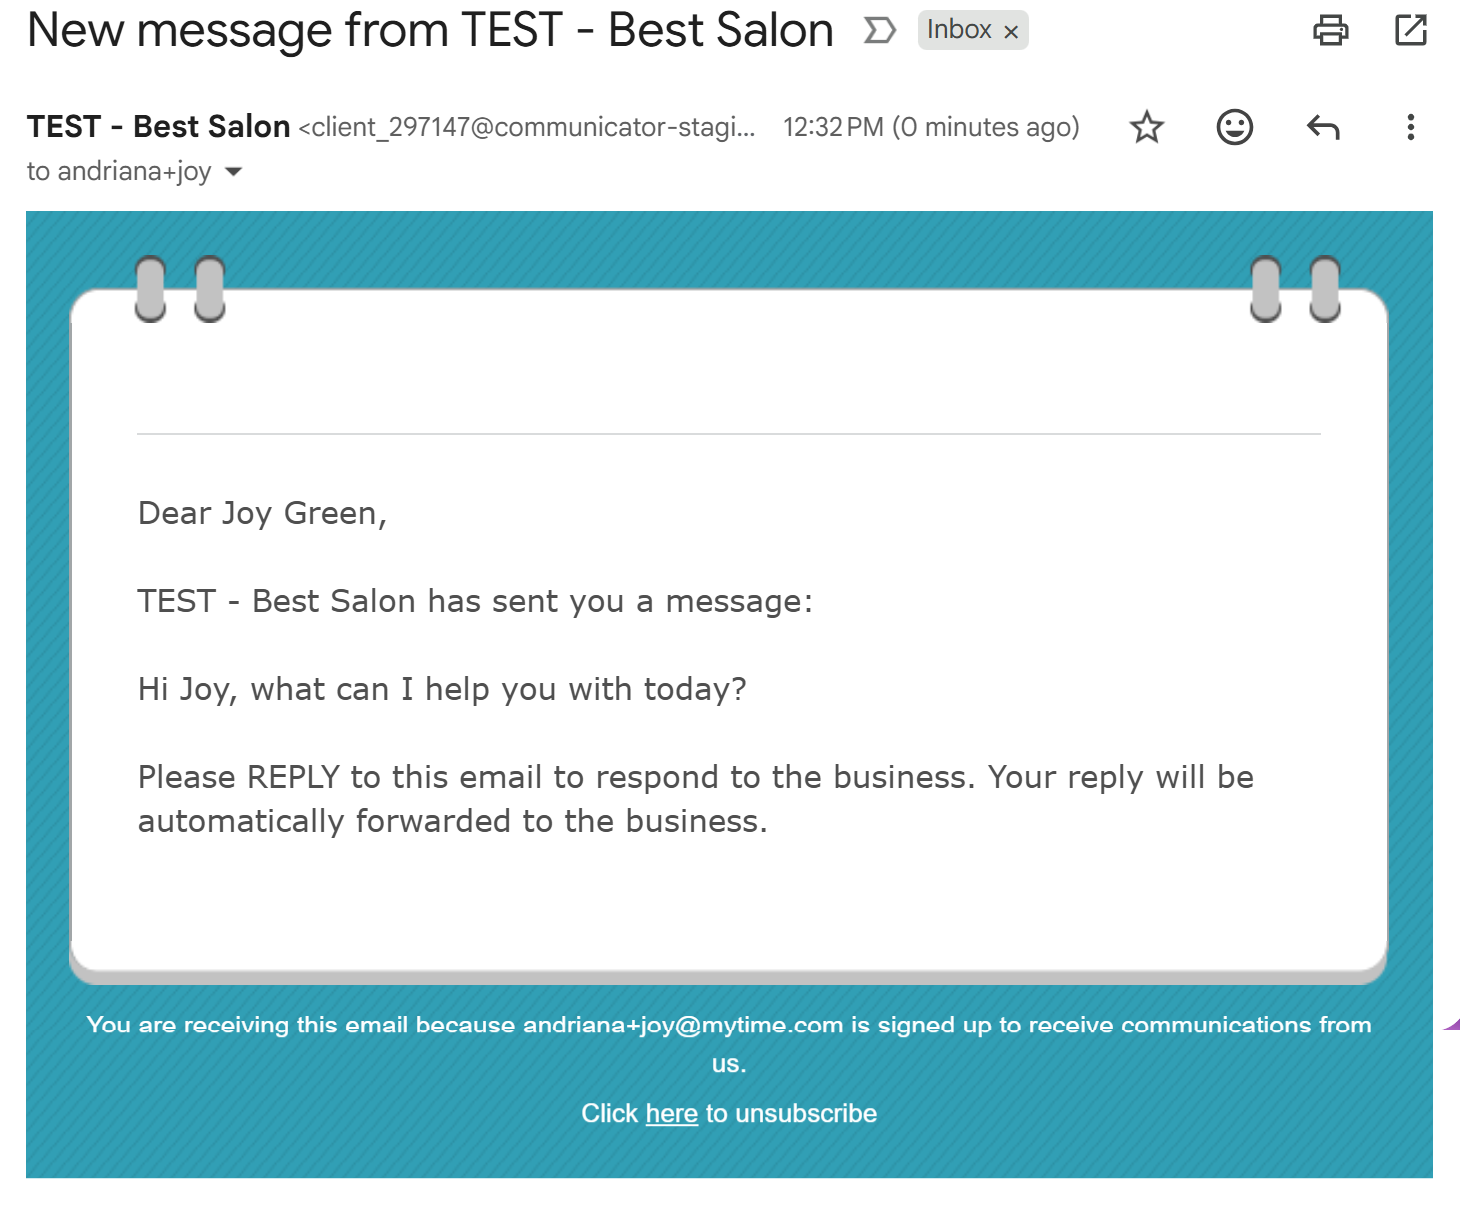
Receiving a Response: If a client leaves your website before you reply, they will receive your response via the email address associated with their profile.
For more information, contact us at support@mytime.com or (385) 233-6964.
Related Articles:
Utilize the Communicator on Web
Was this article helpful?
That’s Great!
Thank you for your feedback
Sorry! We couldn't be helpful
Thank you for your feedback
Feedback sent
We appreciate your effort and will try to fix the article