The Vendor Returns feature allows you to return inventory items to suppliers or distributors when stock arrives damaged, defective, or with incorrect shipment quantities. This ensures your active inventory balances stay accurate while tracking credits or replacements owed by vendors.
Things to know:
- The ability to use the Vendor Returns feature is controlled by the "Manage Purchase Orders" access control setting.
- For franchise businesses, vendor returns can only occur at the child level.
- Understanding Return Statuses
- Statuses move in one direction only: Draft > Sent > Closed. You cannot revert a return to a previous stage.
- Draft Status: Automatically applied when you initiate a new return.
- You have complete freedom to edit products, quantities, unit costs, shipping fees, and notes.
- Once the first product is added, the vendor is locked to prevent mixing suppliers.
- Each product requires a return reason.
- Sent Status: Activated by clicking the Submit Vendor Return button
- Quantities and costs become read-only
- If you return more stock than recorded, the system will show a negative count so your workflow is never blocked.
- You can still edit the RMA #, notes, and the "Date Sent". Sent returns cannot be canceled.
- Once a return is sent to the vendor, the returned items are automatically deducted from your inventory.
- You can easily track all vendor returns within the Inventory Adjustment report. The Reason column for returned items will automatically display "Return to vendor."
- Closed Status: The final, permanent archive for history logs and auditing.
- The entire record becomes strictly read-only.
- Closing a return does not alter your inventory counts again.
- Once a vendor return reaches Sent or Closed status, the system automatically generates a shareable PDF document summarizing the return details
- History Tracking: For all Sent and Closed returns, a dedicated history log is displayed at the bottom of the page. This section displays the exact date, time, and name of the staff member who performed any of the following actions:
- Created the return
- Sent the return to the vendor
- Closed the return
- RMA Reference vs. Vendor Return ID
- Vendor Return ID: A unique number automatically assigned by MyTime to identify the record internally. It is found in the "ID" column on the list page.
- RMA Reference #: Stand for Return Merchandise Authorization. This is a code provided by your vendor that you enter manually so they can identify the shipment on their end.
- Once a vendor return is in Sent or Closed status, you can click Export to PDF to download a clean packing slip to include with your physical shipment.
- When creating a vendor return, you can manually enter custom amounts for your shipping cost and other fees directly in the summary footer. The system automatically adds these costs to the product subtotals to calculate your final grand total. These amounts are saved to the record and will display clearly on your final exported PDF packing slip.
- The data shown on the Vendor Returns page depends on the selected location. For example, a return created for Location 1 will not appear if you have Location 2 selected.
Contents
Submitting a Vendor Return
- Navigate to POS > Inventory
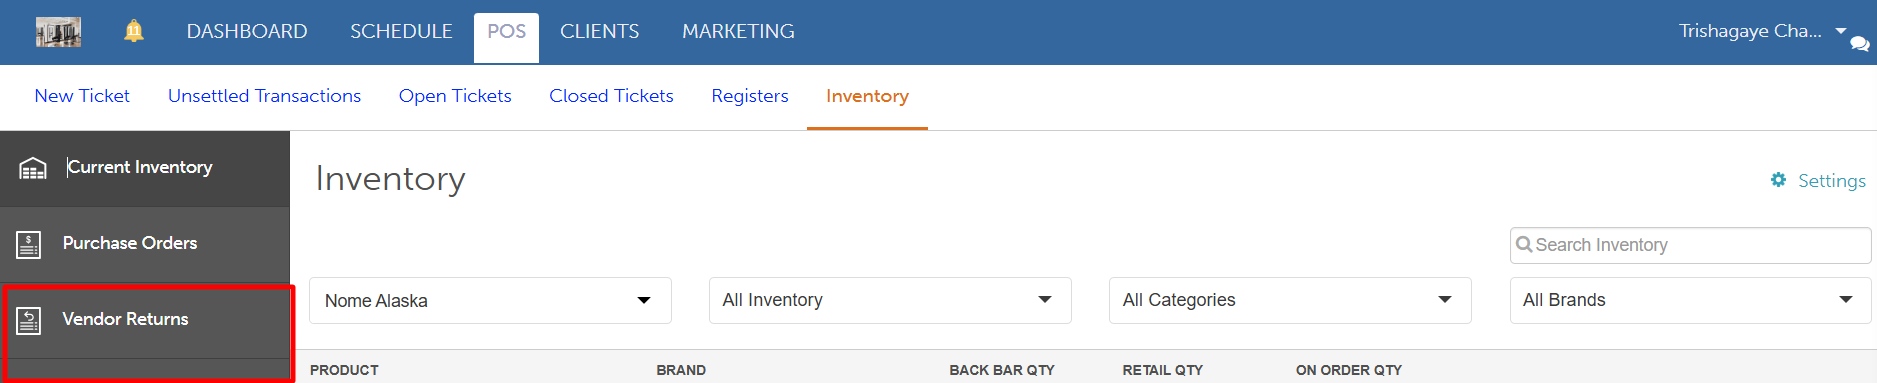
- Select Vendor Returns from the left panel
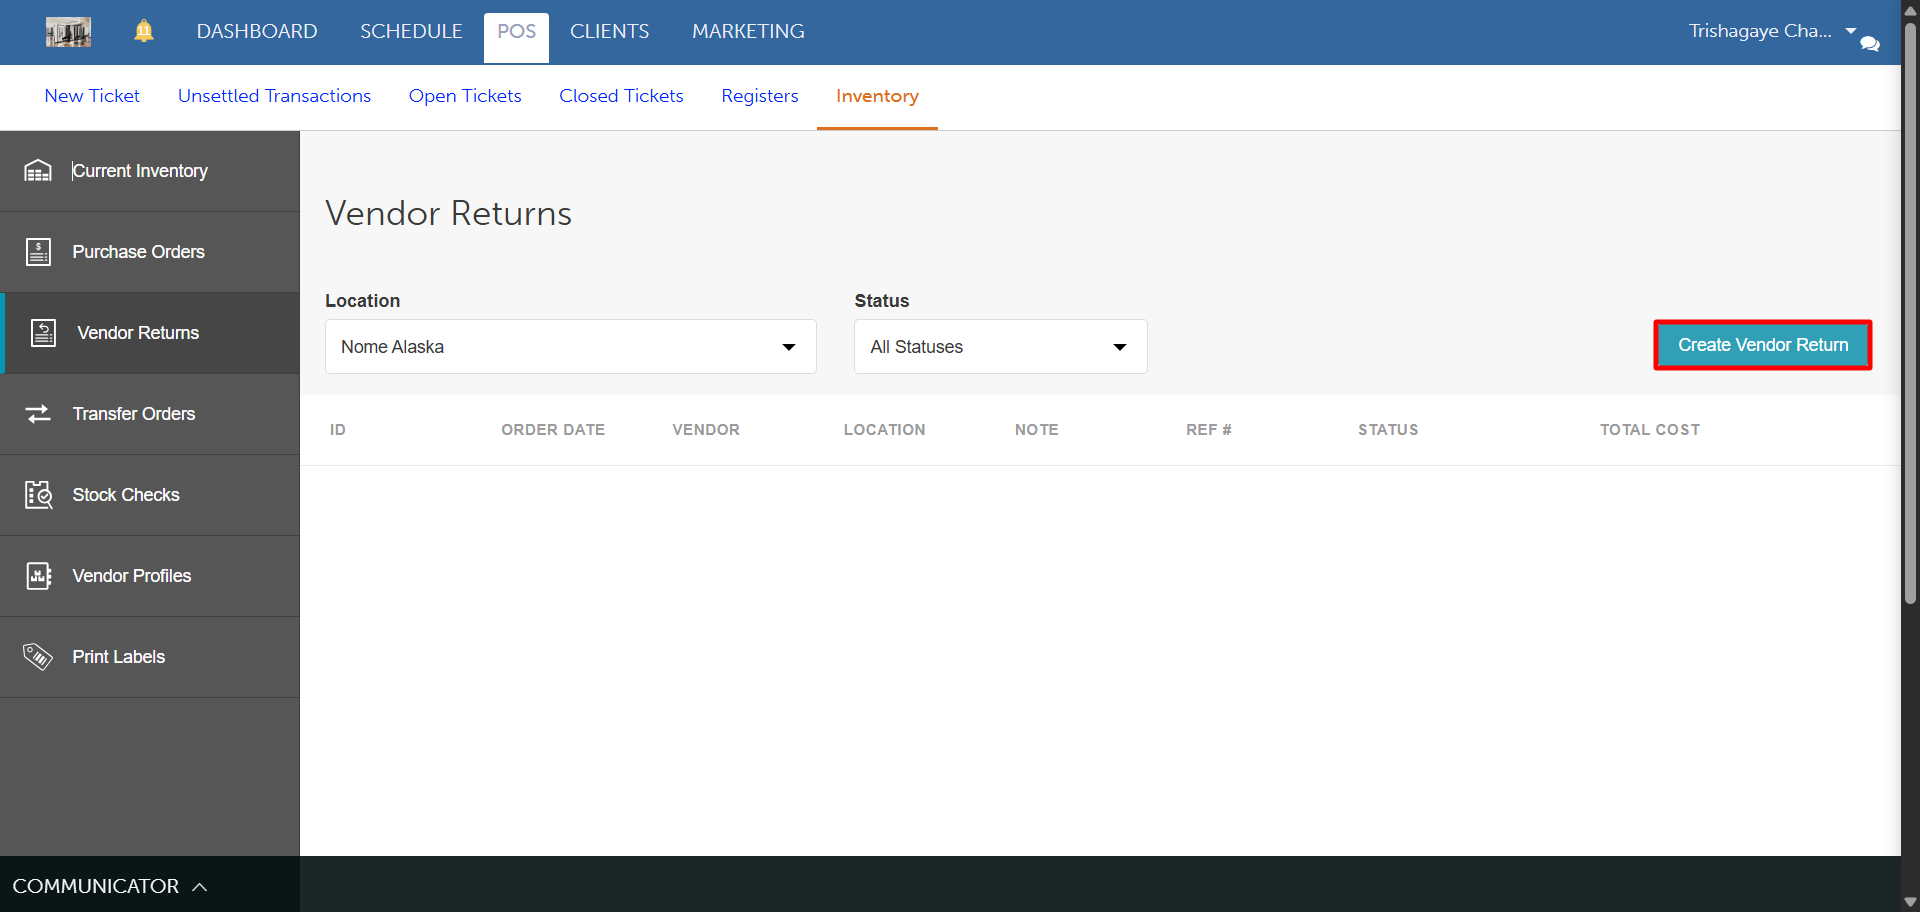
- Click the Create Vendor Return button
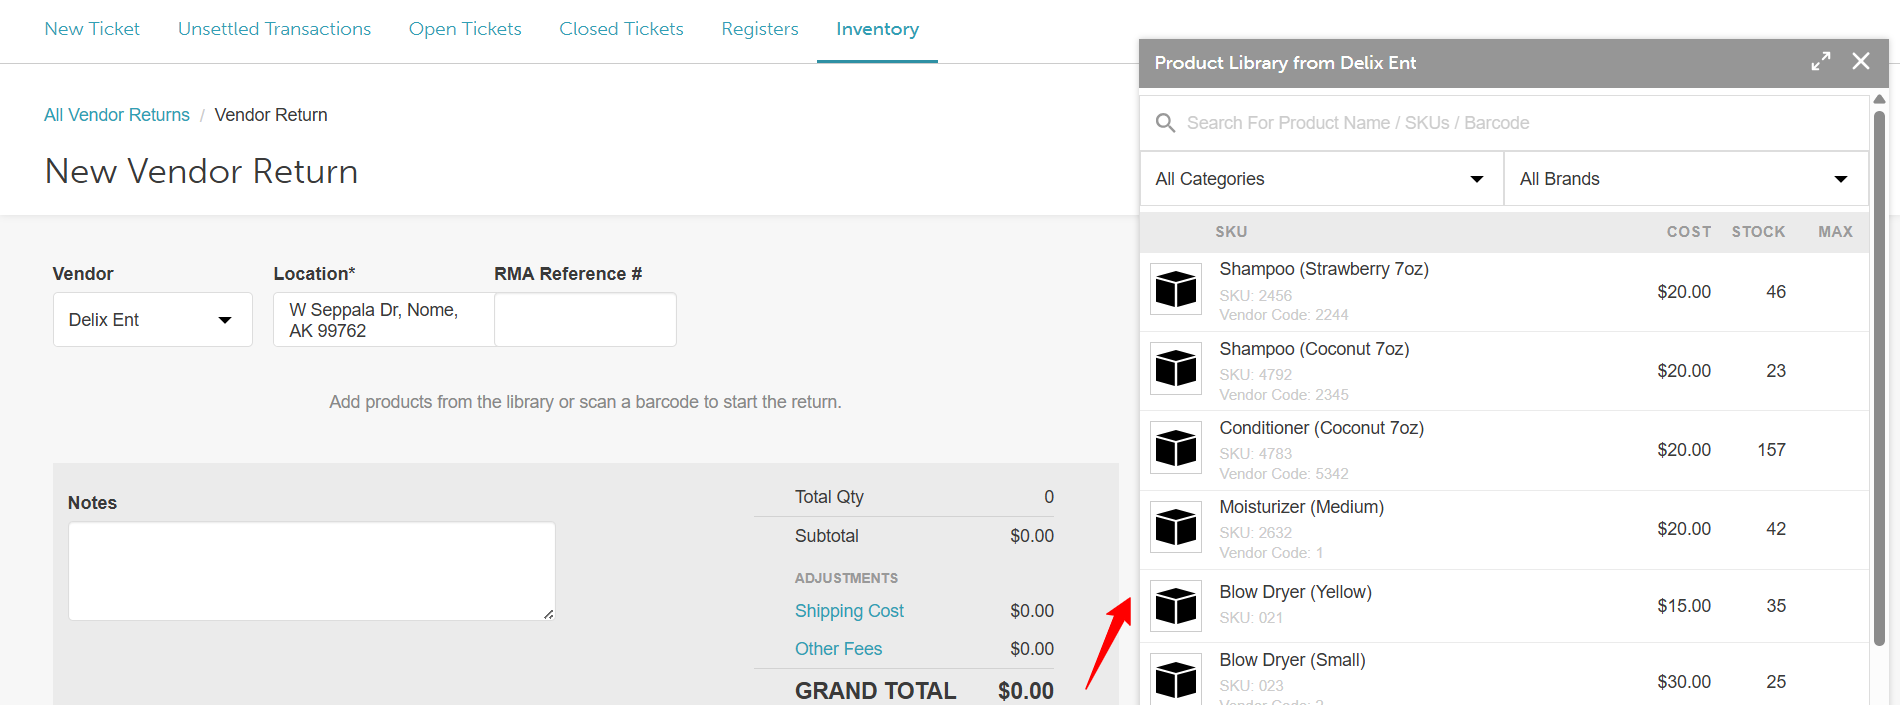
- Select the desired product(s) from your product library
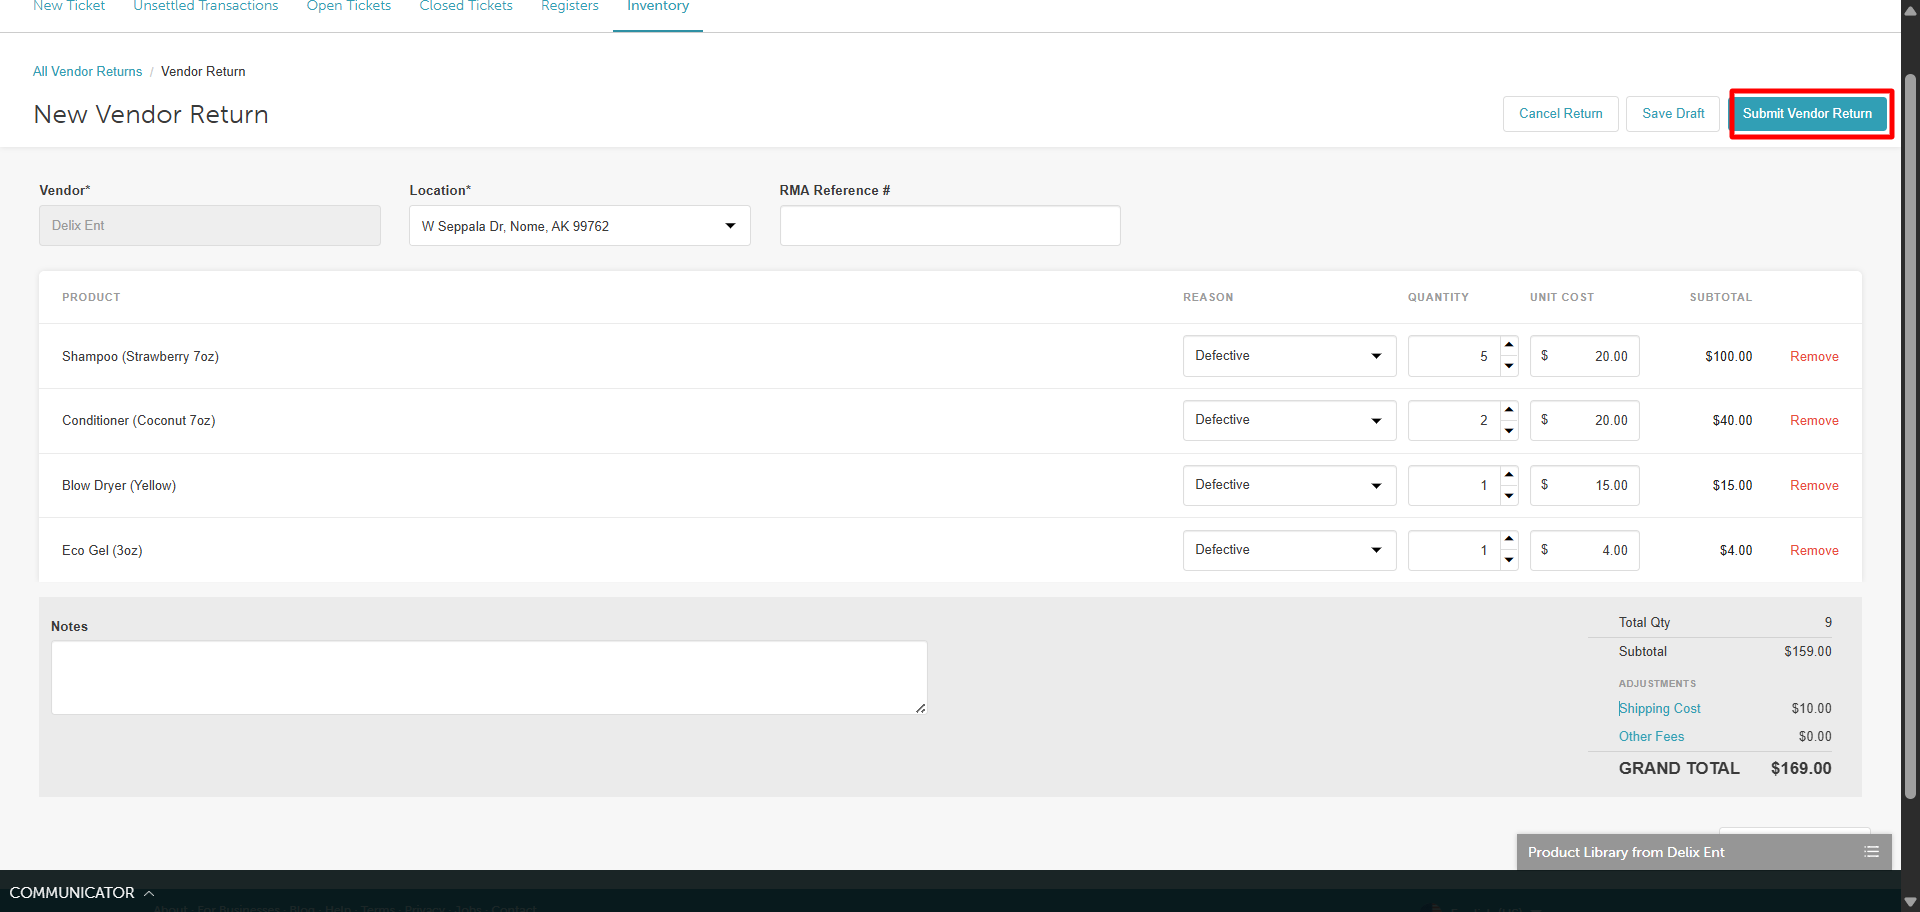
- Review and update the following fields:
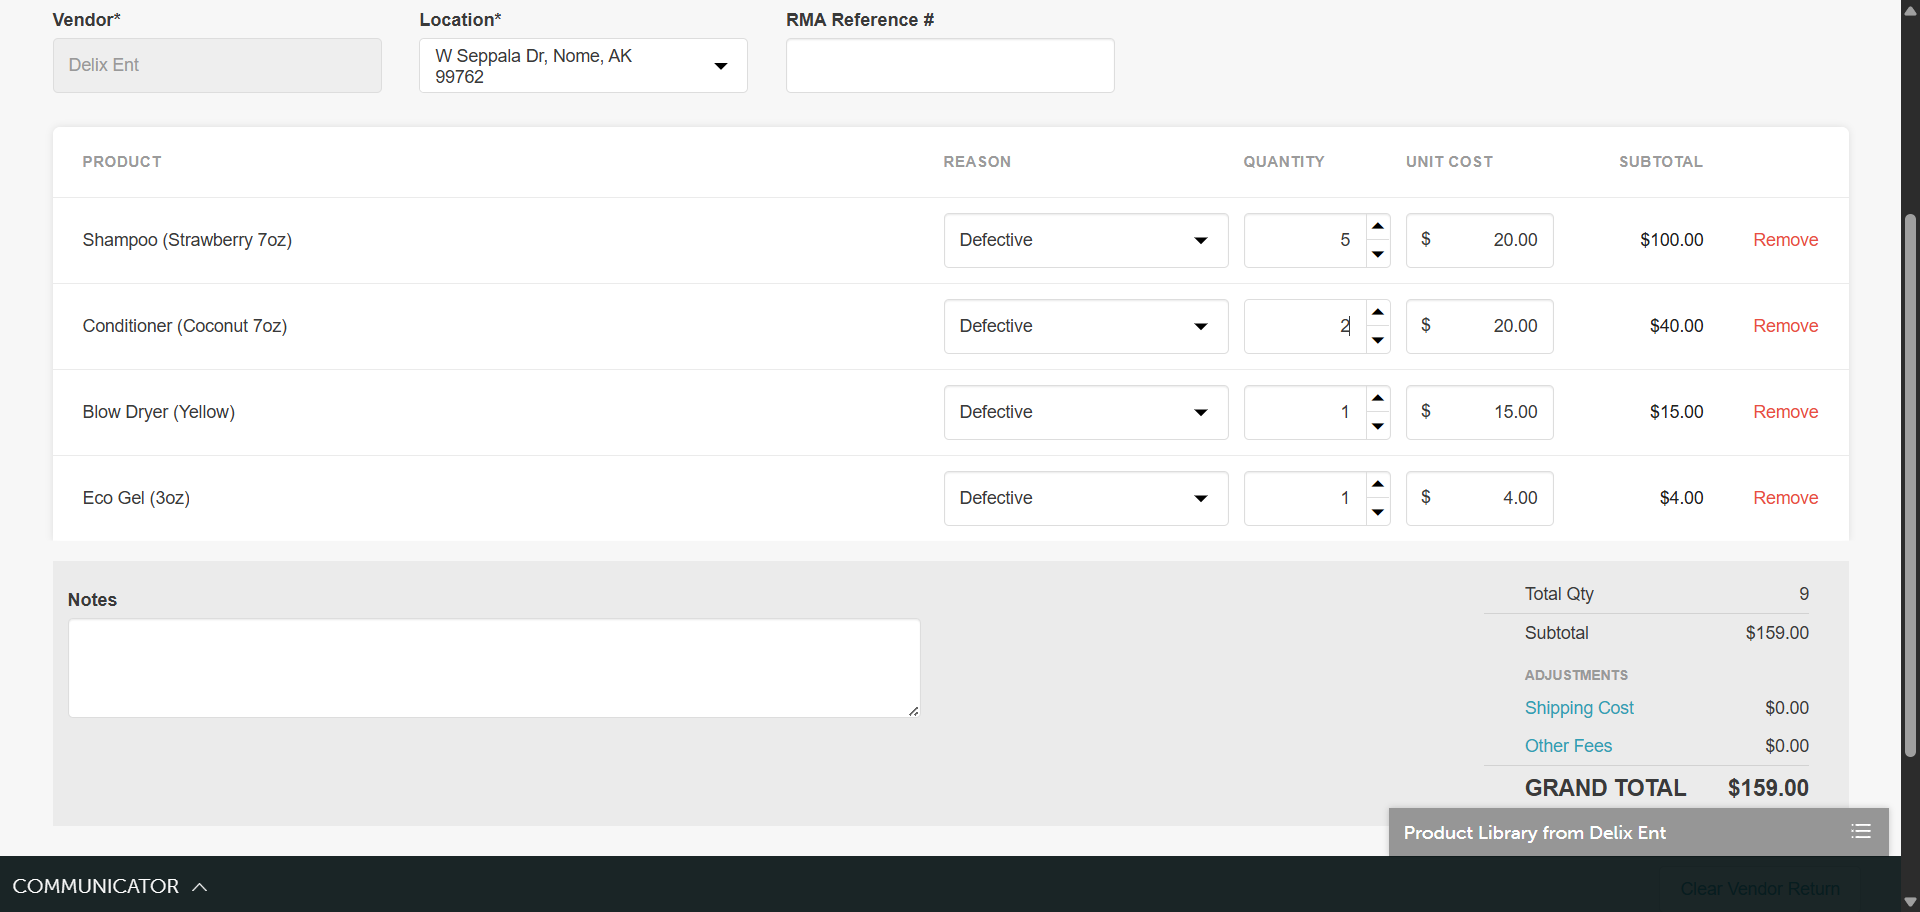
- Location: The business location the return originates from. This is the location whose inventory stock will be deducted when submitted. Note: You must change this using the location dropdown menu before adding products.
- RMA Reference #: Enter the manual tracking code provided by your vendor so they can identify the shipment on their side.
- Product & Reason: Select the items being returned and provide the required reason for each item.
- Quantity: The number of units being returned for each product.
- Unit Cost: Represents what your business originally paid the vendor (wholesale cost). This pre-fills automatically from the vendor catalog on file, but you can manually override it on any product line if needed.
- Subtotal: The total cost of the items on that specific line before shipping or other fees are applied (automatically calculated).
- Notes: A text space to add any special notes or internal comments about the return.
- Summary Footer
- Total Qty: The overall total number of individual items being returned.
- Subtotal: The combined total cost of all product lines before extra fees.
- Shipping Cost: Manually enter any shipping fees associated with the return.
- Other Fees: Manually enter any miscellaneous extra costs.
- Grand Total: The final total value of the return, automatically calculated by combining the product subtotal, shipping cost, and other fees.
- Location: The business location the return originates from. This is the location whose inventory stock will be deducted when submitted. Note: You must change this using the location dropdown menu before adding products.
- Once everything is verified, click Send.
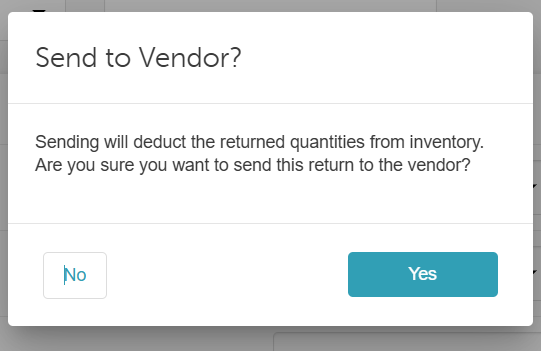
- When the confirmation modal appears ("Sending will deduct the returned quantities from inventory. Are you sure...?"), click Yes to confirm. (Spam-clicking "Yes" will not cause duplicate entries or double-deduct your stock).
Viewing and Managing Sent Returns
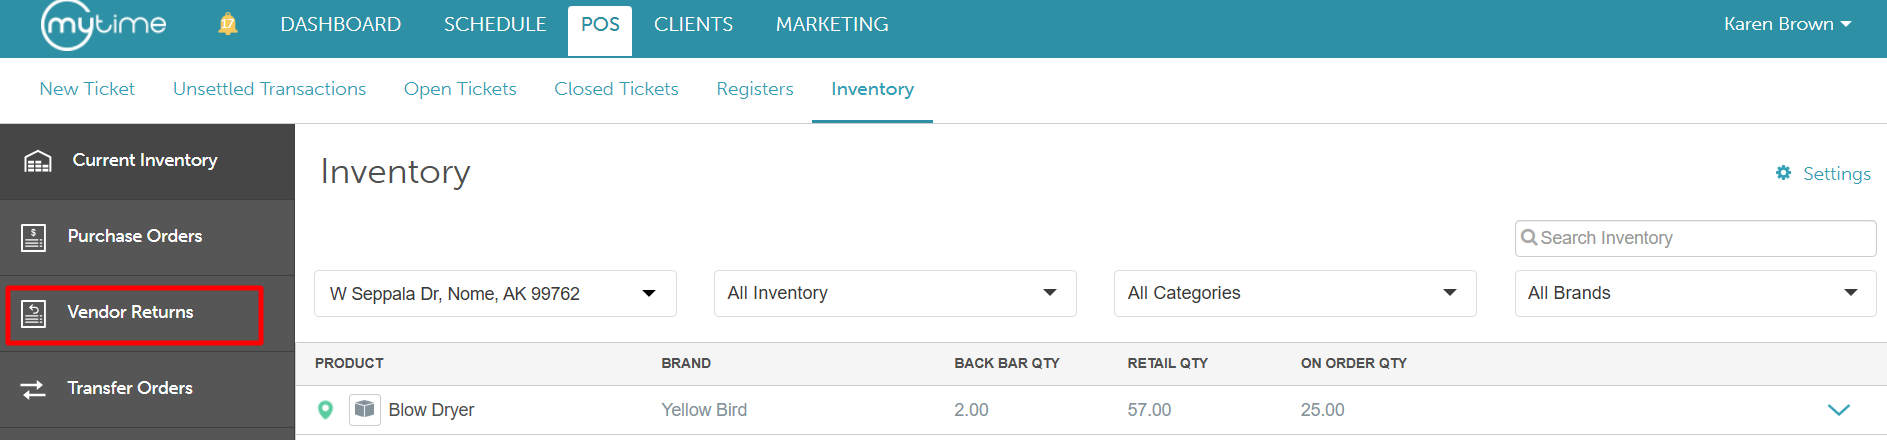
- Navigate to POS > Inventory.
- Select Vendor Returns from the left panel
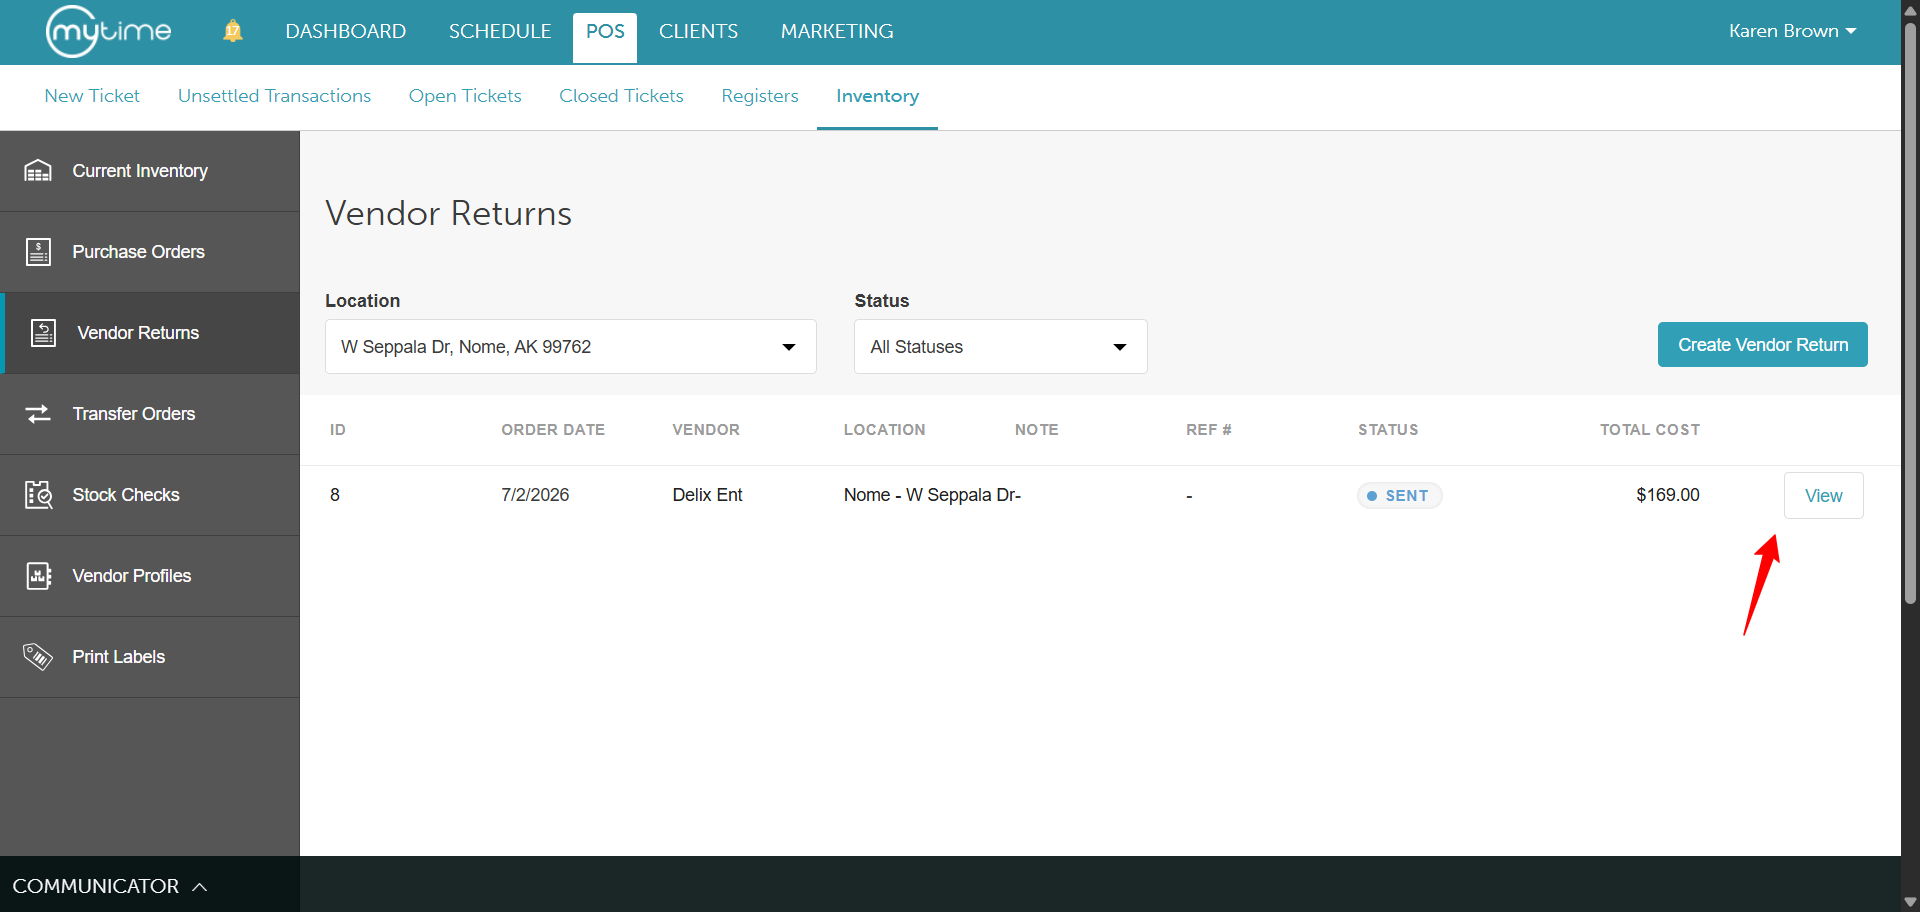
- Locate the desired return and click View
- From here, you can:
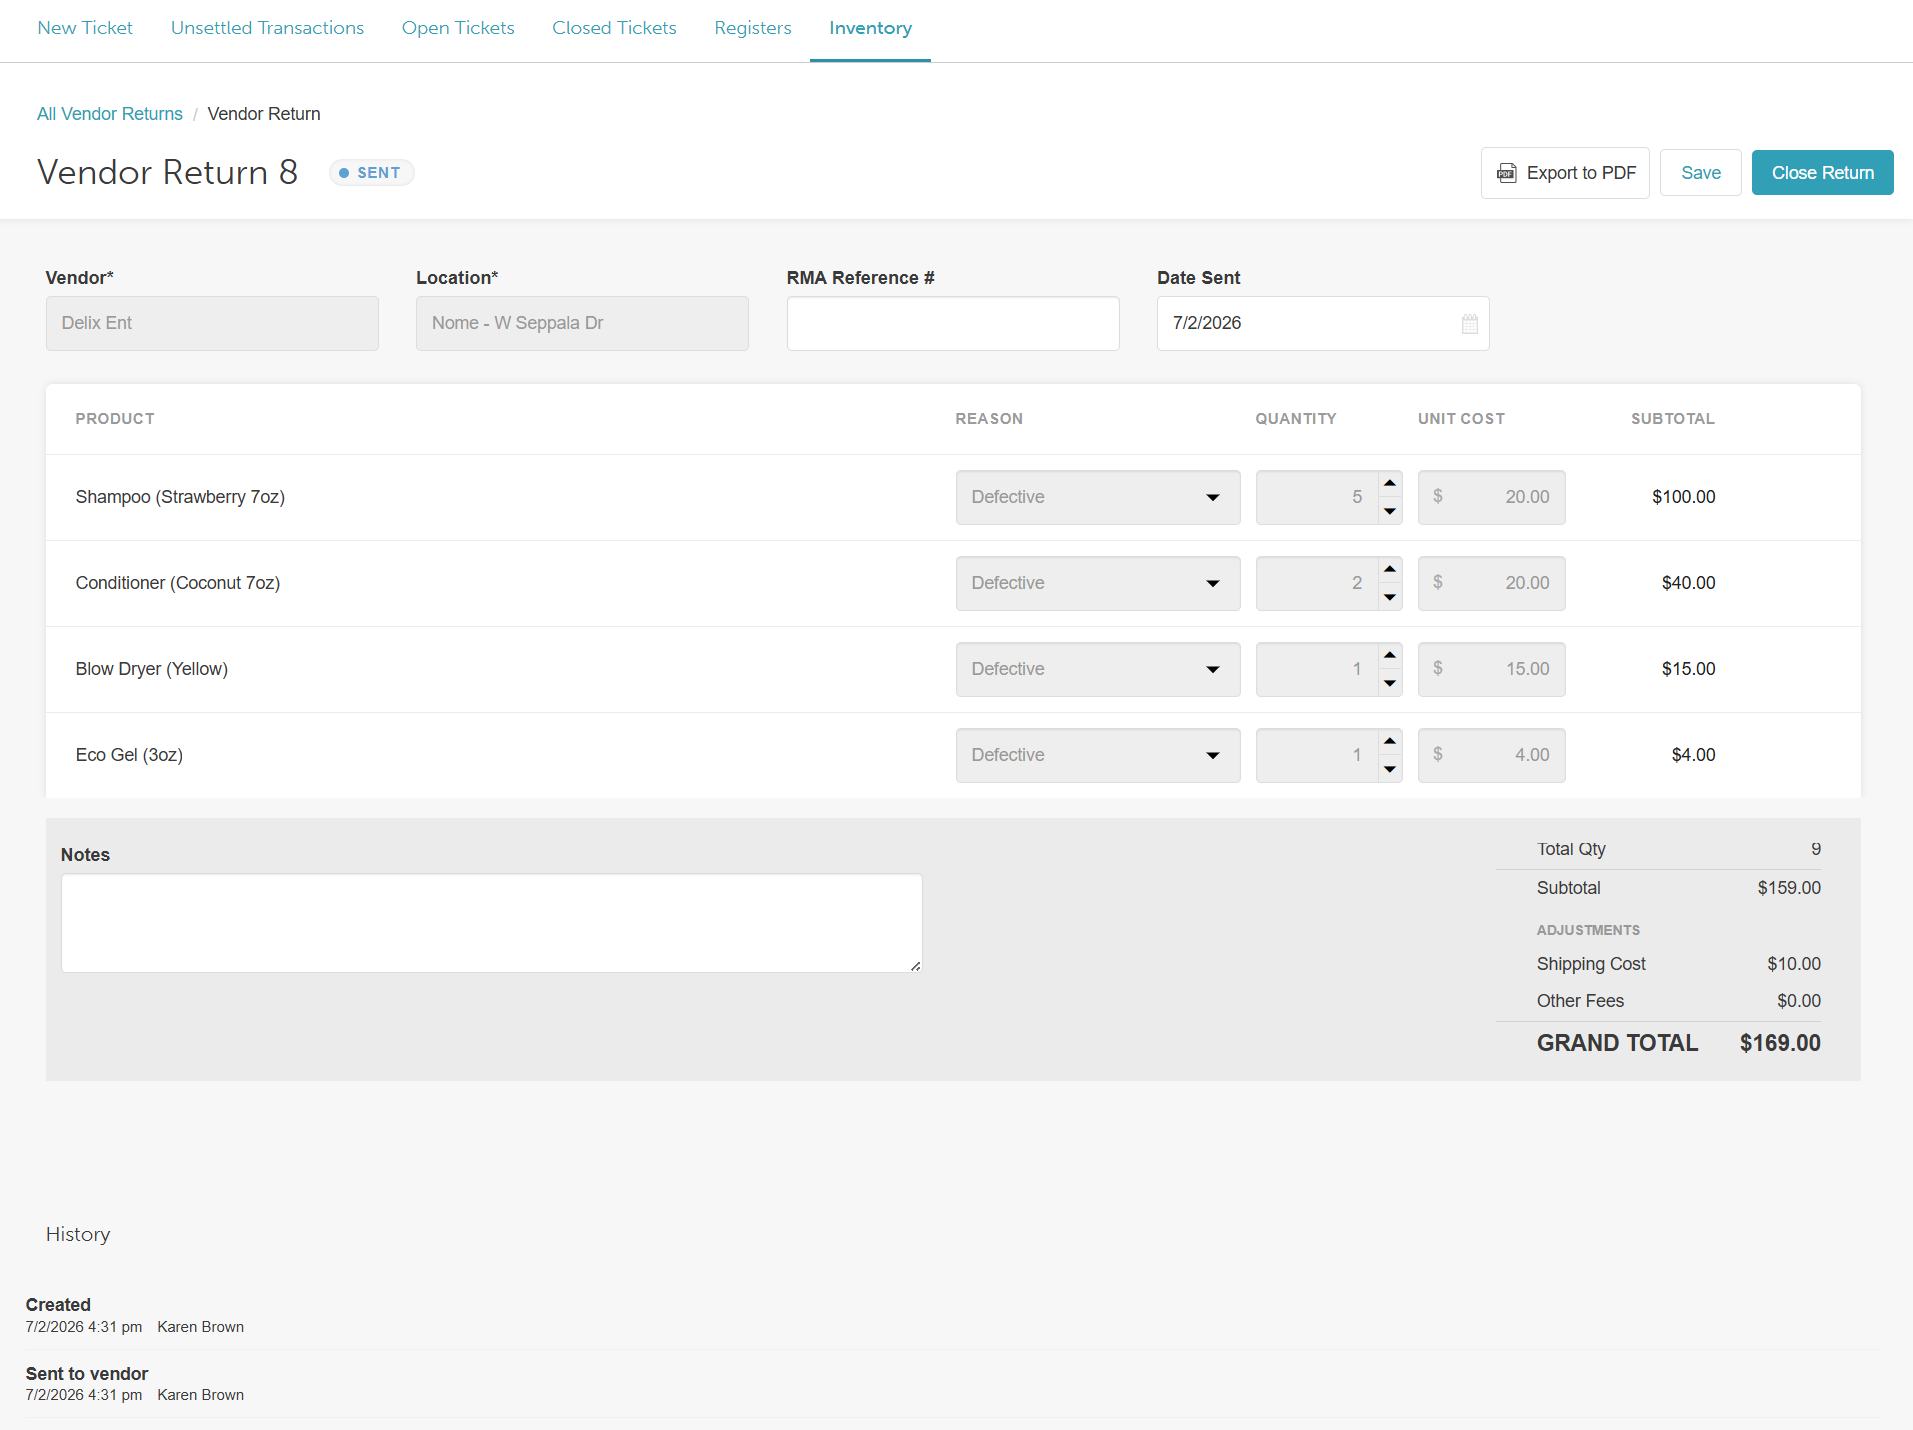
- Export to PDF: Click this in the header to download a clean packing slip to include with your physical shipment
- Make Minor Edits: Update the manual RMA #, adjust the "Date Sent" field, or add notes
- Close the Return: Click Close and confirm to permanently lock the record.
- Export to PDF: Click this in the header to download a clean packing slip to include with your physical shipment
Example of return in Inventory Adjustment report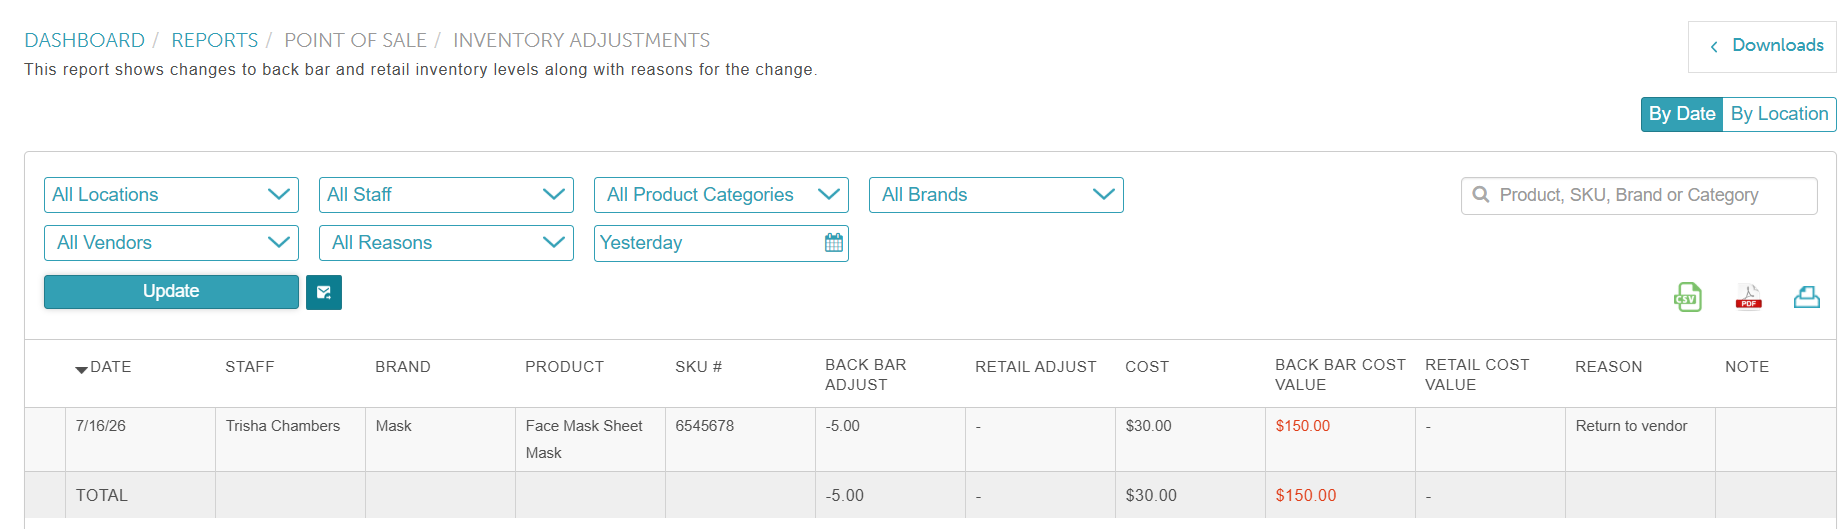
For additional information, please contact us at support@mytime.com.
Related Articles:
Assigning Products to Vendor Profile
Adding Vendors using the Shipment Button on the Inventory Page
Was this article helpful?
That’s Great!
Thank you for your feedback
Sorry! We couldn't be helpful
Thank you for your feedback
Feedback sent
We appreciate your effort and will try to fix the article